4 simple steps for capturing UTM parameters in Netlify
Learn how to capture UTM parameters every time someone completes a form on your Netlify website, so you can see where your leads are coming from.

Are you looking for a way to capture UTM parameters in Netlify forms and send them to your CRM and other sales and marketing tools?
If so, you're on the right track. By capturing UTM parameters with each form submission, you'll be able to see which campaigns generate the most leads for your business (and subsequently which ones you should invest more in to grow).
In this article, we’ll guide you through the process of using Attributer to capture UTM parameters in Netlify forms. We’ll also provide example reports you can run once everything is set up.
4 steps for capturing UTM parameters in Netlify forms
Using Attributer to capture UTM parameters in Netlify forms is easy. Here's how to do it in 4 easy steps:
1. Add the Attributer code to your website
The first step is to add the Attributer code to your website.
When you sign up for a 14-day free trial, you'll get given a snippet of code that needs to be placed in the Head of your site.
If your site uses tools like Google Tag Manager then you can add it through there, otherwise you can just place it in the Head section of your main site files.
2. Add hidden fields to your forms
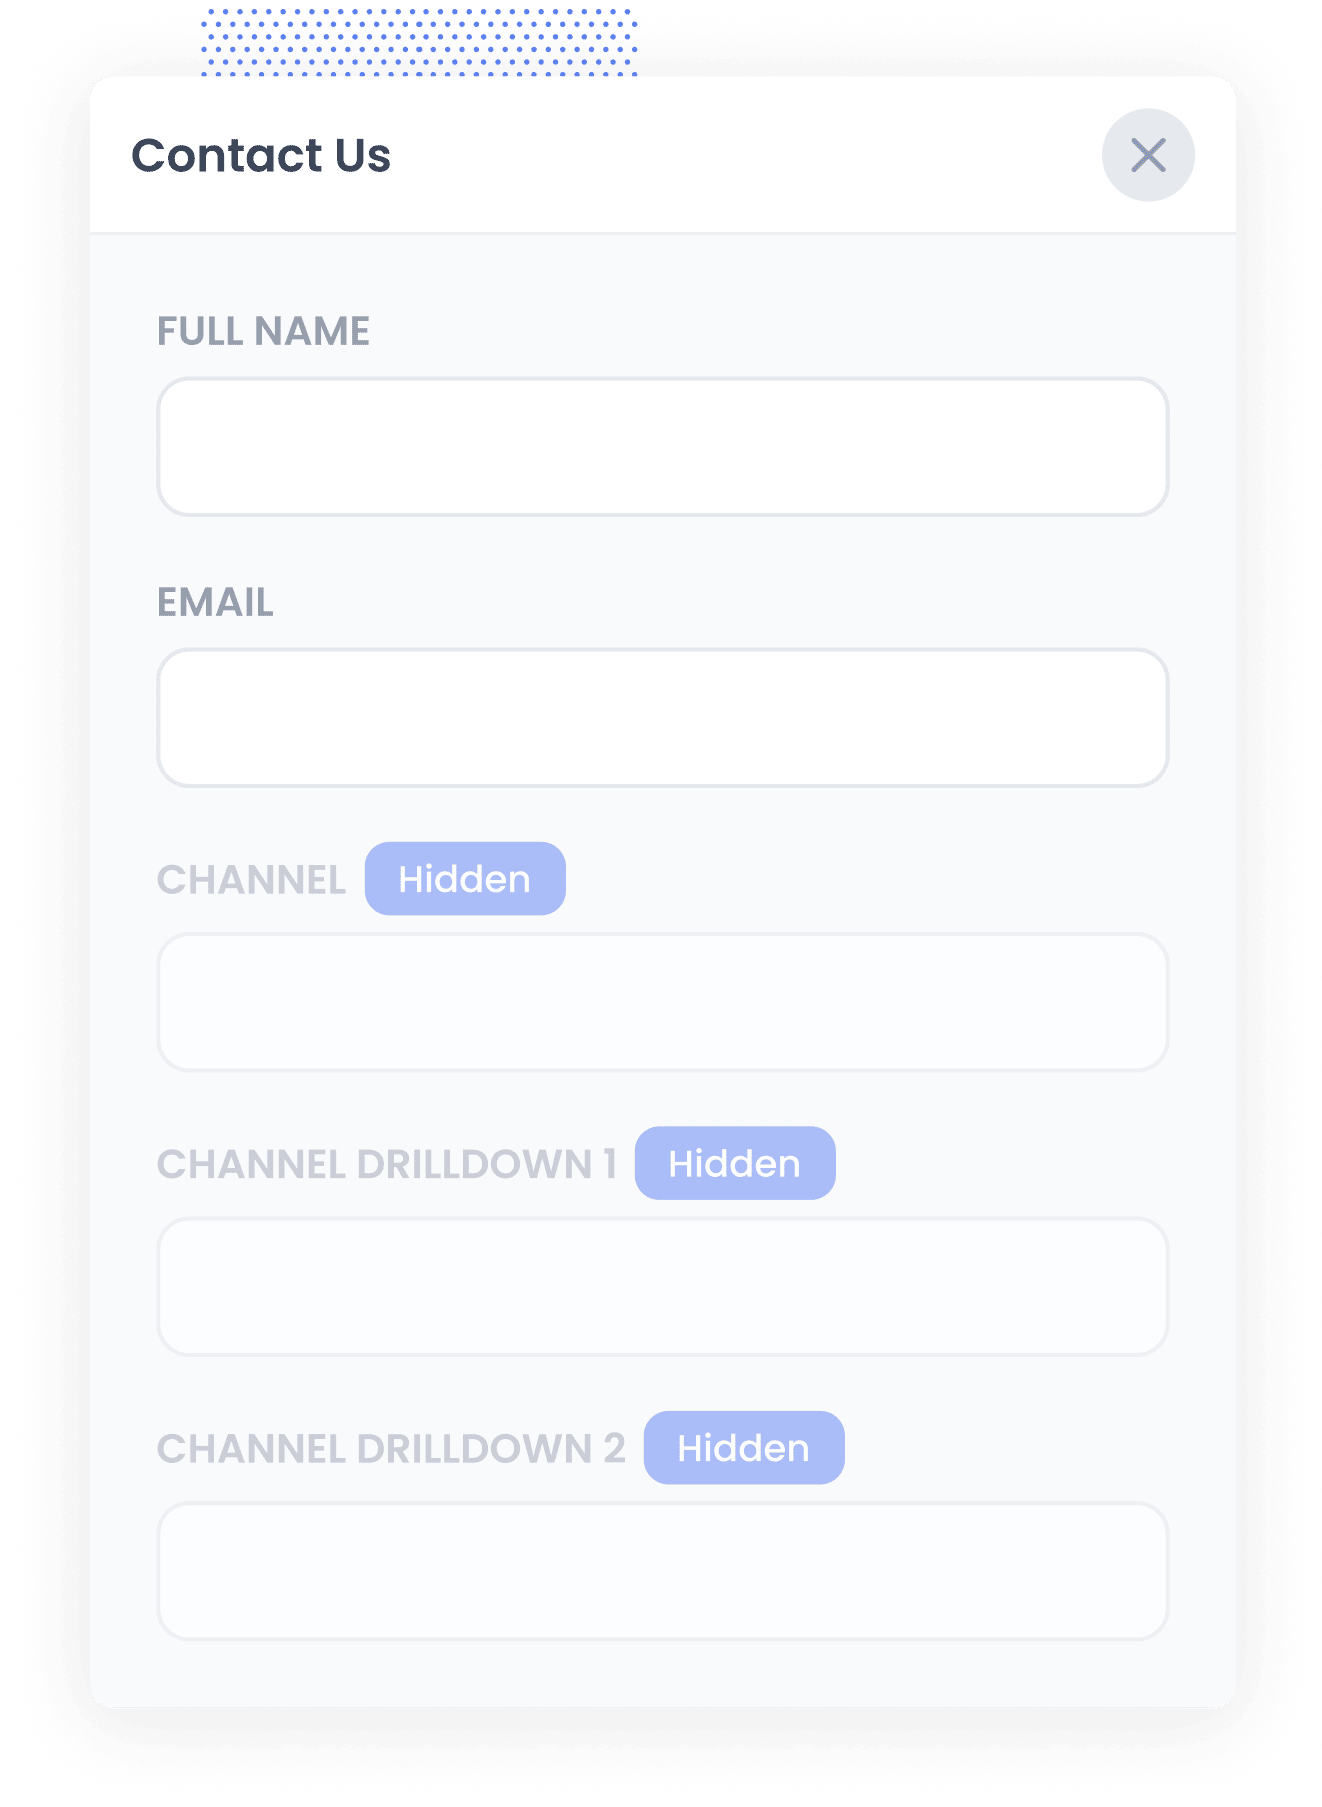
The next step is to add a series of hidden fields to the forms on your site (I.e. your Contact Us or Request A Quote form)
The six hidden fields that need to be added to your forms are:
- Channel
- Channel Drilldown 1
- Channel Drilldown 2
- Channel Drilldown 3
- Landing Page
- Landing Page Group
If you're using a third-party form builder (like Typeform, Jotform, etc) then you can find instructions for adding the hidden fields here.
Alternatively, if your site uses HTML forms and Netlify's built-in form handler, then you can simply add the hidden fields to the HTML of the form, and instructions (and code) can be seen here.
3. Attributer automatically completes the hidden fields with UTM data
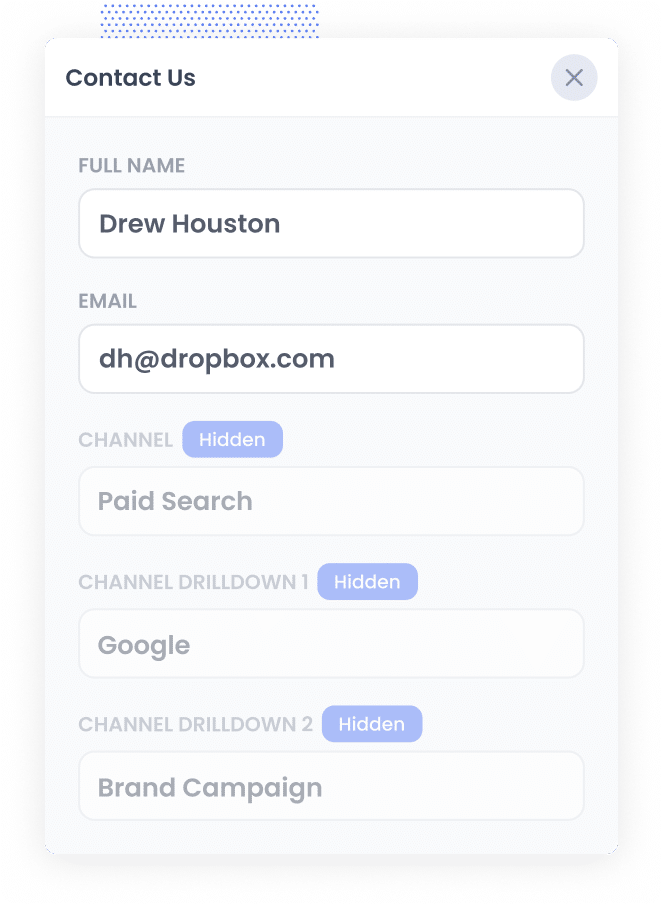
Now that everything is set up, Attributer will automatically populate the hidden fields in your Netlify forms with the data from the UTM parameters.
Let’s assume you are a marketer at Slack.
Imagine a potential customer searches on Google for "best team communication tools" and clicks on a paid search ad for Slack. The user arrives on the Slack website, browses around, and fills out a form to request a demo.
Depending on the UTM parameters you put behind the ad, Attributer would write the following information into the hidden fields:
- Channel = Paid Search
- Channel Drilldown 1 = Google
- Channel Drilldown 2 = Productivity Campaign
- Channel Drilldown 3 = Team Communication Ad
In addition, Attributer will write the specific landing page and subdirectory where the user landed:
- Landing Page = www.slack.com/features/communication
- Landing Page Group = /features
4. UTM parameters are captured with each form submission
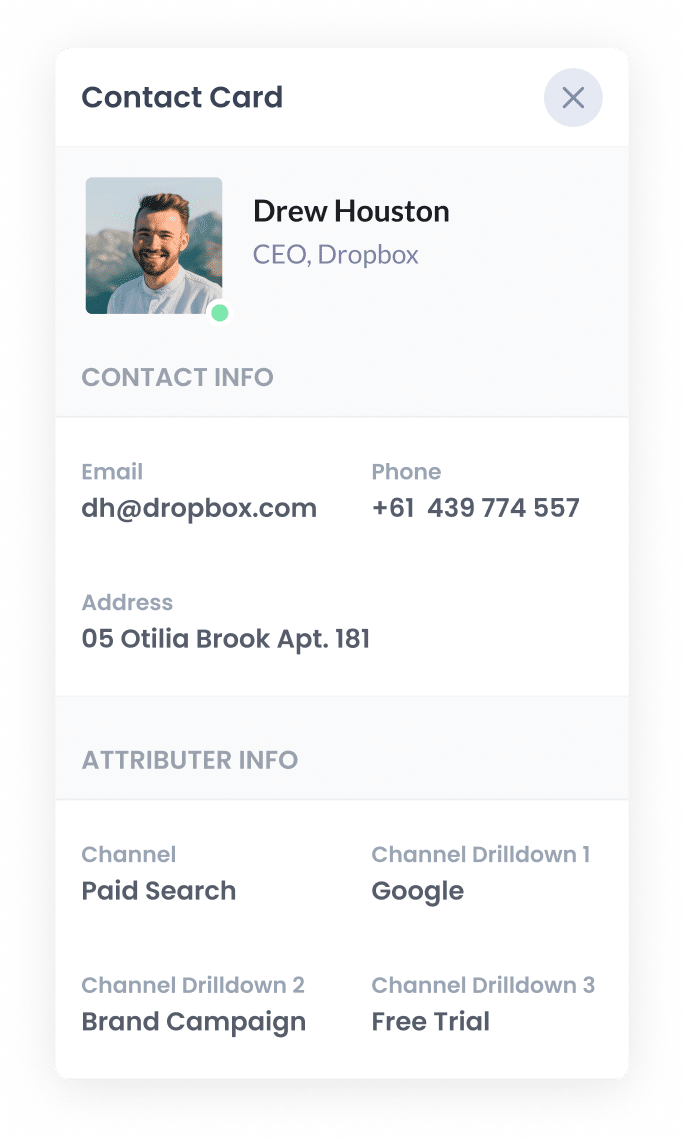
Finally, when the user submits a form, the UTM parameters that Attributer wrote into the hidden fields are captured as part of the form submission (alongside the information the user entered into the form, like their name, email, etc).
You can then use Netlify's native integrations or Zapier to send the data to a CRM (like Salesforce, HubSpot, Pipedrive, etc.), a spreadsheet, your email marketing software, or other tools.
What is Attributer?
As you’ve seen from the steps above, Attributer is a tool designed to capture UTM parameters in Netlify forms.
But let’s break down exactly how it works:
Once you sign up for a 14-day free trial, you’ll receive a snippet of code to install on your website.
When a visitor lands on your site, Attributer looks at various technical details (similar to what tools like Google Analytics look at) to determine where that visitor originated.
Using this data, Attributer then categorises each visitor into specific "Channels" (such as Paid Search, Organic Search, Paid Social, etc.) and stores this information within the user’s browser.
Then, when a user completes a form on your Netlify website, Attributer automatically fills in the hidden fields with the attribution data. And when the form is submitted, this information is captured along with the other details the lead provided (like their name, email, phone number, etc.).
Attributer was created by a marketing consultant who needed a tool to accurately track which channels were driving leads and customers for his clients.
"I initially built it for use on my clients' websites, but over time, I realised it could be valuable for businesses everywhere," says Aaron Beashel, the founder of Attributer.
Today, Attributer is used on thousands of websites worldwide, tracking over 8 million visitors every month.
Why using Attributer is better than capturing raw UTM parameters
There are other options for capturing UTM parameters with each form submission on your Netlify website, so what makes Attributer different?
Let's take a closer look:
1. Captures all traffic
Attributer provides information on the source of ALL your leads, not just those from your paid ad campaigns with UTM parameters.
This means that if someone arrives on your site via Organic Social, Organic Search, Direct traffic, Referral, etc, Attributer will still capture and pass along attribution data with each form submission.
This allows you to pinpoint the source of every lead, enabling you to make more informed decisions about how to allocate your marketing budget.
2. Remembers the data across pageviews & sessions
Many other methods for capturing UTM parameters only work if the UTMs are still in the URL of the page where the form is submitted.
This can be problematic, especially when the page where users complete the form is different from the page they initially landed on with the UTM parameters.
For example, if you’re using Google Ads to drive traffic to your homepage, a visitor might click the ‘Contact Us’ button and be redirected to another page to fill out a contact form. In this case, the form submission page is different from the landing page, meaning the UTM parameters can get lost.
Attributer solves this issue by storing the UTM parameters within the user's browser. This ensures that the original UTM parameters are captured and passed along with the form submission, no matter which page the visitor completes the form on.
3. Provides cleaner data
Capturing raw UTM parameters can be tricky, as the data is often inconsistent and disorganised.
For example, imagine some of your Facebook campaigns are tagged with UTM_Source=facebook while others are tagged with UTM_Source=fb.
If you simply capture these raw UTM parameters and use them to generate reports, they would appear as two different lead sources, meaning you'd need to manually consolidate them to get an accurate picture of how many leads came from your Facebook Ads.
Attributer solves this problem. It’s specifically built to recognise variations in capitalisation and other inconsistencies in UTM parameters. It will still categorise these leads into the correct channel (Paid Social, in this case) without any manual intervention.
4. Captures landing page data as well
Attributer not only captures UTM parameters but also tracks the lead's landing page and landing page group.
For instance, if a lead lands on attributer.io/blog/capture-utm-parameters, Attributer will capture the full landing page URL (attributer.io/blog/capture-utm-parameters) as well as the landing page group (e.g., /blog).
This allows you to run reports that show which content on your site is attracting leads and customers.
By capturing both the specific landing page and the landing page group, you can see how many leads and customers are coming from your blog overall, as well as drill down to see how many leads and customers each blog post is driving.
4 example reports you can run when you capture UTM parameters in Netlify forms
1. Leads by Channel
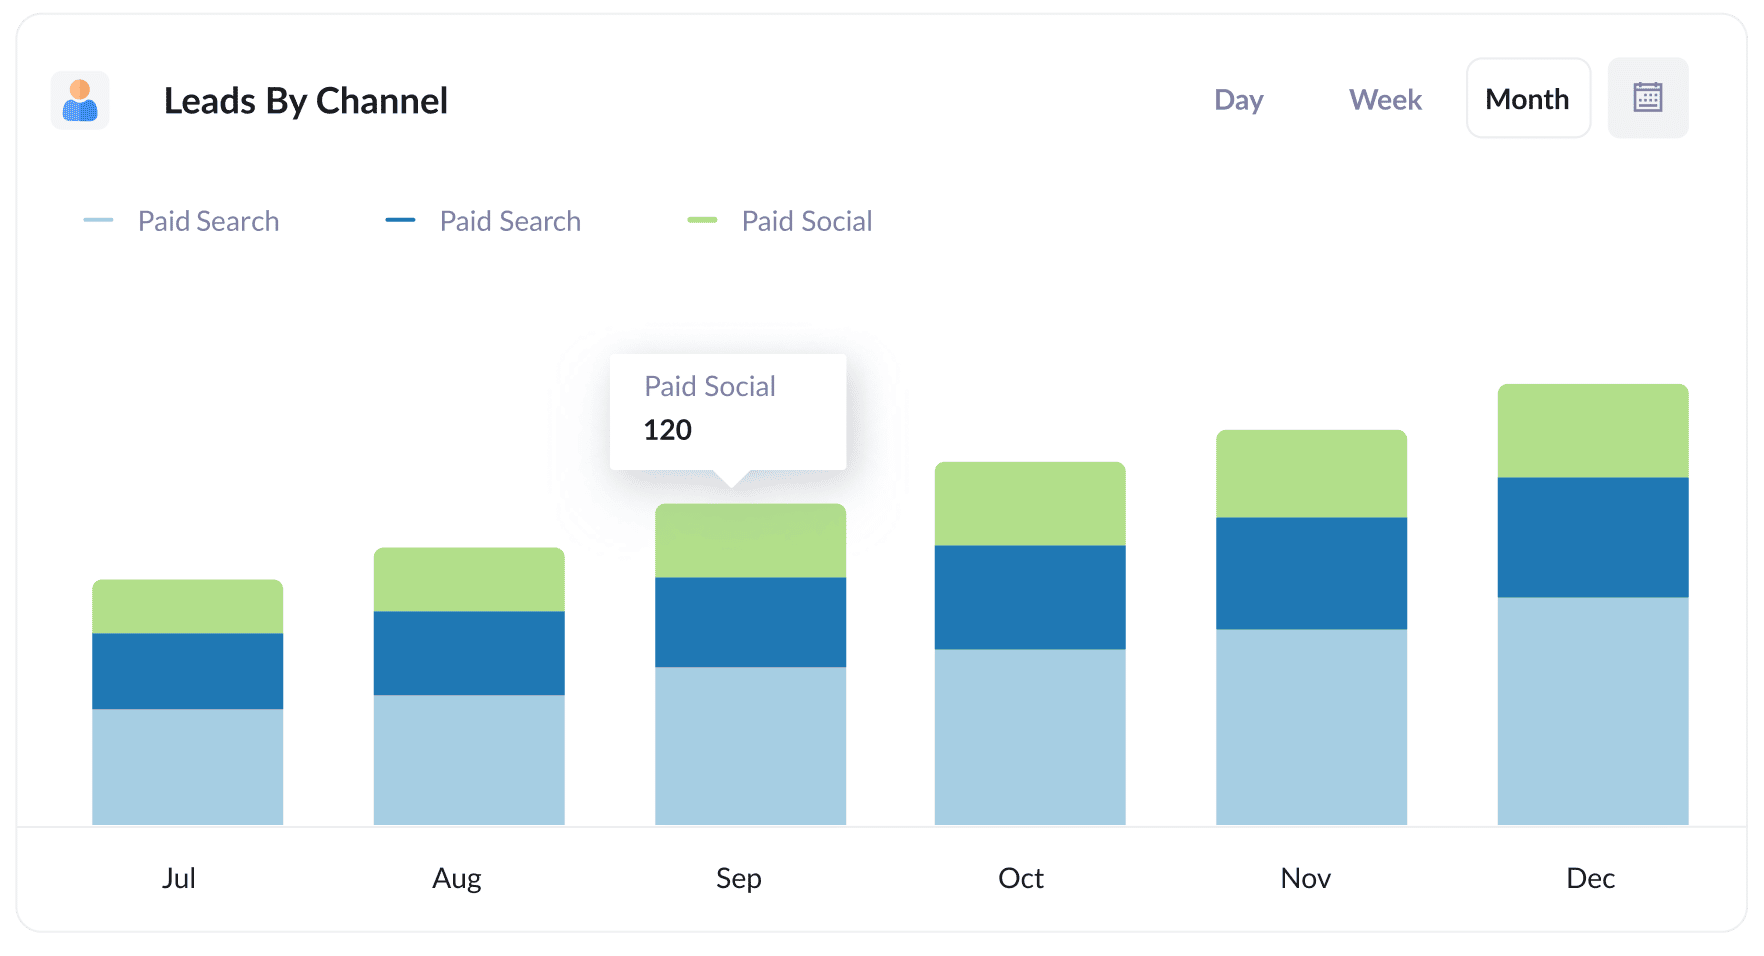
Since Attributer tracks the source of all your leads (not just those from paid ad campaigns), you can create reports (like the one above) that show your leads by channel.
This type of report is useful for identifying which channels are driving the most leads and where there might be more opportunity for growth.
For instance, if most of your leads are coming from Organic Search but the majority of your budget is spent on paid ads, it might make sense to reallocate some of that budget to boost your SEO efforts.
2. Leads by Facebook Ads Network
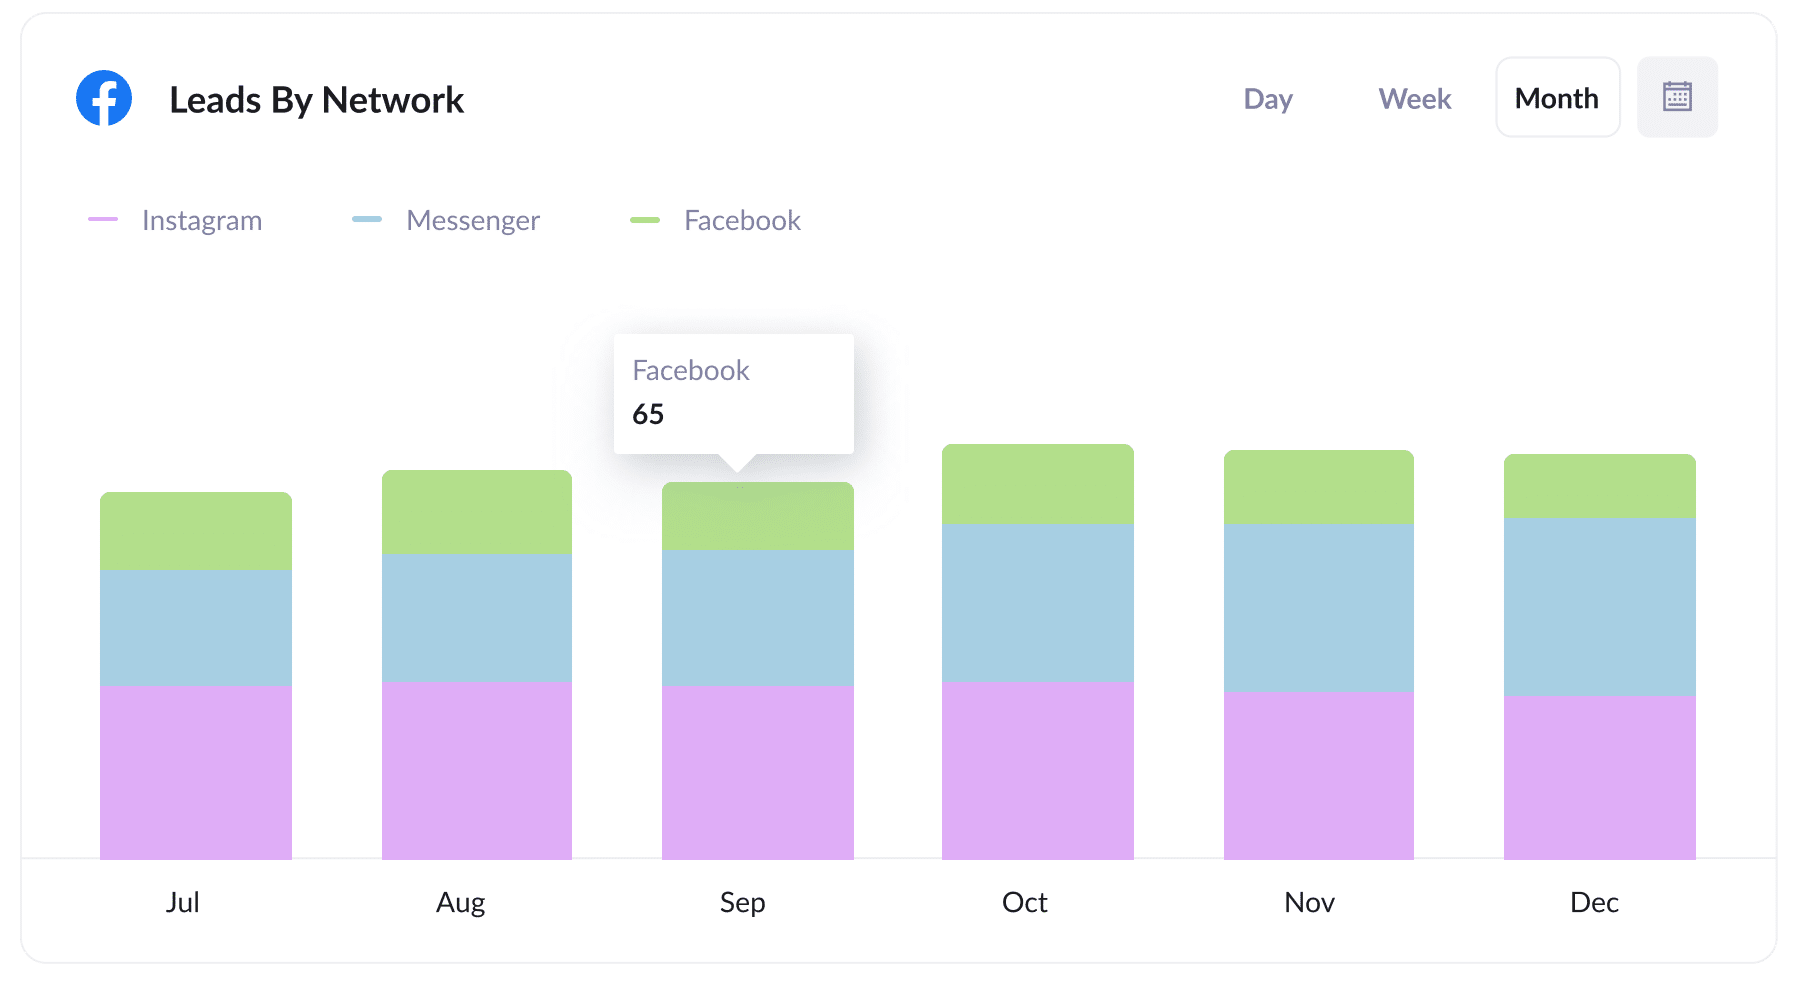
If you're running ads across the different networks owned by Meta (e.g., Facebook, Instagram, Messenger, etc.), the report above helps you work out which network is driving the most leads.
This insight allows you to optimise your ad spend. By refining your targeting to focus on the most effective networks, you can increase your lead volume while lowering your cost per lead.
3. Customers by Google Ads campaign
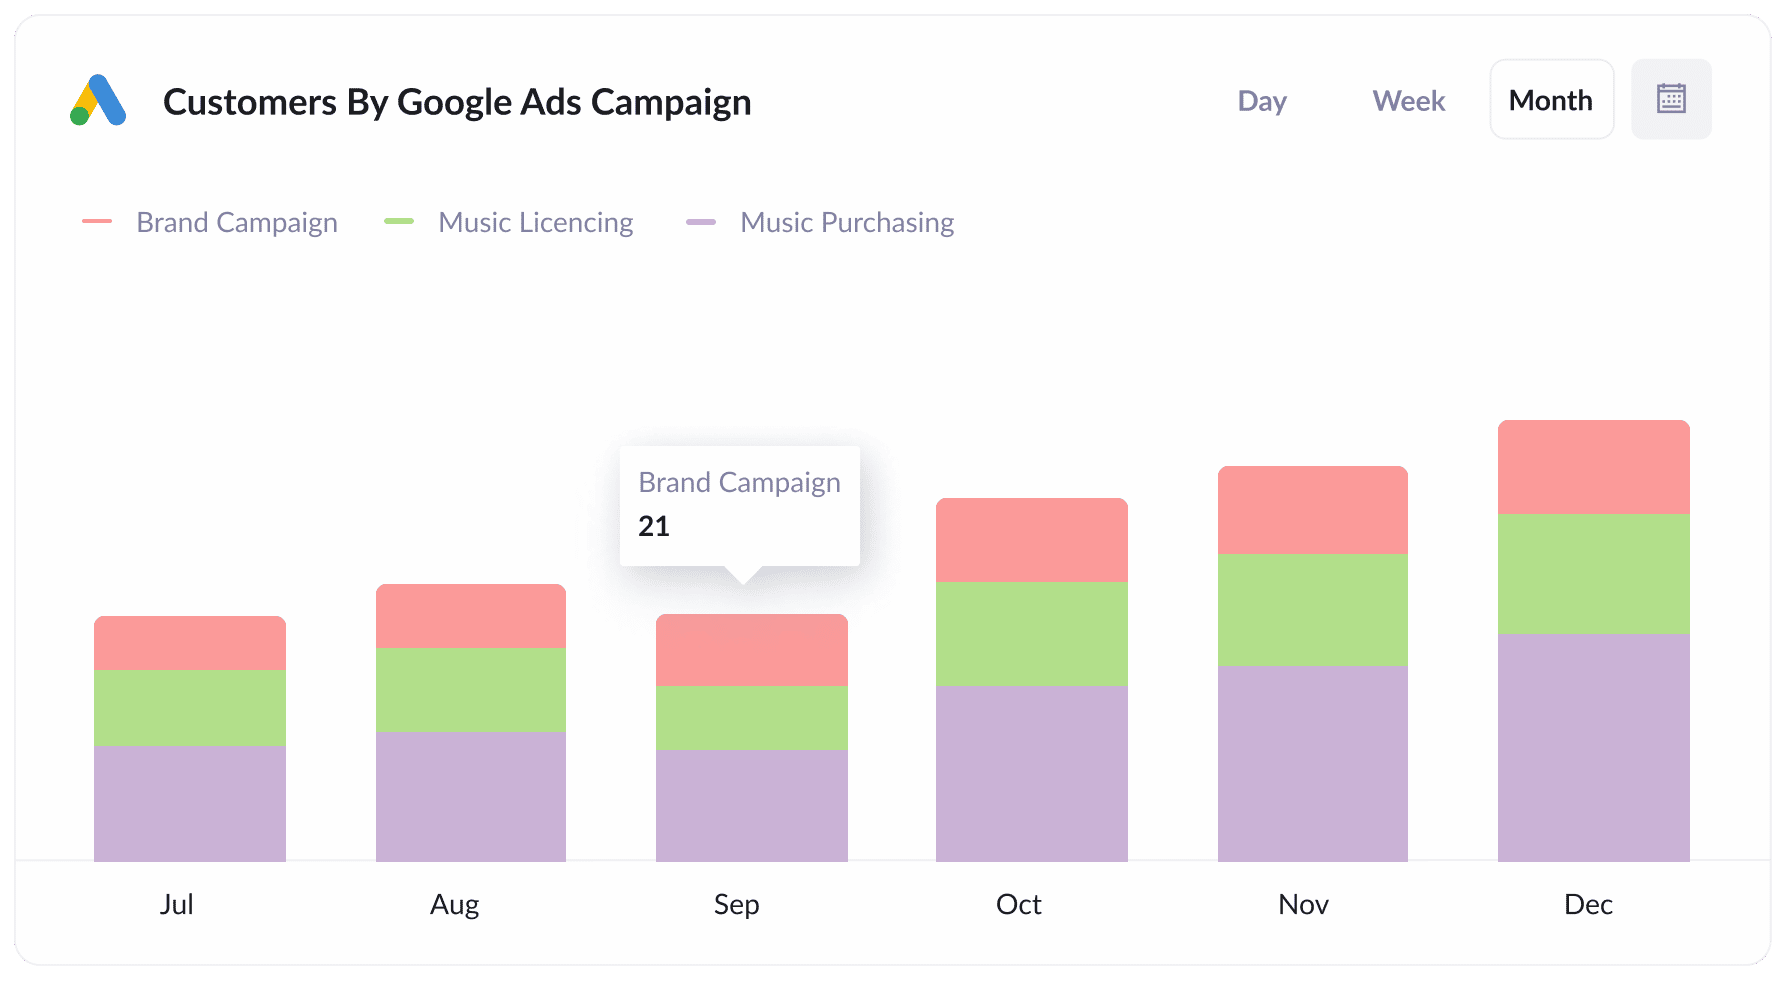
The report above, showing how many customers you’re acquiring each month from your various Google Ads campaigns, helps you identify which campaigns are truly driving paying customers, rather than just generating visitors who don’t convert.
This helps you optimise your Google Ads spend. You can direct more of your budget to the campaigns that are working and pull it from the ones that aren't, helping you to get more customers at a lower cost.
4. Revenue by Keyword
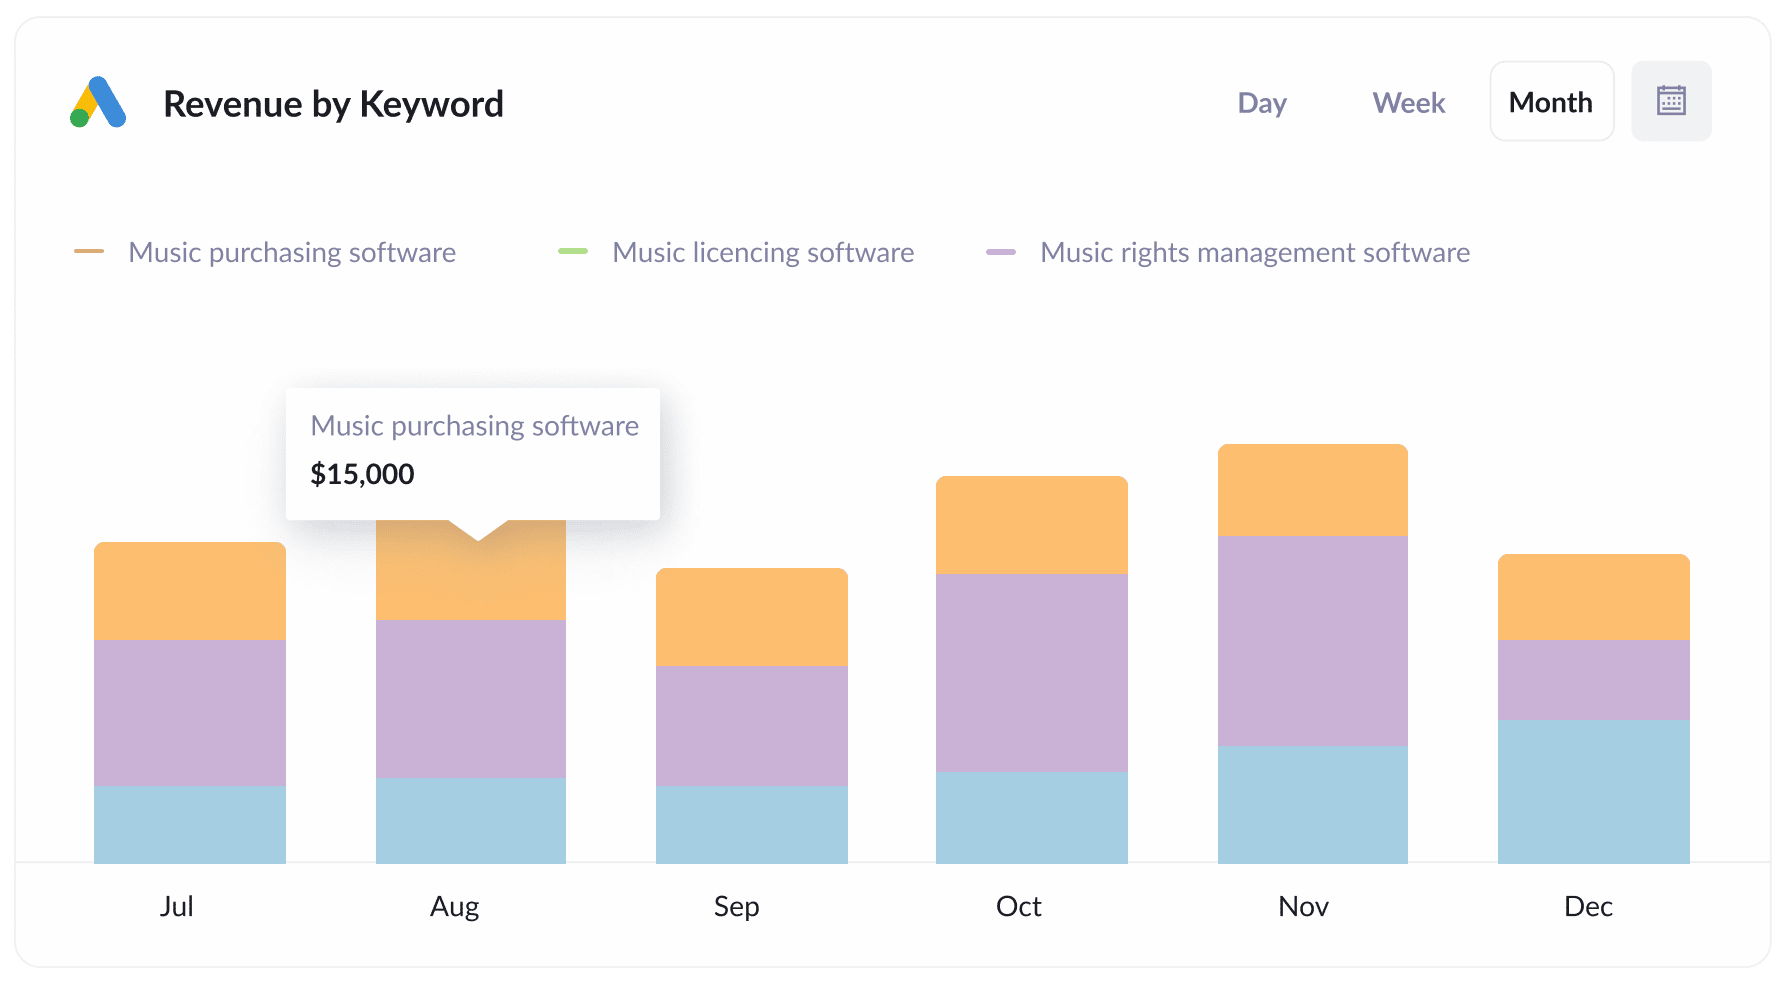
By including the keyword in the UTM parameters of your Google Ads (which can be done with tracking templates), you can actually track how much revenue you have generated from each keyword you are bidding on.
This not only helps you determine which keywords to increase bids for in Google Ads, but also provides insights into which keywords to prioritise for SEO, the language to use in your messaging, and generally supports many other aspects of your marketing efforts.
Wrap up
If your website is powered by Netlify and you're looking for a way to capture UTM parameters with each form submission, then Attributer is a great way to do it.
It will remember the UTM parameters as users browse around your site (or even if they leave and come back later), which means you'll get accurate data on how many leads and customers your campaigns are generating.
And as a bonus, it will also help you understand how many leads and customers you are getting from organic channels as well (such as Organic Search, Organic Social, etc).
If you’re keen to give it a try, start your 14-day FREE trial today and see if it’s the right fit for you.
Get Started For Free
Start your 14-day free trial of Attributer today!

About the Author
Aaron Beashel is the founder of Attributer and has over 15 years of experience in marketing & analytics. He is a recognized expert in the subject and has written articles for leading websites such as Hubspot, Zapier, Search Engine Journal, Buffer, Unbounce & more. Learn more about Aaron here.