How to capture Facebook Ads data in Elementor forms
Learn how to capture Facebook Ads data (like campaign, network, ad set, etc) with Elementor Forms submission so you can see where your leads are coming from

Are you wanting a way to know how many leads you get from your Facebook Ads?
Suppose you could see in Elementor Forms the exact origin of each lead, right down to the precise campaign, ad, and ad set they clicked; what improvements could you make to your Facebook Ads if you had that kind of information available?
In this article, we’ll walk you through how to use Attributer to track the source of all your leads, including those from Facebook Ads, in Elementor Forms.
4 simple steps to capture Facebook Ads data in Elementor Forms
Capturing Facebook Ads data in Elementor Forms is simple with Attributer. Find out how below:
1. Add UTM parameters to your Facebook Ads
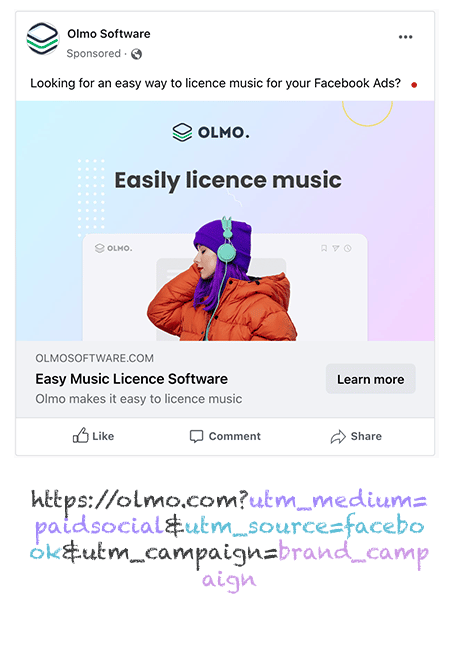
First, you need to add UTM parameters to your active Facebook Ads.
If you’re unfamiliar with UTM parameters, they’re simply extra bits of text that you put at the end of the URL you send to people from your campaigns.
Let’s say the page you want to send someone is attributer.io/integrations/elementor-forms, then your final URL with UTM parameters may look like this:
attributer.io/integrations/elementor-forms?utm_medium=paidsocial&utm_source=facebook&utm_campaign=brand-campaign
You can put whatever information you desire in the UTM parameters you place behind your ads, but the general best practice for Facebook Ads is probably:
- UTM Medium = Paid social
- UTM Source = Facebook (or Instagram or whatever network it's on)
- UTM Campaign = The name of your campaign
- UTM Term = The name of the ad set the ad belongs to
- UTM Content = The specific ad
Adding UTM parameters to your URLs is straightforward. Plus, free tools are available online to help you in adding them.
2. Install Attributer on your website

In its rawest form, Attributer can be described as a small piece of code you place on your business website.
At the time of a user’s arrival on your site, Attributer scans through a couple of technical data points about how the visitor got there and uses this to pinpoint the visitor’s origin (i.e., Facebook Ads).
Then when the visitor submits a form on your site, Attributer sends the attribution information into the hidden fields on your form, which will get captured by Elementor alongside the lead’s name, email, etc.
Placing Attributer on your site is easy. Once you’ve signed up for a 14-day free trial, you’ll be provided a set of codes you need to add to your website by following these instructions.
3. Add hidden fields to your forms
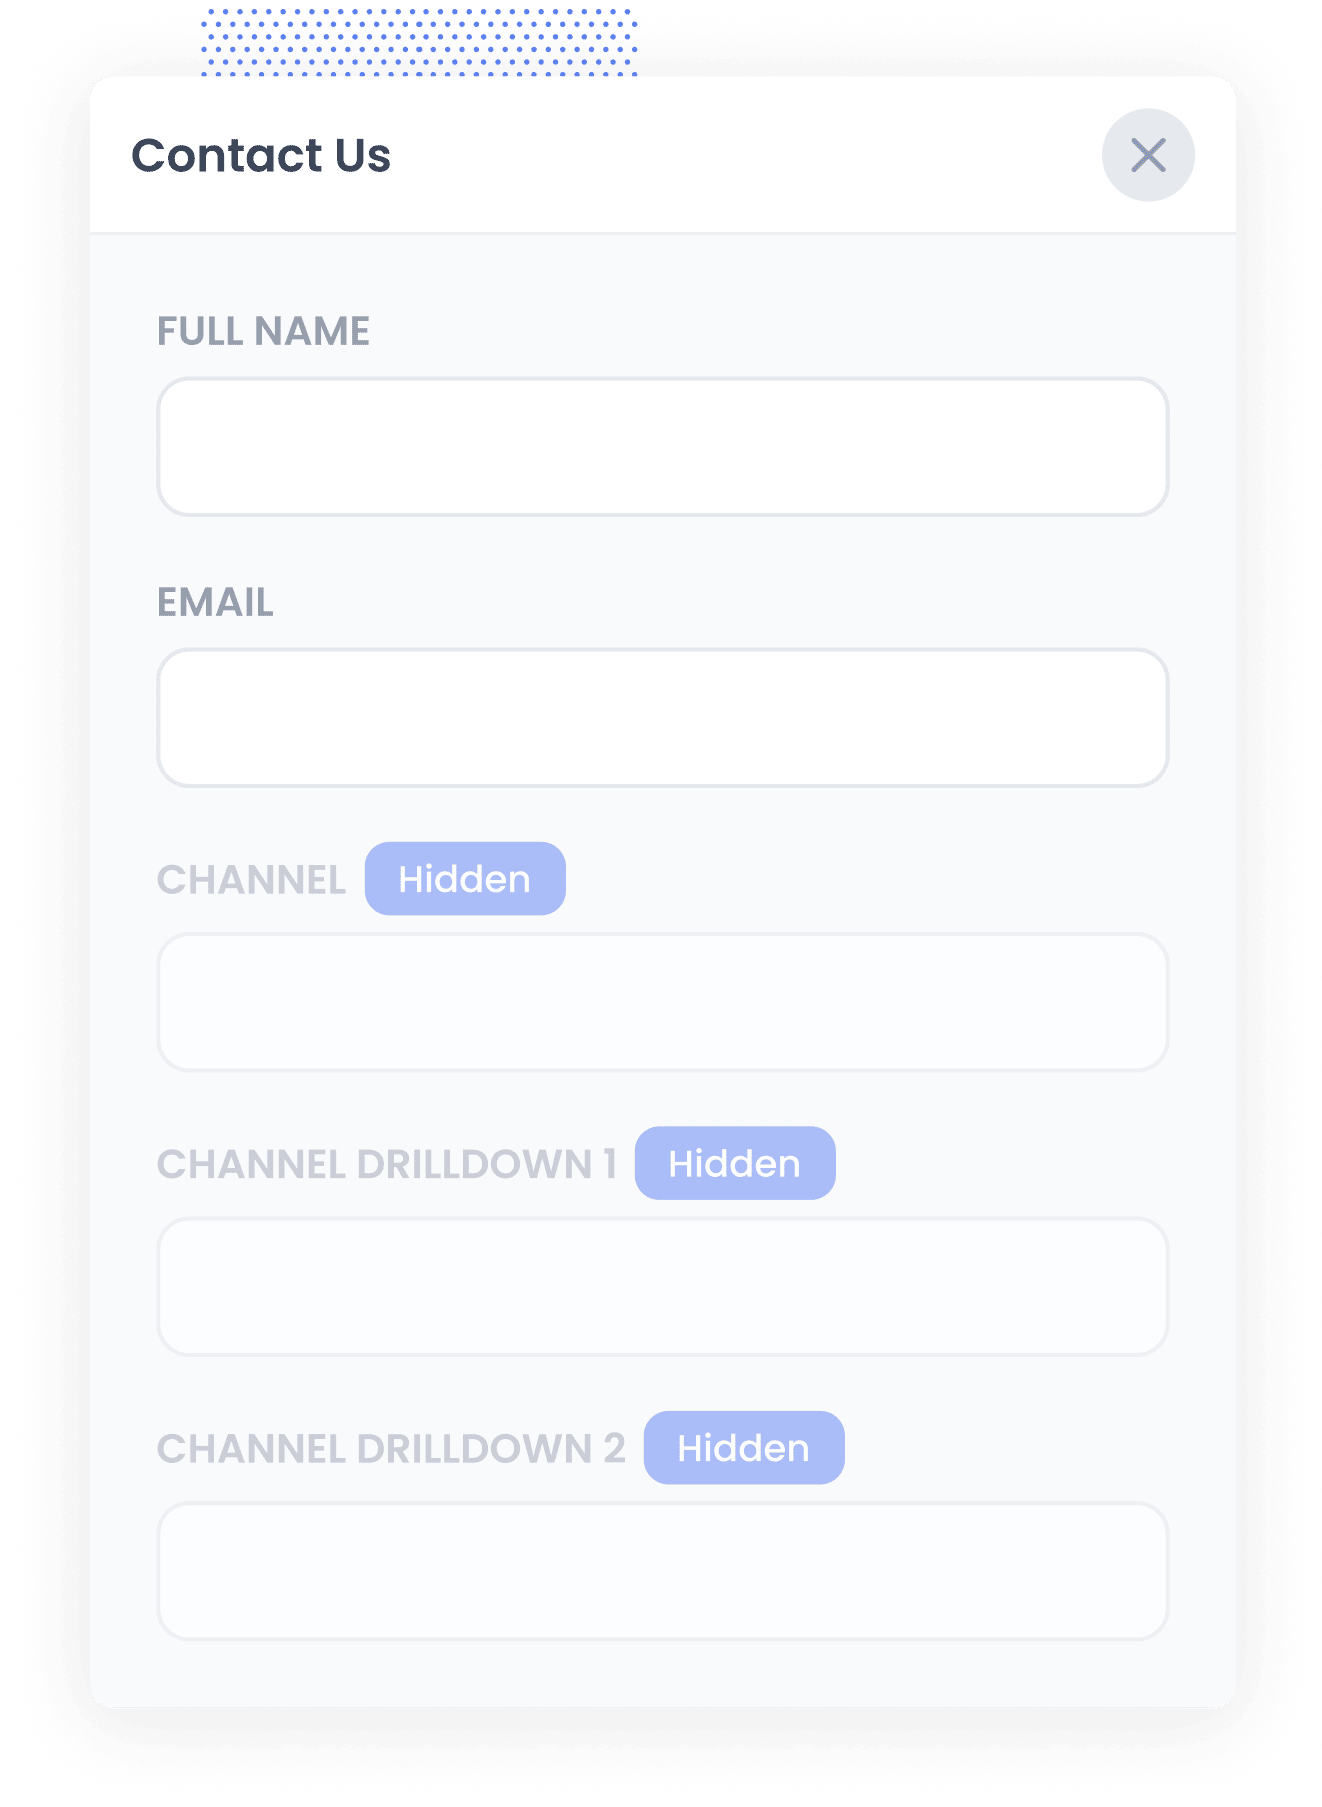
The third step is setting up several hidden fields in your lead capture forms. These forms are the ones you use to collect information from site visitors, like your Contact Us form or your Request A Demo form.
The following are the hidden fields you need to add to your forms:
- Channel
- Channel Drilldown 1
- Channel Drilldown 2
- Channel Drilldown 3
- Channel Drilldown 4
- Landing Page
- Landing Page Group
Adding hidden fields to your forms is super simple with Elementor. You can simply click the 'Add Item' button to add a new form field to your form, and then select 'Hidden' form the Type dropdown to make it a hidden field. Further instructions (with screenshots) can be seen here.
4. Attributer writes the Facebook Ads data into the hidden fields and it’s captured by Elementor Forms
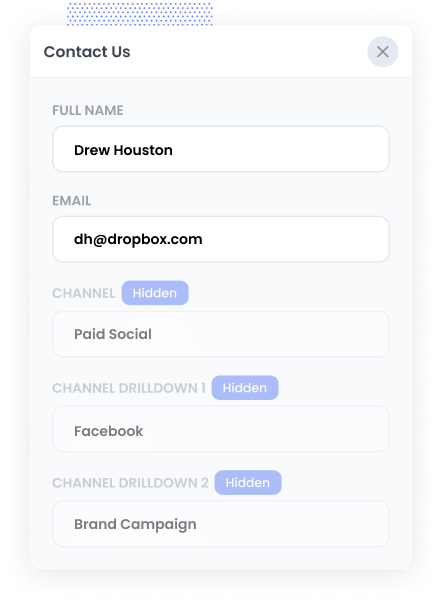
Every time a visitor lands on your site from your Facebook Ads, Attributer captures the UTM parameters and keeps them in a cookie in the visitor’s browser. This is so they won’t be forgotten while visitors browse your site.
Eventually, when the visitor completes a form on your site, Attributer will write the Facebook Ads data (derived from the UTM parameters) into the hidden fields on the form, which will be captured together with the lead’s name, email, etc., once the form is submitted.
What you can do with the data
When the Facebook Ads data has been captured in Elementor, you can use Elementor's native integrations or third-party tools like Zapier to send the data to different platforms:
- Send it to your CRM - If you send the Facebook Ads data into your CRM (Salesforce, Hubspot, Pipedrive, and more), you can use this data to run reports that provide insight on the number of leads your Facebook Ads produce, how many of those turned into customers, the total revenue generated, etc.
- Pass it to a spreadsheet - You can do basic analysis in a spreadsheet by using Zapier or an Elementor Forms Add-On to send the data into a Google or Excel sheet. Alternatively, you can link analytics tools like Microsoft Power BI or Google Data Studio to the spreadsheet and do more advanced reporting there.
- See it in your email notifications - If you use email to respond to new leads instead of a CRM, you can append the Facebook Ads data to the lead notification email so you can know the origins of your leads.
- Send it to your billing platform - If you use a billing platform like Stripe or Square and have connected it to Elementor, you can send the Facebook Ads data to these platforms and create reports to know how much revenue your Facebook Ads are generating.
Why use Attributer
Other ways to capture Facebook Ads data in Elementor are available, so why opt for Attributer?
Check out a few of its main benefits:
Captures other attribution information
Together with the source of leads from your Facebook Ads, Attributer also captures data on leads who come from other channels like Organic Search, Organic Social, Referral, or Direct. With this, you’ll be able to see the origins of ALL your leads and customers, not just the ones from your Facebook Ads.
Remembers the data
Most other tools and methods for capturing UTM parameters require the UTM parameter to actually be present on the page where the form is completed. This is a problem because the page a visitor completes your form on may not be the same page they landed on from your ad.
As an example, imagine someone clicks one of your Google Ads and goes to a landing page you created for that campaign. Once they’re convinced your product or service is amazing, they click the ‘Get A Quote’ button and are taken to a different page to complete your quote request form. This would mean that the page they complete a form on is not the same page they originally landed on, so the UTM parameters are lost.
Attributer works differently. It stores the UTM parameters in a cookie in the user’s browser, meaning that regardless of what page the user completes a form on the UTM parameters will always be passed through.
Cleans the data
Attributer was designed to recognize inconsistencies in UTM usage, such as using utm_source=facebook in some campaigns and utm_source=facebook.com in others. It can assign all your leads to the correct channel regardless of the discrepancies, ensuring you have accurate data every time. For the case mentioned, the lead will be assigned to the Paid Social channel.
Captures landing page data
In addition to Facebook Ads data, Attributer also captures landing page URLs (e.g., https://attributer.io/blog/capture-utm-parameters-elementor) and landing page groups (e.g., /blog).
This helps you understand how many leads and customers you get from your content marketing efforts like your blog, as well as allowing you to drill down and see exactly which content pieces (I.e. blog posts) are generating leads.
3 example reports you can run to understand the performance of your Facebook Ads campaigns
If you capture Facebook Ads data in Elementor using Attributer and you send this data into a CRM or spreadsheet, then running reports like the following is possible:
1. Leads by channel
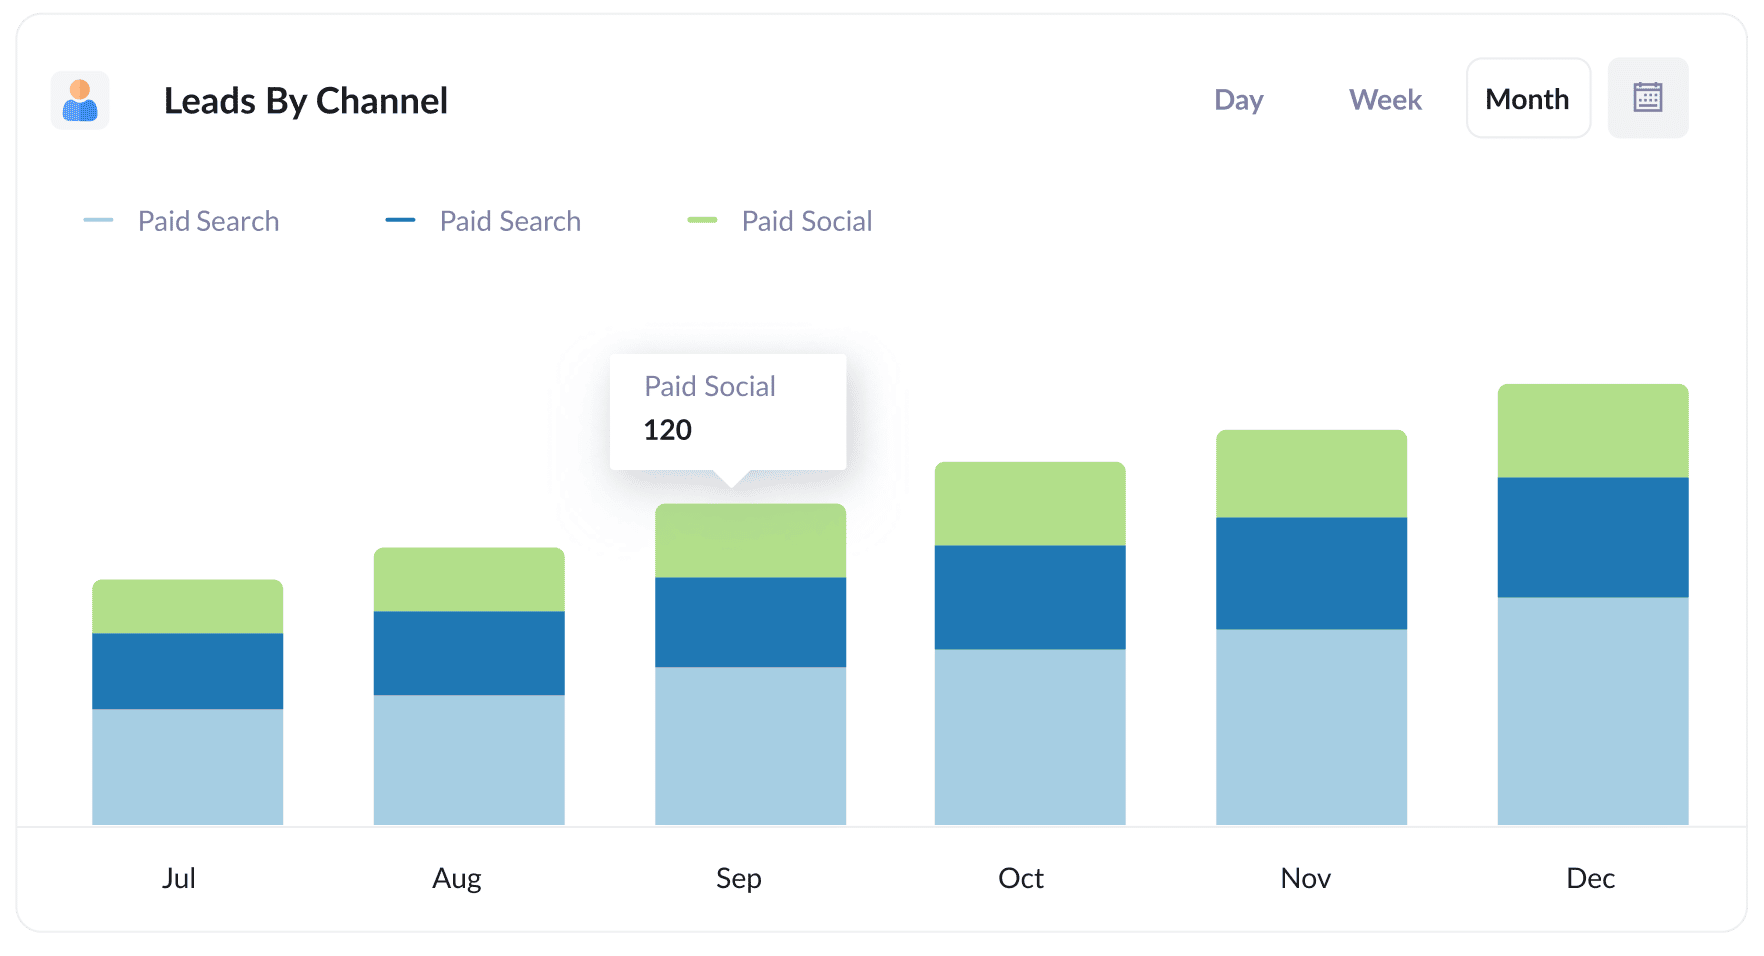
Since Attributer gathers information on the source of all your leads, not just those from your Facebook Ads, running reports like the one above is easy. The report shows the number of leads broken down by channel.
The information can help you see how your Facebook Ads are performing relative to your other channels and, in turn, can assist in your strategic planning on where to spend your marketing resources.
2. Leads by Network
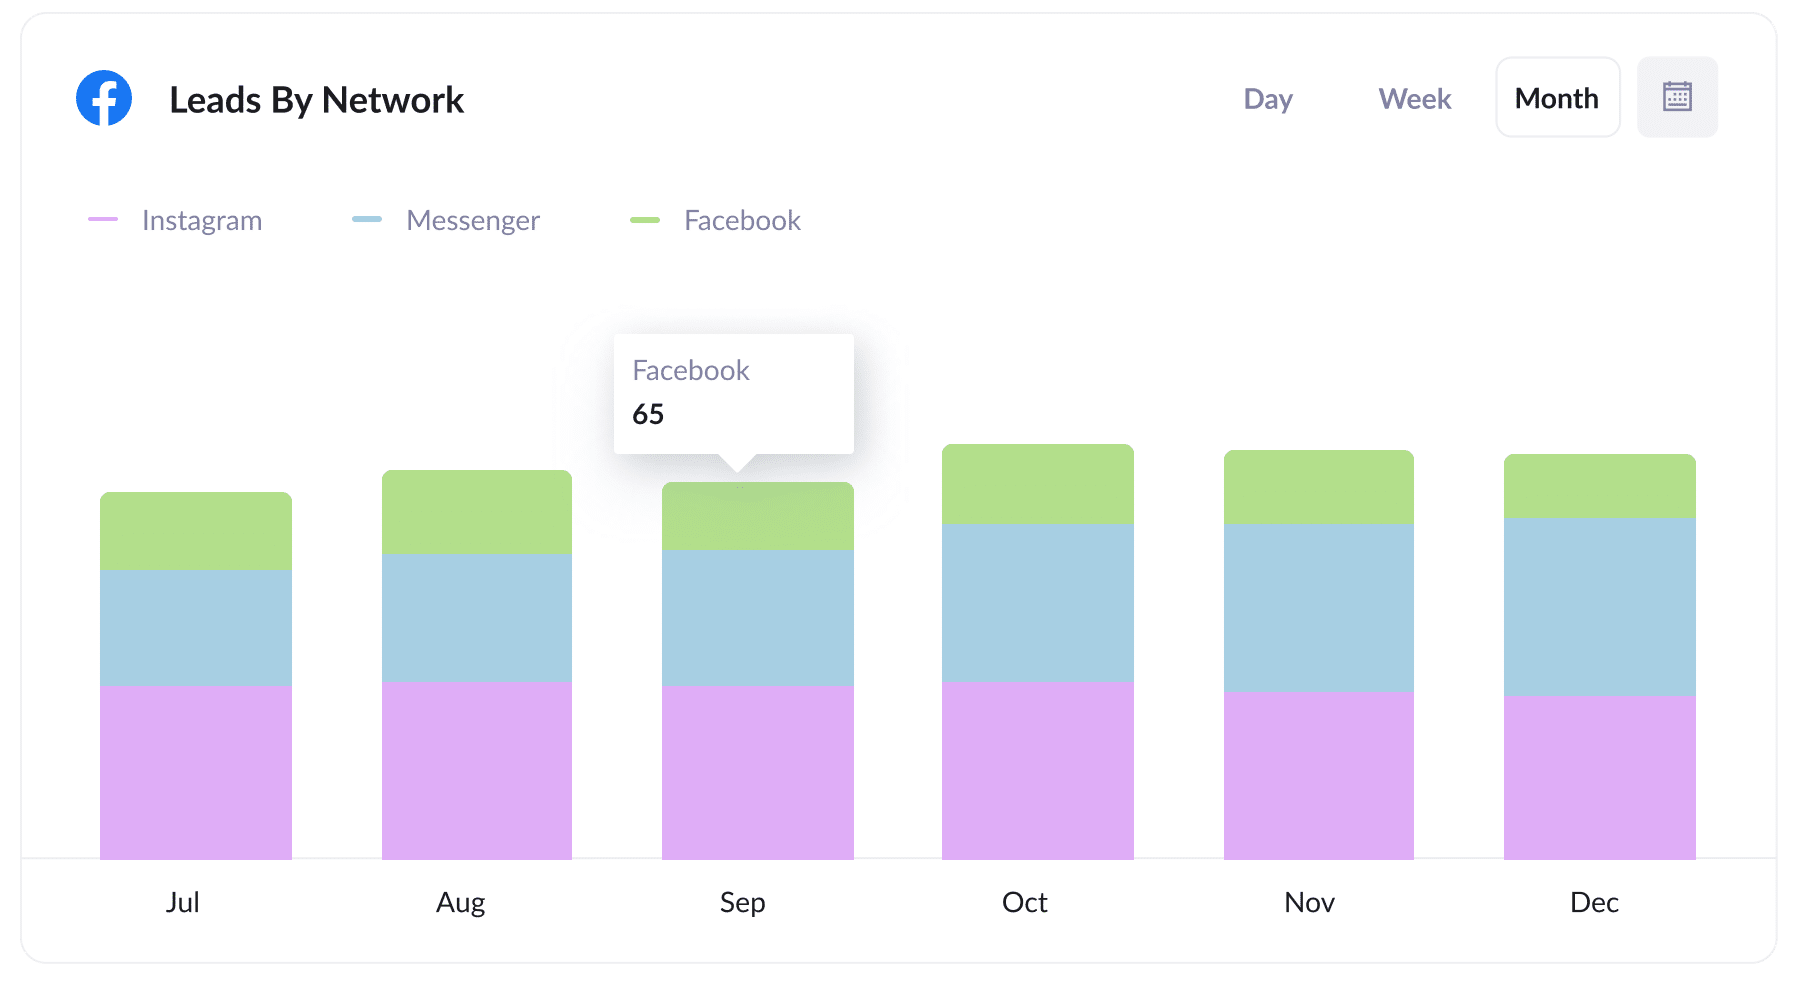
If you have ads running on Facebook’s different networks (i.e., Messenger, Facebook, Instagram, etc.), then the above report can be helpful in understanding which networks are producing the most leads.
The graph can provide insight into which social app your ads are performing best on and enables you to double down on the networks that are working best to get better results.
3. Leads by campaign
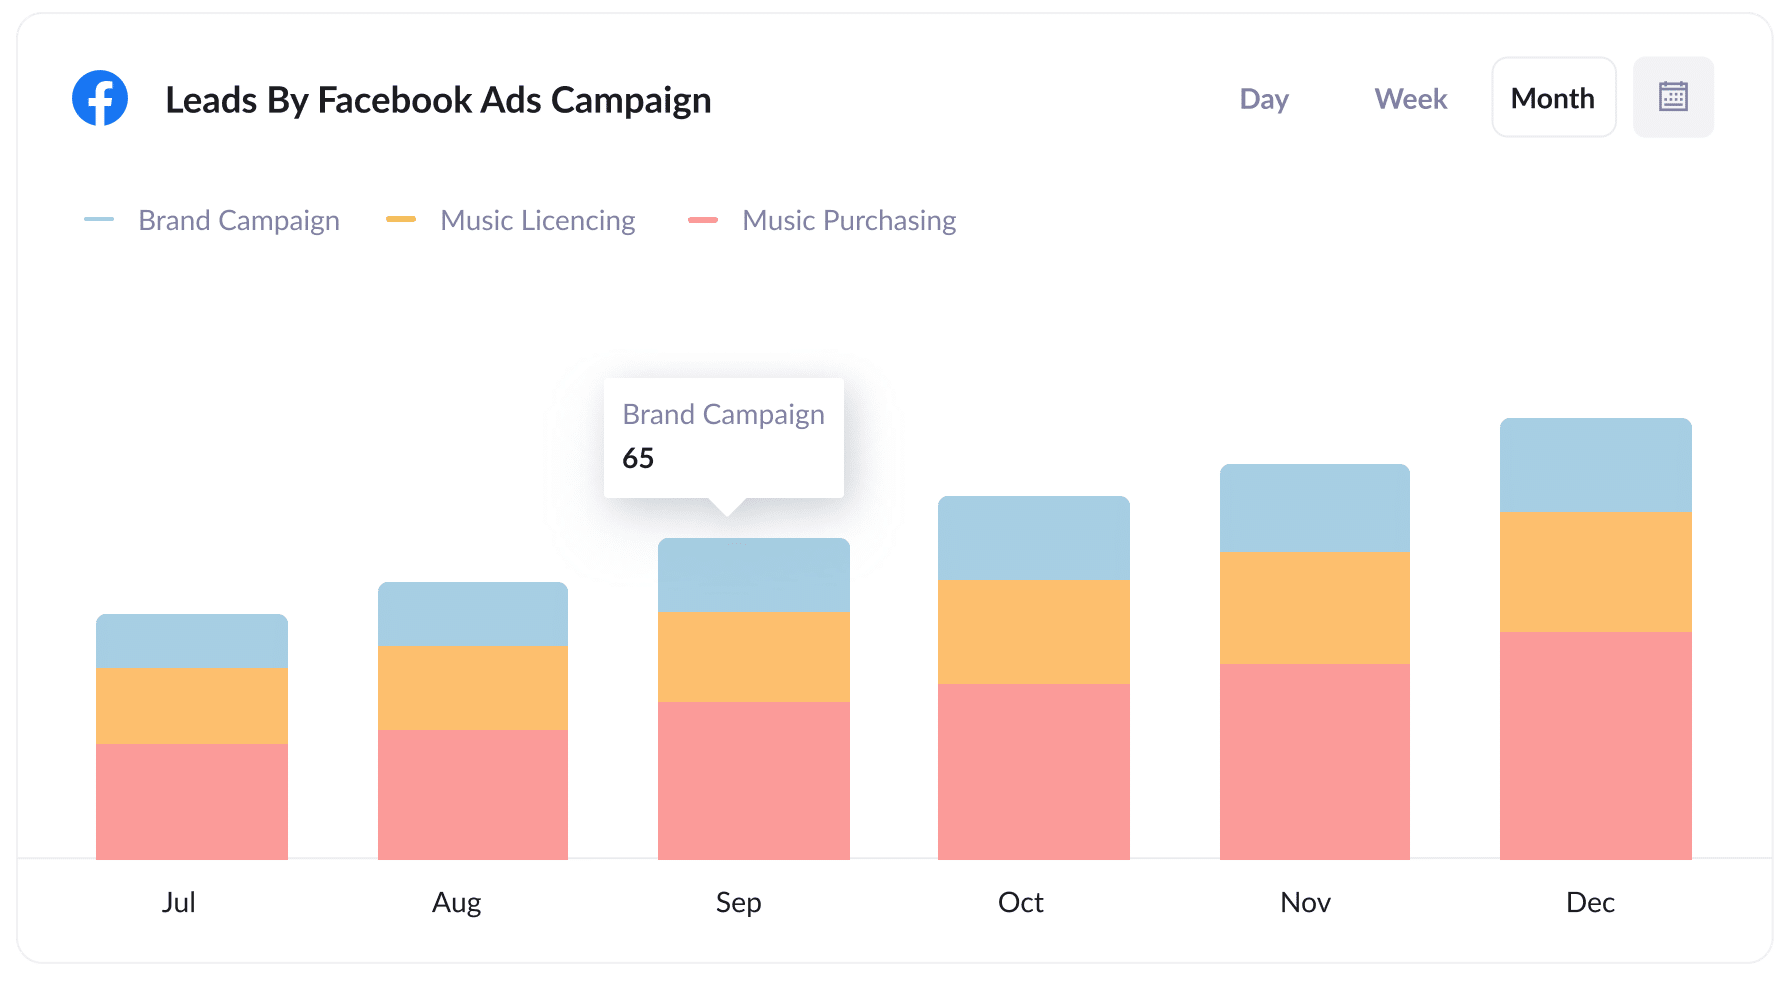
The chart above displays information on the number of leads created per month from Facebook Ads, broken down by the campaign they came from.
It can inform you about which campaigns are actually working to generate you leads, and can ultimately help you decide which one's to invest more budget into.
Wrap up
Attributer makes it easy to capture the UTM parameters your put behind your Facebook Ads.
And with this data being captured in Elementor forms, you can start to understand which campaigns, networks and ads are working best.
In addition to this though, it also provides you with information on leads that come from other channels. This means you know the source of ALL your leads, not just those from Facebook Ads.
Have we mentioned that it’s free to get started? Start your free trial today and see what Attributer can do for you and your company.
Get Started For Free
Start your 14-day free trial of Attributer today!

About the Author
Aaron Beashel is the founder of Attributer and has over 15 years of experience in marketing & analytics. He is a recognized expert in the subject and has written articles for leading websites such as Hubspot, Zapier, Search Engine Journal, Buffer, Unbounce & more. Learn more about Aaron here.