4 simple steps for capturing UTM parameters in Webflow Forms
Learn the 4 simple steps to capturing UTM parameters in your Webflow forms and sending them into your CRM, analytics tools and more.
You can capture UTM parameters in Webflow forms using Attributer. Simply add hidden fields to your forms, Attributer writes the data into them, and they are captured with the form submission. It also gives you information on leads that come from organic channels (like Organic Search, Organic Social, etc).
Are you looking for a way to capture UTM parameters in Webflow forms and send them into your CRM, a spreadsheet or some other sales & marketing tool?
If so, you're on the right track. By capturing UTM parameters with each form submission, you're able to get a much better understanding of which channels and campaigns are actually generating leads and customers for your business, and ultimately where to invest further to grow.
And in this article, we'll walk you step-by-step through how to use a tool called Attributer to capture UTM parameters in Webflow forms as well as show you some example reports you can run once you've got it all set up.
4 steps for capturing UTM parameters in Webflow forms
Using Attributer to capture UTM parameters in Webflow forms is easy. Here's how to do it in 4 easy steps:
1. Add the Attributer code to your website

When you start your 14-day free trial of Attributer, you'll receive a small piece of code that needs to be added to your website.
Adding it to your Webflow site is simple. Head to your site's Settings, click on Custom Code, and paste the Attributer code into the Head Code section. You can see step-by-step instructions here.
You can also add it via tools like Google Tag Manager as well.
2. Add hidden fields to your forms
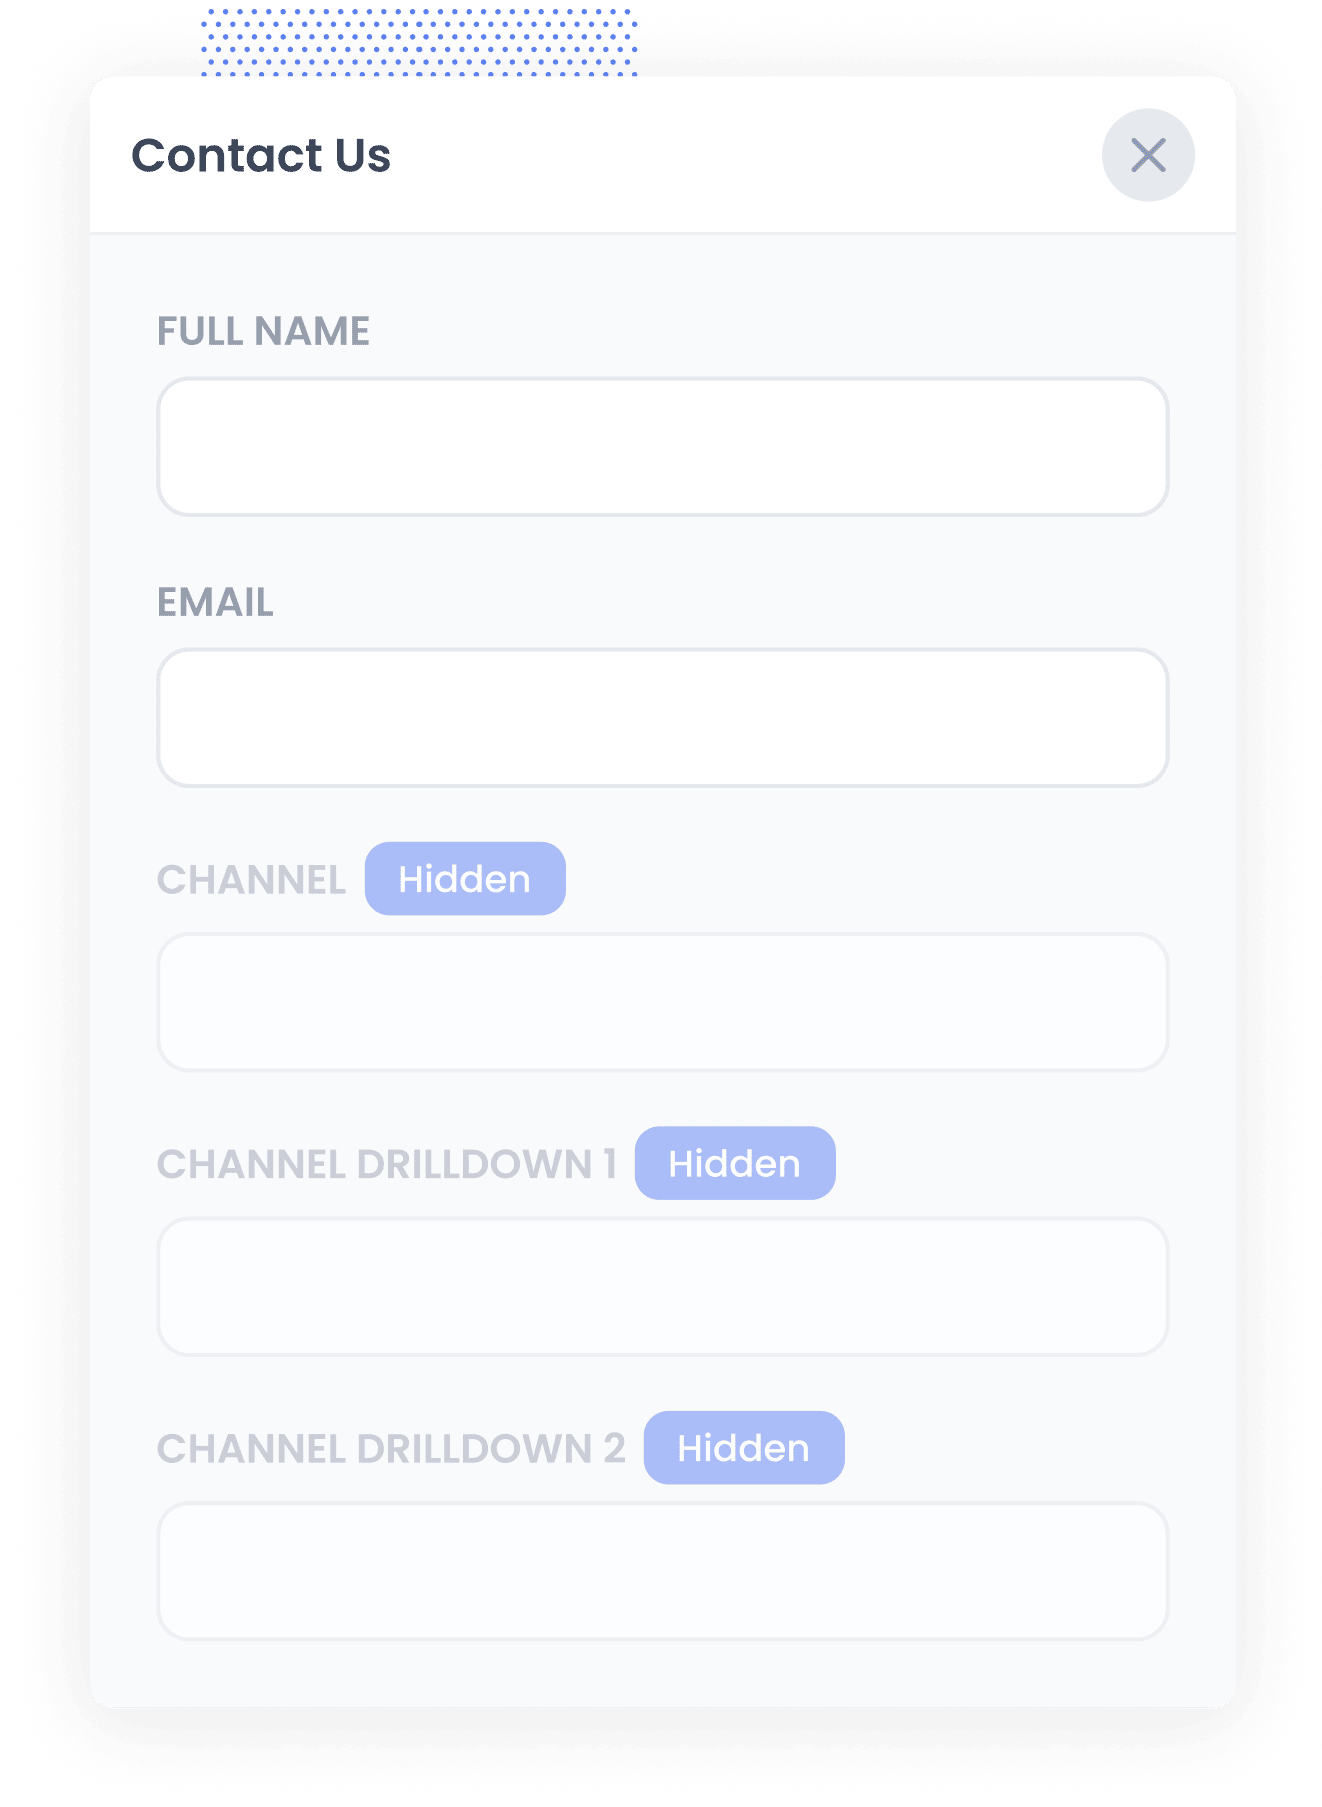
Step two is to add a series of hidden fields to your Webflow forms.
As the name suggests, Hidden Fields are form fields that are not visible to your website visitors but are still technically on the form, allowing tools like Attributer to write the UTM parameters into them without anyone seeing.
The six hidden fields that need to be added to your forms are:
- Channel
- Channel Drilldown 1
- Channel Drilldown 2
- Channel Drilldown 3
- Landing Page
- Landing Page Group
Incorporating hidden fields into your Webflow forms is simple and step-by-step instructions can be seen here.
3. Attributer automatically completes the hidden fields with UTM data
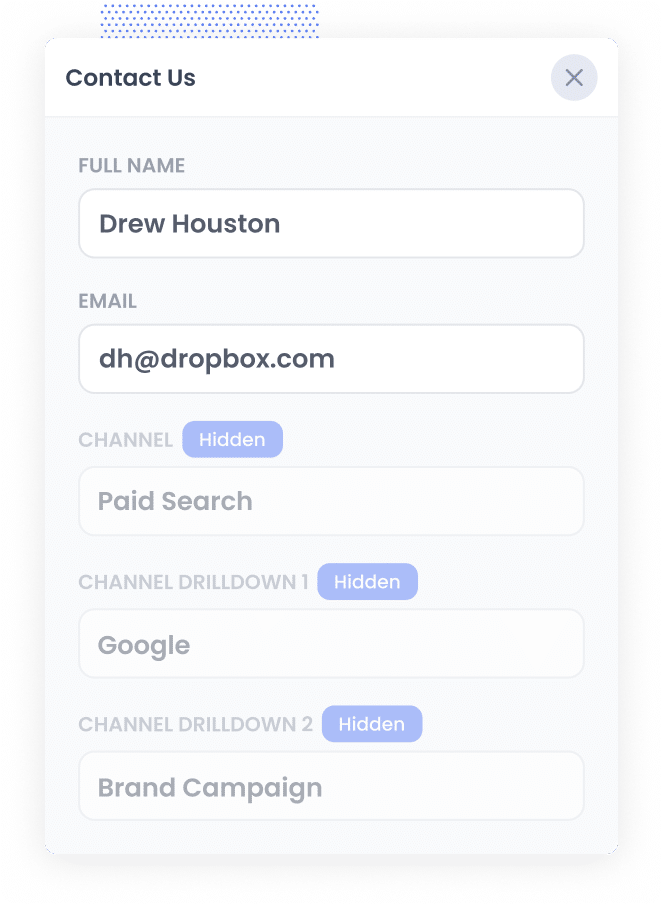
Now that you have everything set up, Attributer will begin to auto-populate hidden fields in your Webflow Forms with the data from the UTM parameters.
To illustrate how Attributer operates, let's assume that you are a marketer at Dropbox.
Suppose a potential customer does a Google search for "ways to share massive files" and the paid search results display an ad from Dropbox. This person then clicks on your advertisement, arrives on the Dropbox websoite, and completes a form to request a product demo.
Depending on the UTM parameters you placed behind the ad, Attributer would write the following details into the hidden fields:
- Channel = Paid Search
- Channel Drilldown 1 = Google
- Channel Drilldown 2 = Brand Campaign
- Channel Drilldown 3 = Dropbox
In addition, Attributer will include the particular landing page and subdirectory where the user landed:
- Landing Page = www.dropbox.com/features/share
- Landing Page Group = Features
4. UTM parameters are captured by your Webflow forms
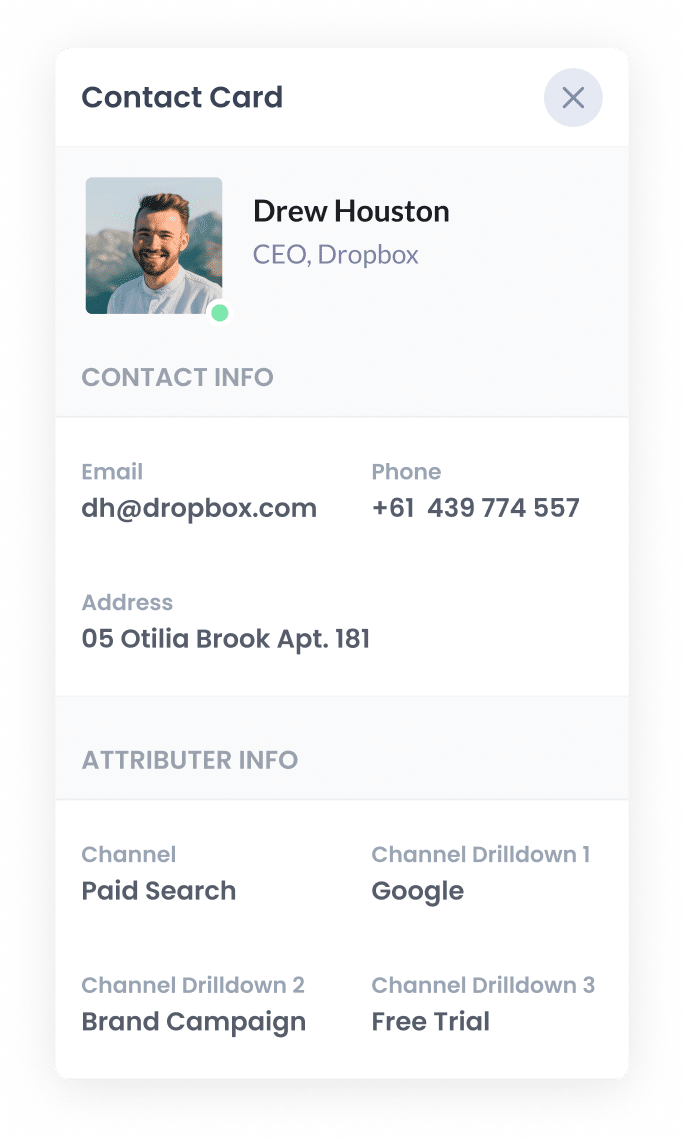
Finally, when the user submits a form with their details (name, email, number, etc.), the UTM parameters are captured in Webflow Forms.
You can then use Webflow Forms native integrations or Zapier to send the data to a CRM (like Salesforce, Hubspot, Pipedrive, etc), a spreadsheet, your email marketing software, or other tools.
What is Attributer?
As you've probably gathered from the above steps, Attributer is a tool for capturing UTM parameters in Webflow forms.
But let's take a closer look at how it works:
Once you signup for a 14-day free trial, you get given a snippet of code to place on your website.
When a visitor arrives at your site, Attributer looks at a bunch of technical information (the same things tools like Google Analytics look at) to determine where that visitor came from.
Based on that data, Attributer then categorizes each visitor into "Channels" (Paid Search, Organic Search, and Paid Social are good examples) and stores that data as a cookie in the user's browser.
When a user fills out one of your Webflow Forms, Attributer completes the hidden fields with the saved data about how the visitor arrived at your site. And when the form is submitted, this data is captured alongside the other information the lead entered into the form (like their name, email, phone, etc).
Attributer was built by a marketing consultant who needed a tool to accurately measure which channels were driving leads & customers for his clients.
"I originally built it to use on my client's website, but after a while, I realized it could be useful for businesses everywhere." said Aaron Beashel, the founder of Attributer.
A few years later, Attributer is used on 1000's of websites across the web and tracks over 7 million visitors to those websites every single month.
Why using Attributer is better than capturing raw UTM parameters
You may have come across other methods for capturing UTM parameters in Webflow Forms, so what makes Attributer different?
Let's take a closer look:
1. Captures all traffic
Attributer gives you information on the source of ALL your leads, not just those from your paid advertising campaigns with UTM parameters.
This means that even if someone lands on your site through Organic Social, Organic Search, Direct, Referral, etc., Attributer will still gather data about where they came from and pass it through with each form submission.
Ultimately, this means that you can identify the source of all your leads and make more calculated decisions regarding how to allocate your marketing budget (For instance, you may find that you get more leads from Organic Search than Paid Search, so it might be advantageous to invest more in SEO).
2. Remembers the data across pageviews & sessions
Many other tools for capturing UTM parameters require the UTM parameter to still be in the URL on the page where the form submission takes place.
This can be problematic, as the page where users complete the form may not be the same as the one they initially landed on with the UTM parameters.
A common example of this is if you are using Google Ads to direct traffic to your homepage. Once a visitor is impressed by your product or service, they click the 'Contact Us' button and are redirected to a different page to complete the contact form. As a result, the page where they fill out the form differs from the initial landing page, meaning the UTM parameters are lost.
However, Attributer addresses this issue by storing the UTM parameters in a cookie within the user's browser. This ensures that Attributer can still pass through the original UTM parameters, regardless of which page the visitor submits the form on.
3. Captures click ID's
Attributer can also capture click IDs like the Google Click ID (GCLID), Microsoft Click ID (MSCLKID), and the Facebook Click ID (FBCLID) and pass them through with each form submission.
You can then send these click IDs to your CRM and other tools, and when a lead reaches a certain stage in your sales process (like becoming a paying customer), send them back to the ad platform as an offline conversion.
This lets you move beyond tracking thank you page visits as conversions and start tracking real customers instead.
4. Captures landing page data as well
Attributer not only captures UTM parameters but it also records the lead's landing page and landing page group.
For example, if a lead arrives at attributer.io/blog/capture-utm-parameters, Attributer would capture the full landing page URL (attributer.io/blog/capture-utm-parameters) as well as the landing page group (I.e. /blog).
This means that you can run reports that show what content on your site is attracting leads & customers.
And because it captures both the individual landing page and the landing page group, you can see how many leads and customers you are getting form your blog as a whole, as well as drill down into how many leads & customers you are getting from each individual blog post.
4 example reports you can run when you capture UTM parameters in Webflow forms
If you are using Attributer to capture UTM parameters in Webflow forms, then you should be able to send the data into your CRM or a spreadsheet and runs reports similar to the following:
1. Leads by Channel
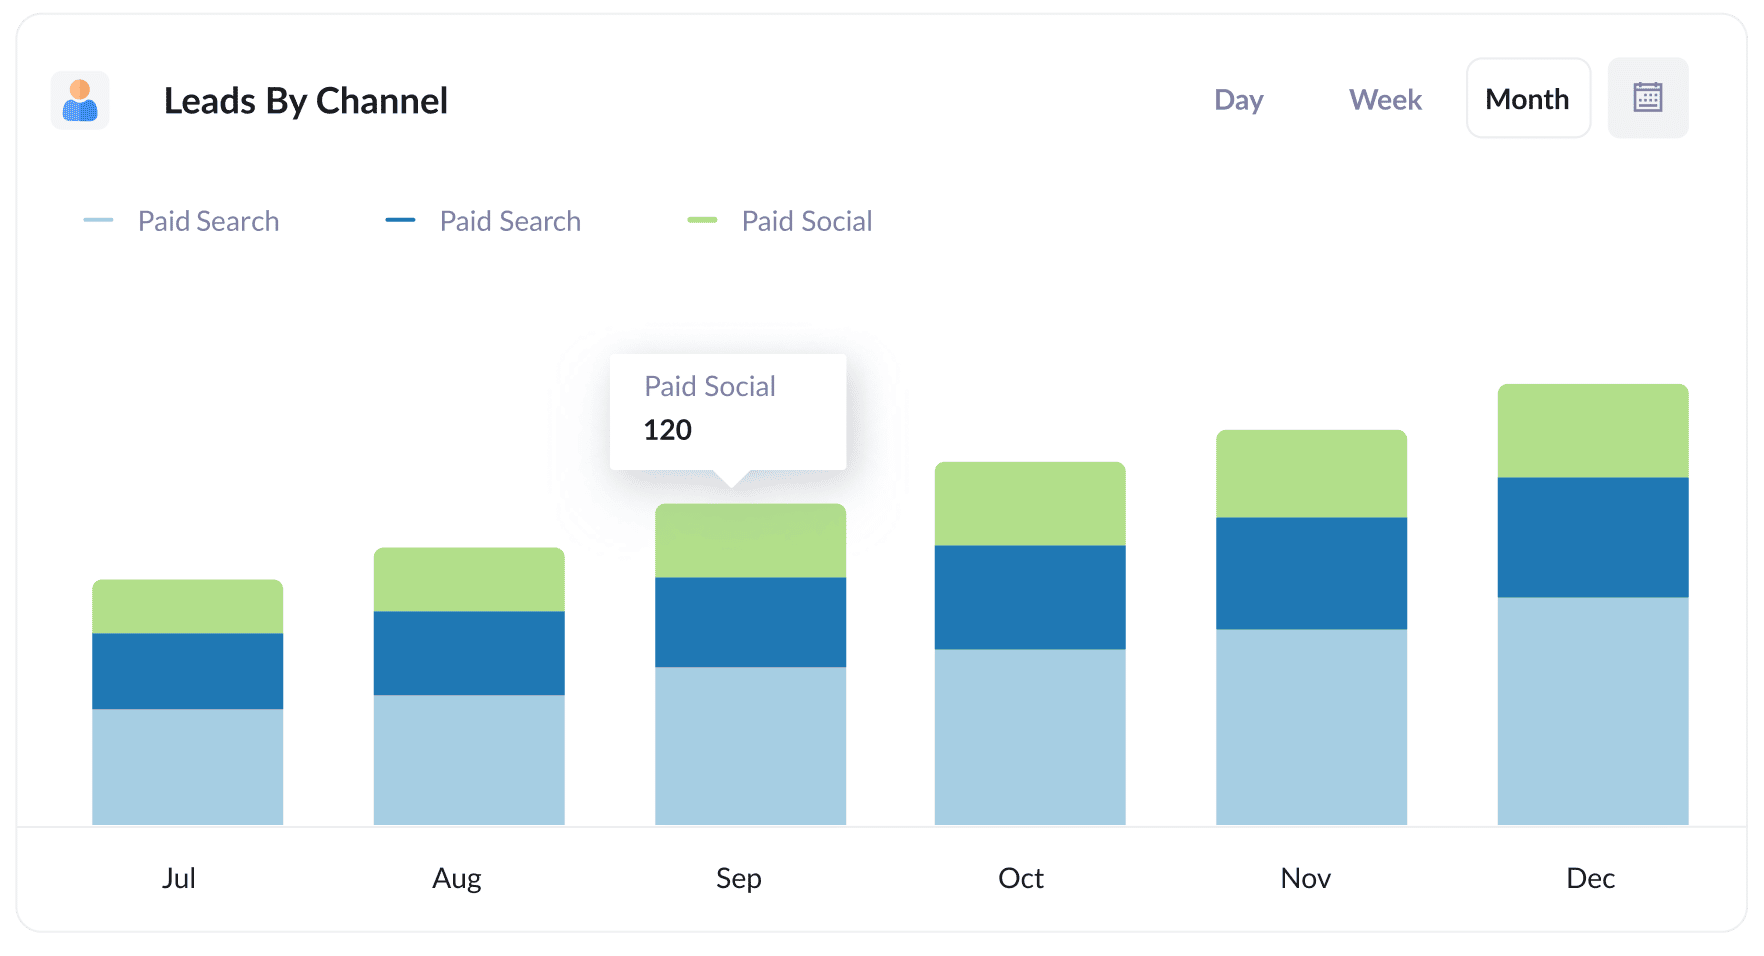
Attributer captures where all your leads come from (not just the ones from paid advertising), which means you can build reports like this one that break down your leads by channel.
This kind of report is great for understanding which channels are actually driving results and where you might want to double down. For instance, if you notice that Organic Search is generating most of your leads but most of your budget is allocated to paid ads, it might be worth reallocating some of that spend to SEO.
2. Leads by Facebook Ads Network
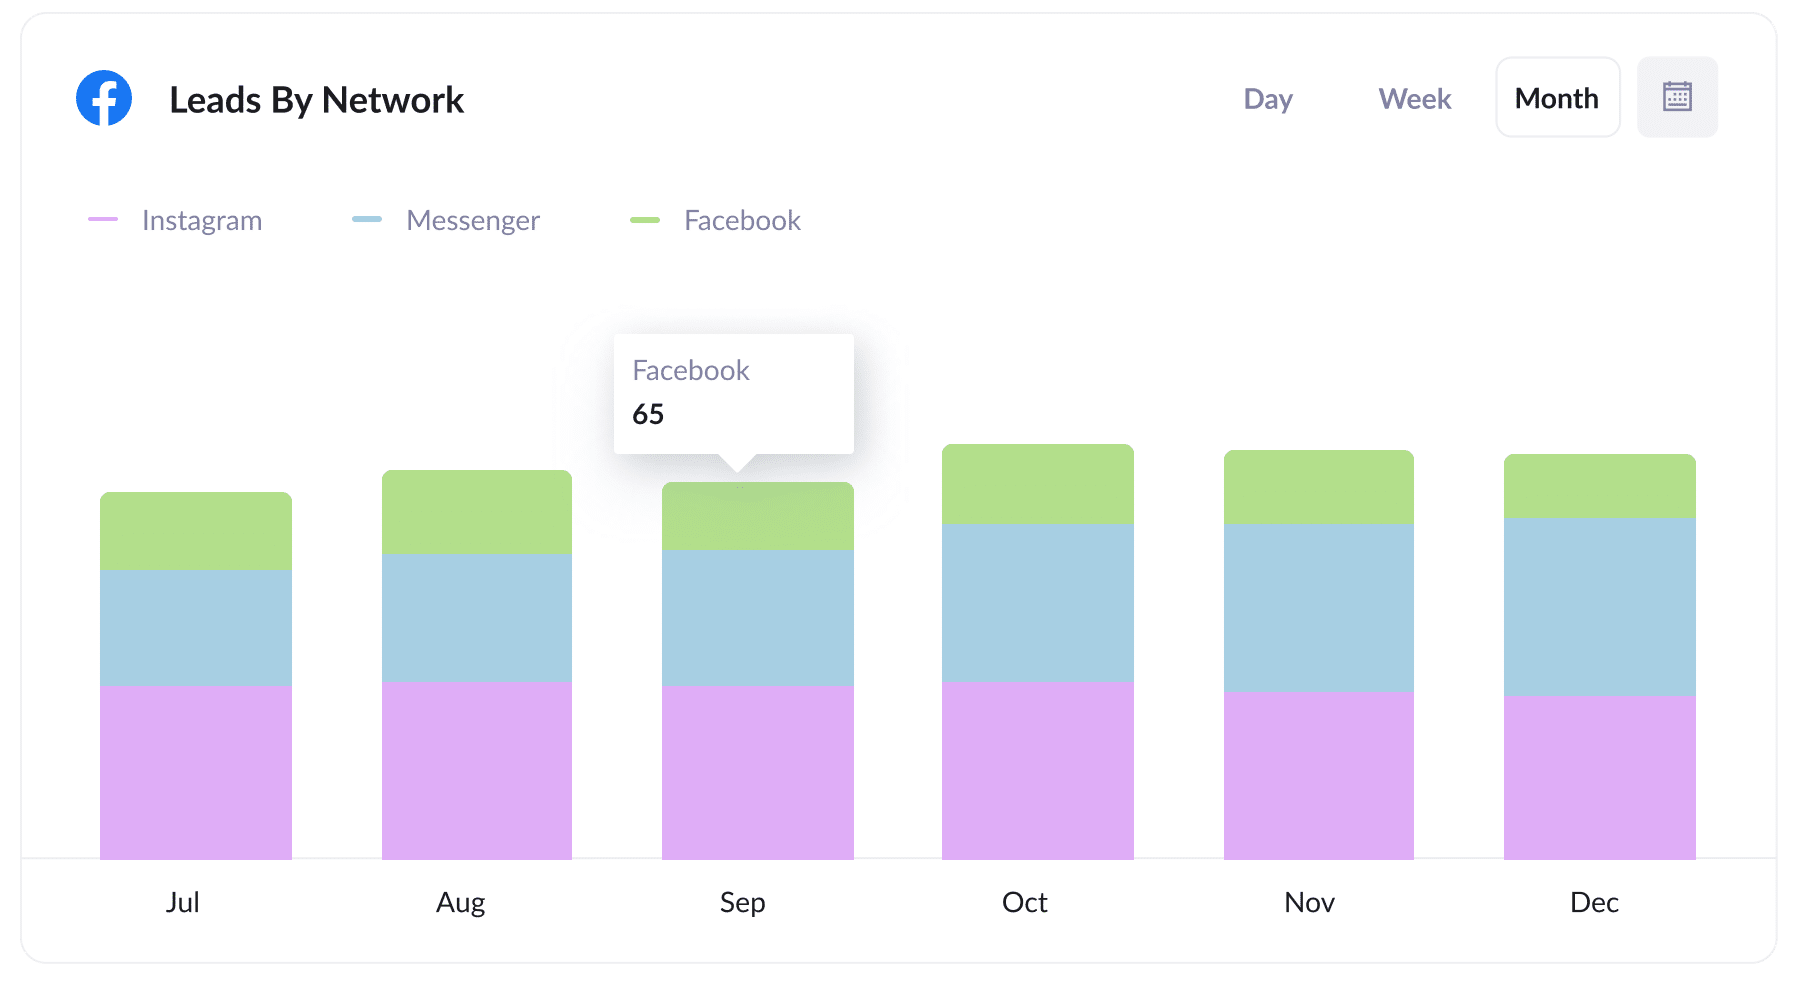
When running ads across the various networks offered by Facebook (e.g., Facebook, Instagram, Messenger, etc.), the above report can help you in identifying which network is generating the most leads.
This can in turn help you to optimise your ad spend. By adjusting your targeting settings to concentrate on the most effective networks, you can increase the number of leads while reducing the cost per lead.
3. Customers by Google Ads campaign
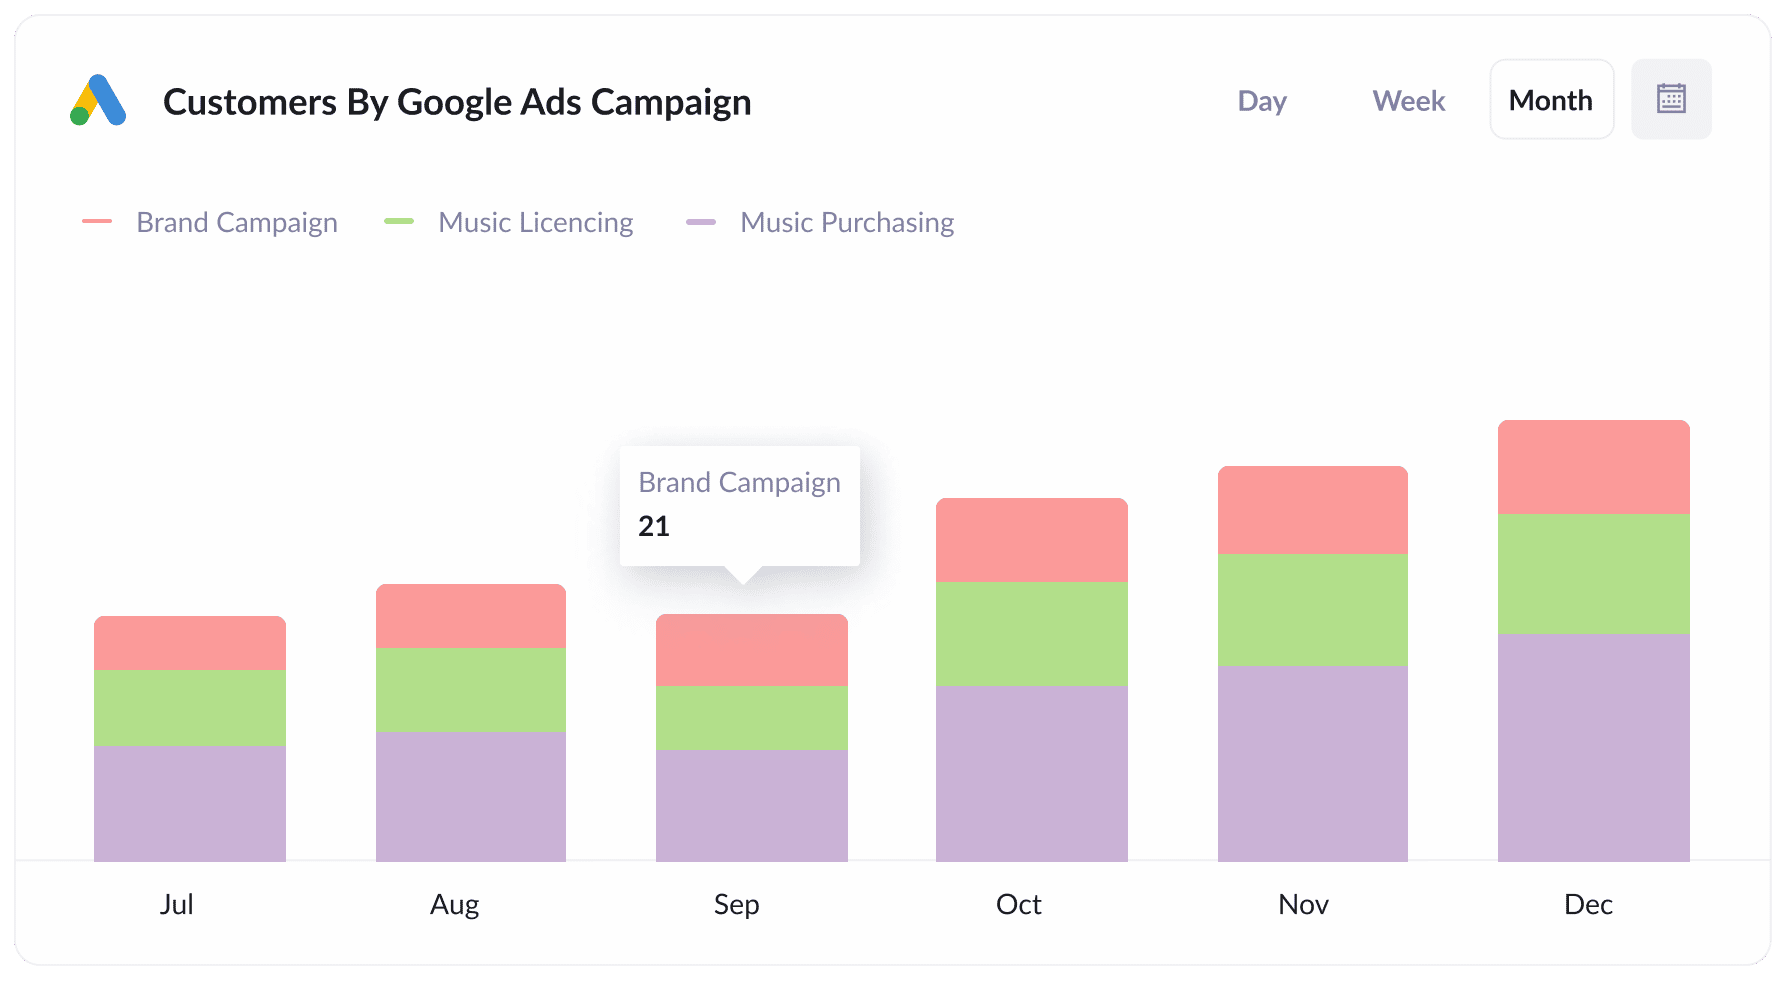
The report above, which displays how many customers you get each month from your various Google Ads campaigns, helps you figure out which campaigns are really bringing in customers, instead of just attracting visitors who don't convert.
This way, you can fine-tune your Google Ads spending by focusing your budget and A/B testing efforts on the campaigns that are actually getting you paying customers.
4. Revenue by Keyword
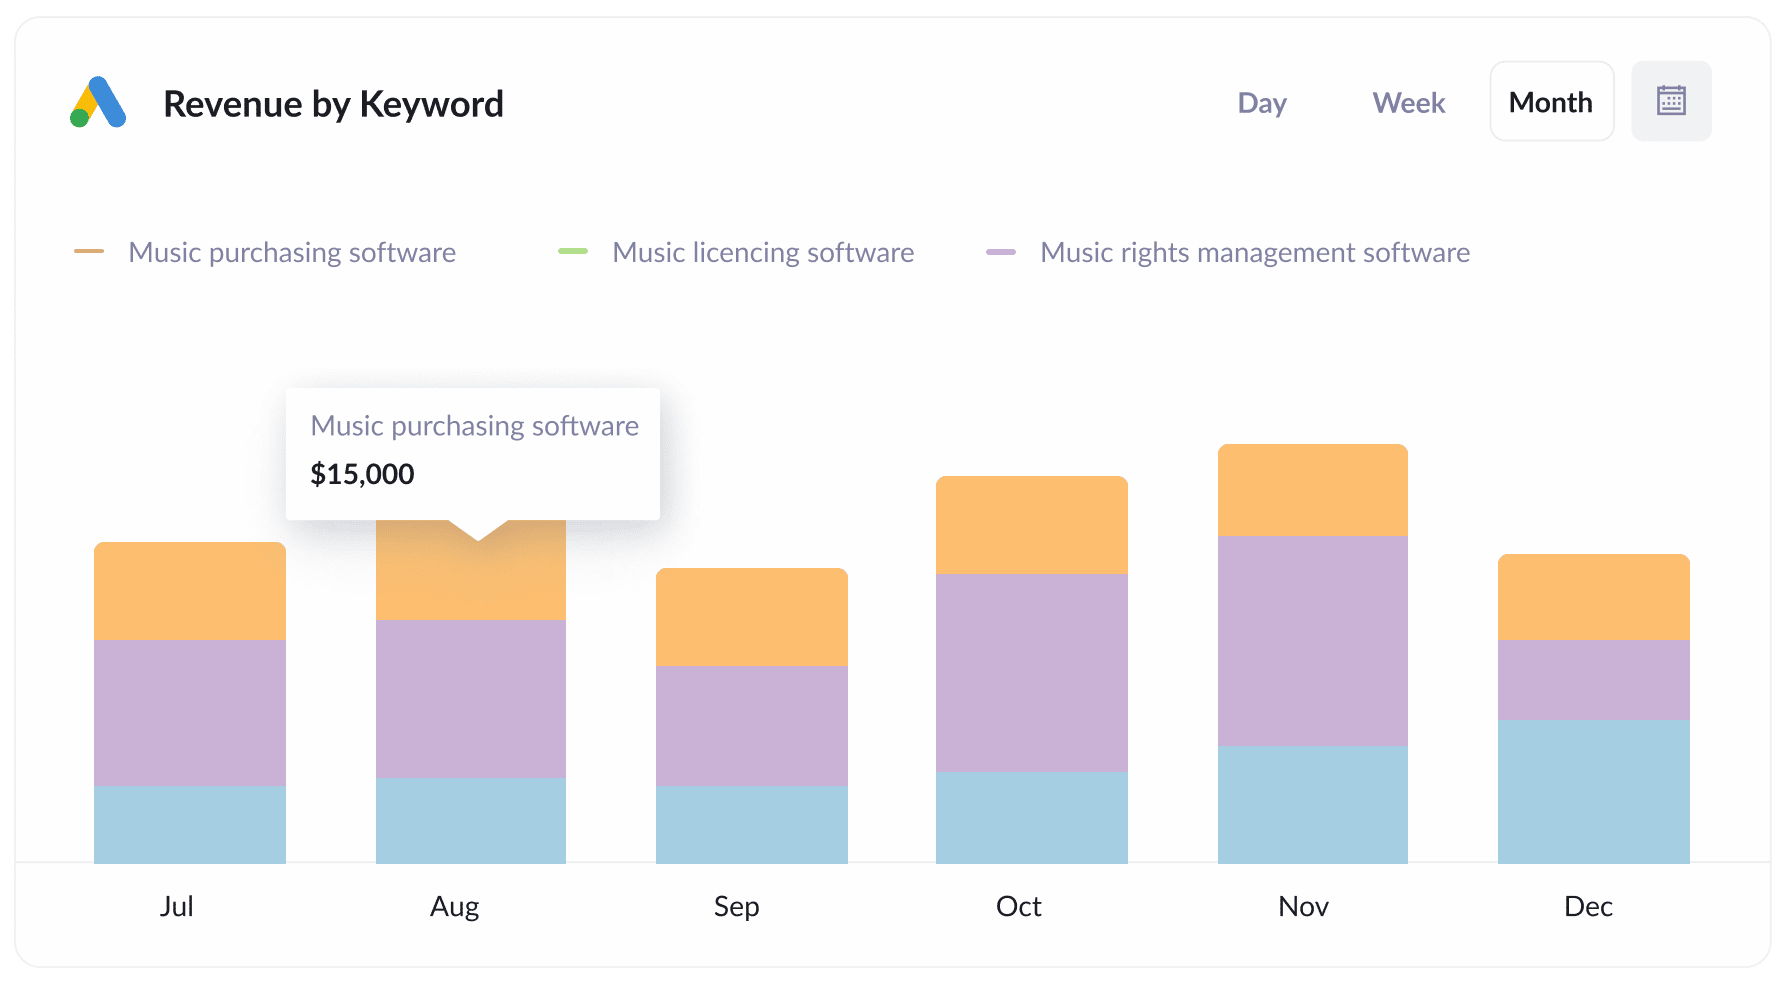
By including the keyword in the UTM parameters of your Google Ads (which can be done effortlessly with tracking templates), you can identify the keywords leads are using to discover your business.
This not only assists you in determining which keywords to increase bids for in Google Ads but also offers insights into the keywords you should prioritize for SEO, the type of language to use in your messaging, and just generally helps with many other aspects of your marketing.
How Attributer helped Harris Federal Law track which Google Ads are truly generating customers & revenue
Harris Federal Law Firm is a Washington D.C based practice that focuses on helping federal employees get the benefits they're entitled to.
The team was using Google Ads to generate new business, and by using tools like Google Analytics they were able to see how many people were clicking through to their website.
But they had a provle. They had no visibility into which of those visitors were actually becoming leads and paying clients.
That's when they implemented Attributer.
Now whenever a potential client fills out a form on their site, Attributer automatically captures UTM parameters (which include information on the campaign, ad group, specific ad, and even the search term) and passes it through with each form submission. They then send that data to their CRM with each new lead.
Once that data started coming through, everything changed. The team could finally build reports showing which campaigns were driving actual clients, rather than just accumulating clicks that went nowhere.
The results were surprising. A few of their display campaigns looked great on paper with all the traffic they were generating, but when it came to paying clients? Almost nothing. With this newfound clarity, they paused the display campaigns and moved the budget over to some of their high-performing search campaigns.
As a result, they were actually able to get more new clients with a reduced as spend.
"With Attributer we can see which campaigns are actually generating customers & revenue, rather than just website visitors. We were able to see that some of our campaigns were driving lots of visitors but few of them converted into leads and customers. Now we’re able to reinvest that budget into other campaigns that we can see are generating revenue."

Nick Child - Director of Marketing, Harris Federal Law Firm
Wrap up
If you're looking for a way to capture UTM parameters with each submission of your Webflow forms, then Attributer is a great choice.
It remembers the UTMs as visitors browse around your site, so they'll always be passed through regardless of which page the form was submitted on. On top of that, you'll also get information on leads that come from organic channel as well, so you'll be able to track where ALL your leads are coming from.
The best part? It's free to get started and setup usually takes less than 10 minutes. So start your 14-day free trial today!
Get Started For Free
Start your 14-day free trial of Attributer today!

About the Author
Aaron Beashel is the founder of Attributer and has over 15 years of experience in marketing & analytics. He is a recognized expert in the subject and has written articles for leading websites such as Hubspot, Zapier, Search Engine Journal, Buffer, Unbounce & more. Learn more about Aaron here.