How to capture the GCLID in Ninja Forms
Learn how to capture the GCLID with each submission of your Ninja Forms and send it to your CRM and other tools (and back to Google Ads).

Before I started Attributer, I had a problem.
I was pouring money into Google Ads and the reports made everything look great. Impressions were good, clicks were strong, and on the surface it all seemed to be moving in the right direction.
But when my boss asked me how many leads and customers were being generated from the ads, I couldn't respond.
What I need was a way not just to track impressions and clicks, but which campaigns, ad groups, keywords, etc. were generating real leads and customers for the business.
Sound familiar? There is a solution.
In this post, I am going to show you how to use Attributer to capture the GCLID in Ninja Forms with every submission. From there, I'll show you how to send that data into your CRM and then back into Google Ads as an Offline conversion so you can finally track the leads and customers your Google Ads efforts are generating.
3 steps for capturing the GCLID in Ninja Forms
Capturing the GCLID is really straightforward when you use Attributer with Ninja Forms. Here is a quick look at how the whole thing comes together:
1. Install Attributer on your website and add a hidden field
When you start your 14 day free trial of Attributer, you will receive a small snippet of code that you can drop into your website.
There are plenty of ways to add it to a WordPress site. Most themes include a spot where you can place code in the Head of the site, or you can use a plugin like Insert Header and Footer Code. If you prefer, you can also load it through Google Tag Manager.
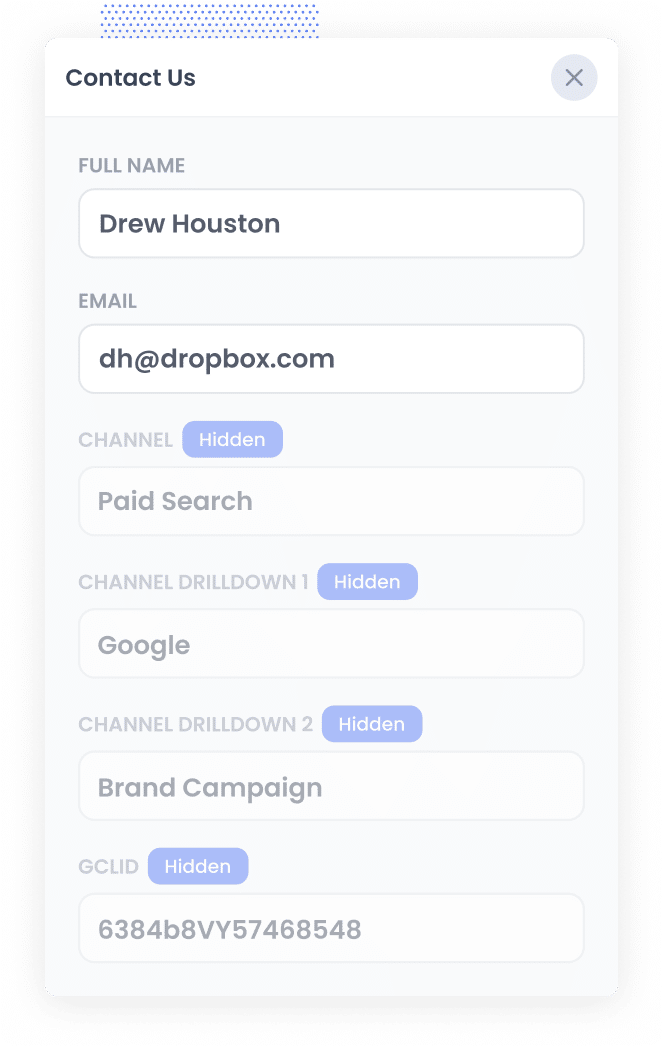
After that, the last thing you need to do is create a hidden field in your Ninja Forms with a default value of [gclid]. This gives Attributer a place to store the GCLID so it is included with every form submission.
2. Attributer writes the GCLID into the hidden field
When someone arrives on your site from your Google Ads, Attributer picks up the GCLID from the URL and stores it in their browser. This means that even if they click around your site for a while before filling out a form, or even if they leave and return later, the original GCLID from that first visit is still kept safe.
Then, when they finally complete a form on your site, Attributer writes that saved GCLID into the hidden field you set up earlier.
3. GCLID is captured with each form submission
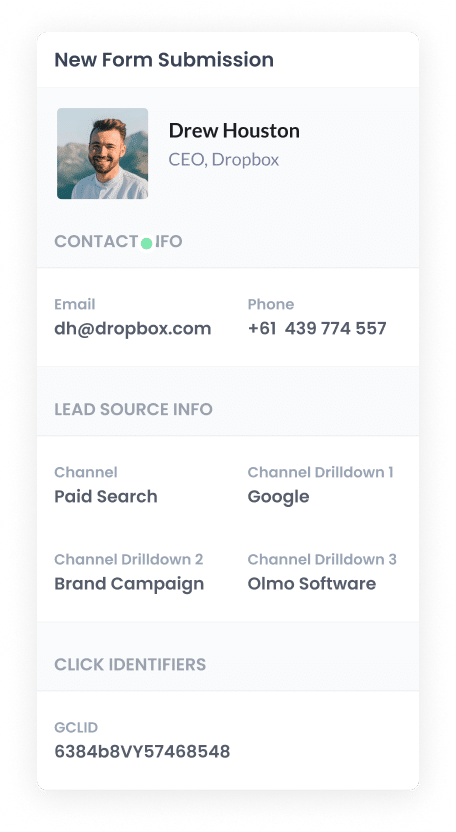
Finally, when the form is submitted, the GCLID is captured in Ninja Forms along with all the other information the lead entered into the form (like their name, email, etc)
You can then send the GCLID to your CRM and other tools using Ninja Forms Add-ons or a 3rd-party integration tool like Zapier.
How to send the GCLID back to Google Ads and mark it as an offline conversion
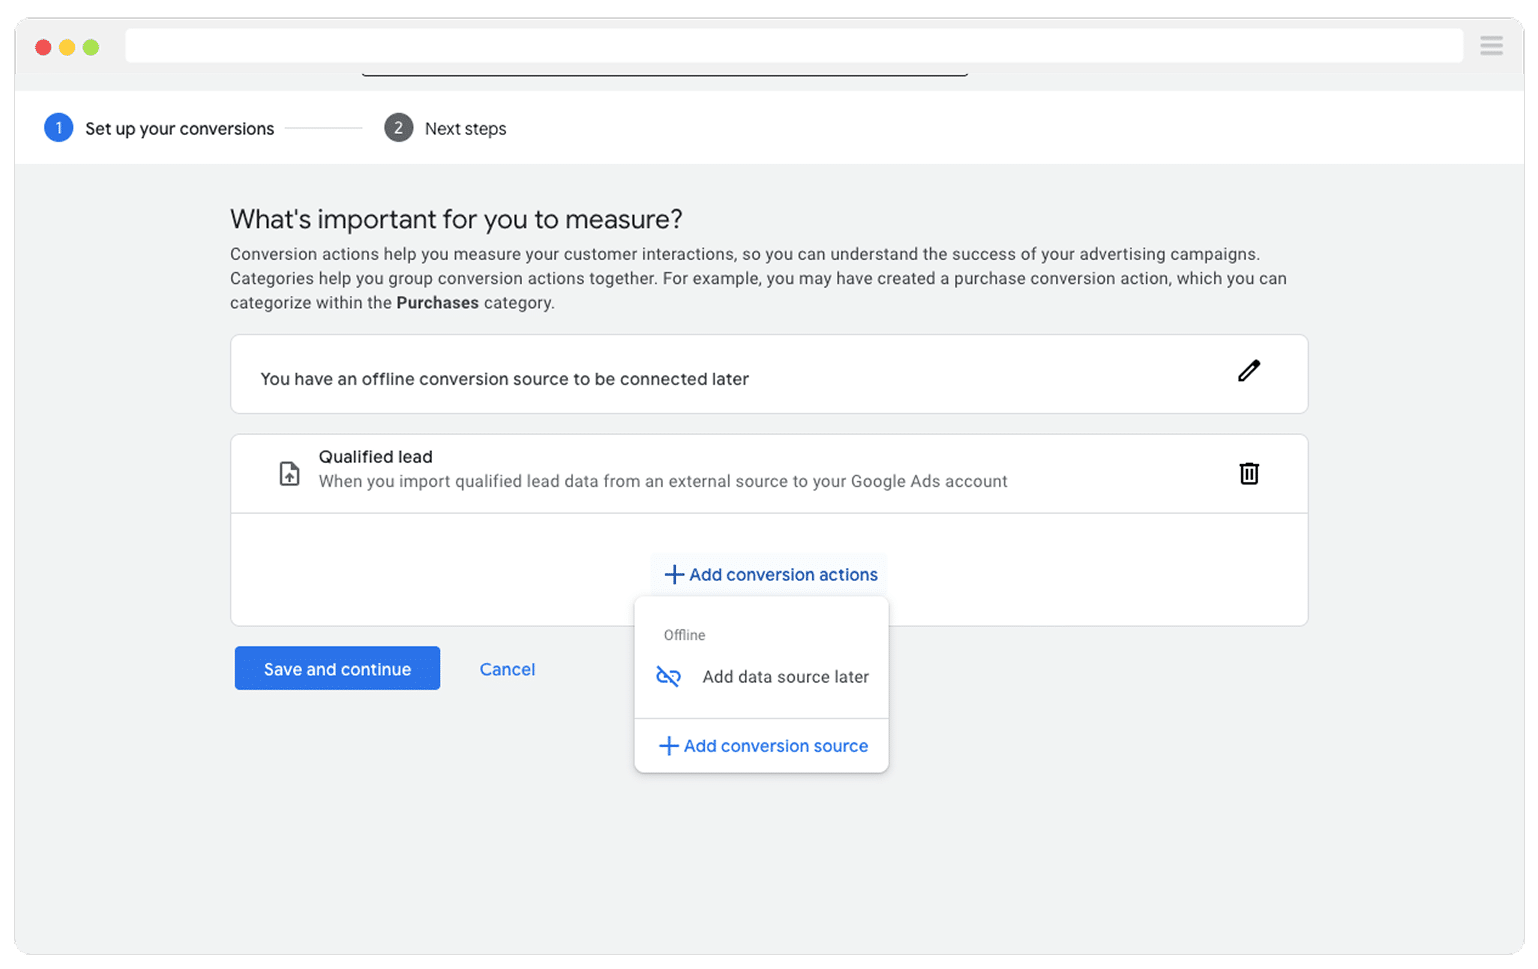
Before you can send the GCLID back into Google Ads, you need to set up a new conversion.
To do this, sign in to your Google Ads account, open the Goals section in the sidebar, and choose Conversions. Once you are on the Conversions page, click the option to create a new conversion and select Offline Conversion from the list.
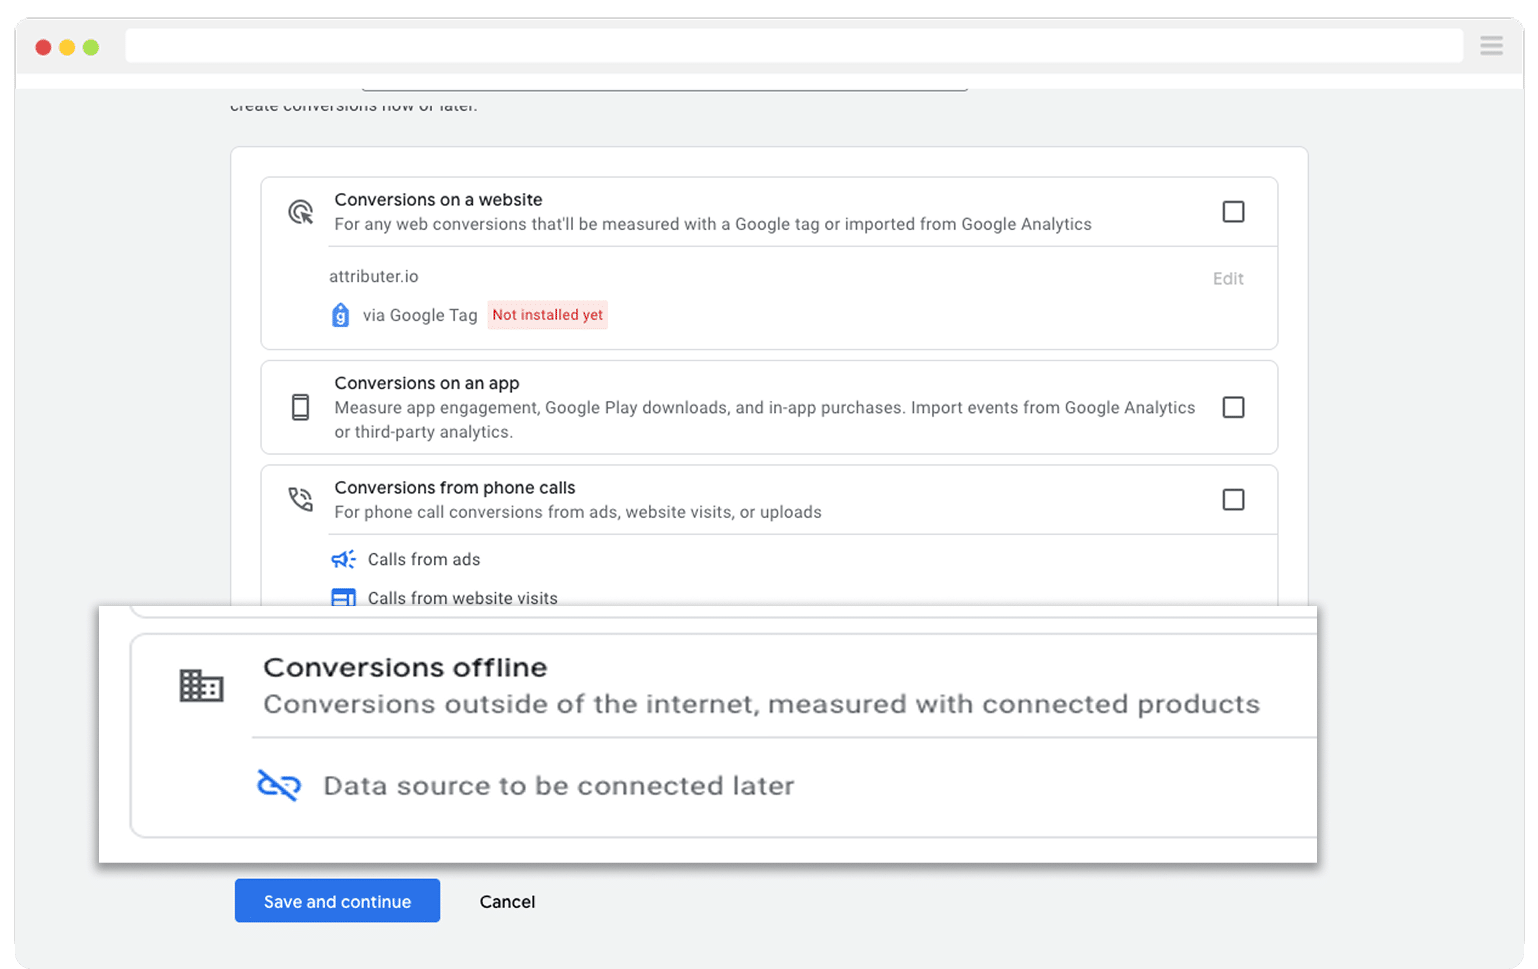
Then, in the final screen when it asks you to add a data source, select the option to ‘Add data source later’.
Once your conversion is ready in Google Ads, the next step is to decide when in your sales process you want to send the GCLID back in. You need to choose the moment that represents a meaningful conversion for your business.
A lot of people wait until a deal is fully closed before sending the conversion to Google Ads. While that sounds logical, it can hold you back. Google smart bidding strategies such as Maximise Conversions, Maximise Conversion Value, or Target CPA usually need at least 50 conversions each month to perform well.
So if you close fewer than 50 deals in a month, it is better to track an earlier moment in the journey, such as when a deal is first created. This gives Google enough data to optimise properly.
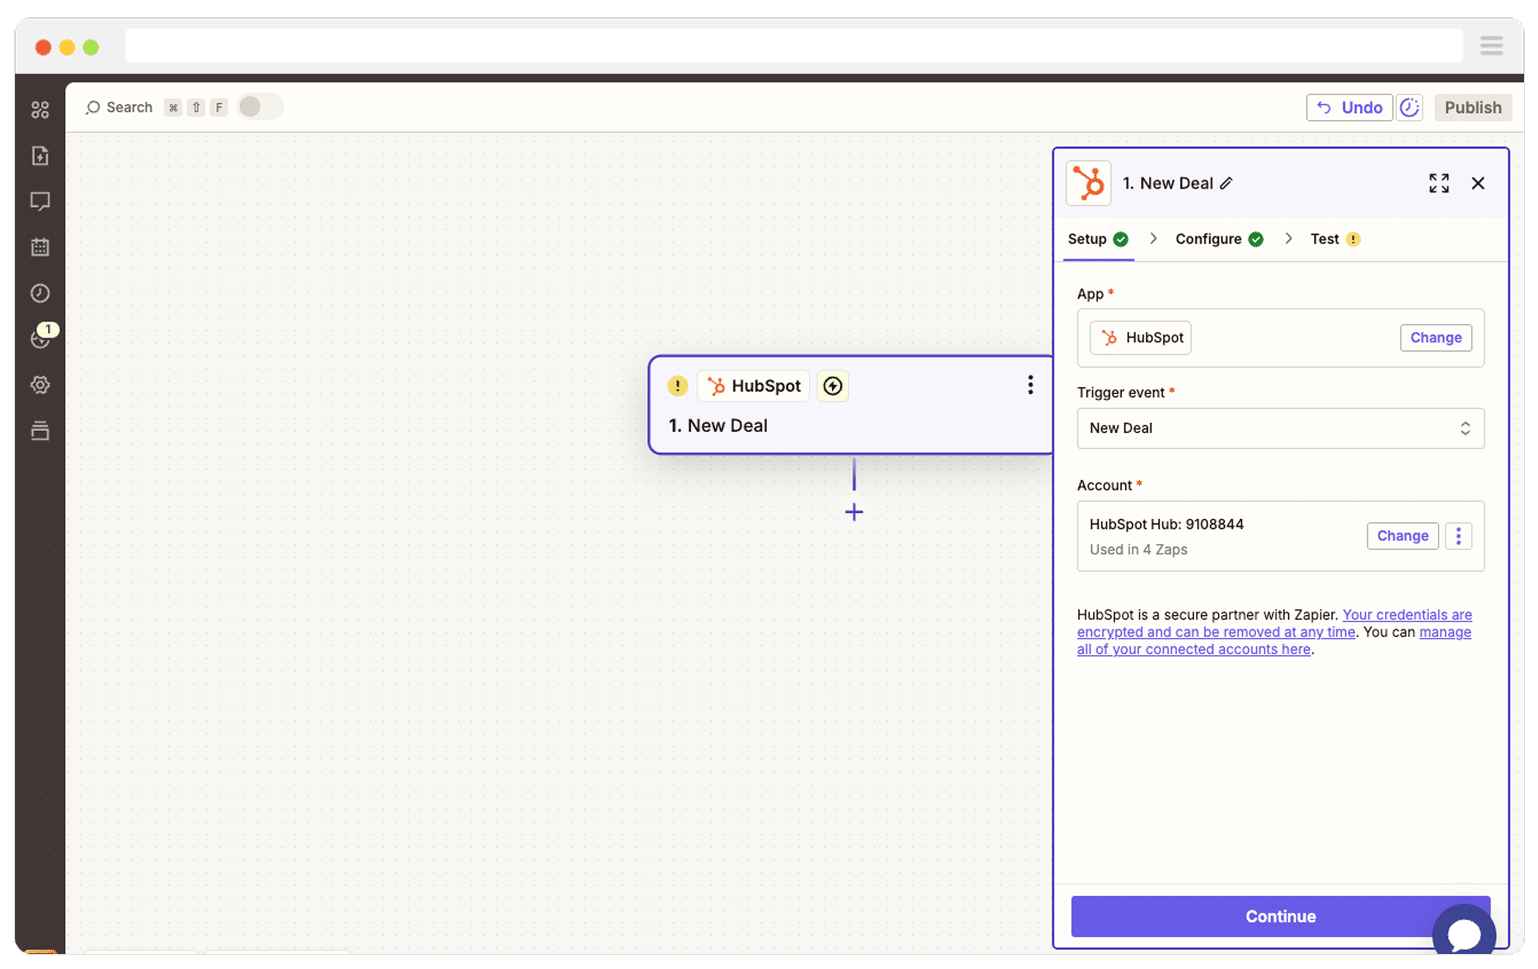
Once you have chosen that point in your funnel, head over to your Zapier account and create a new Zap. Set the trigger to match the moment you picked. So if you want to send the offline conversion to Google Ads when a deal is created for a contact, then that is the trigger you would select.
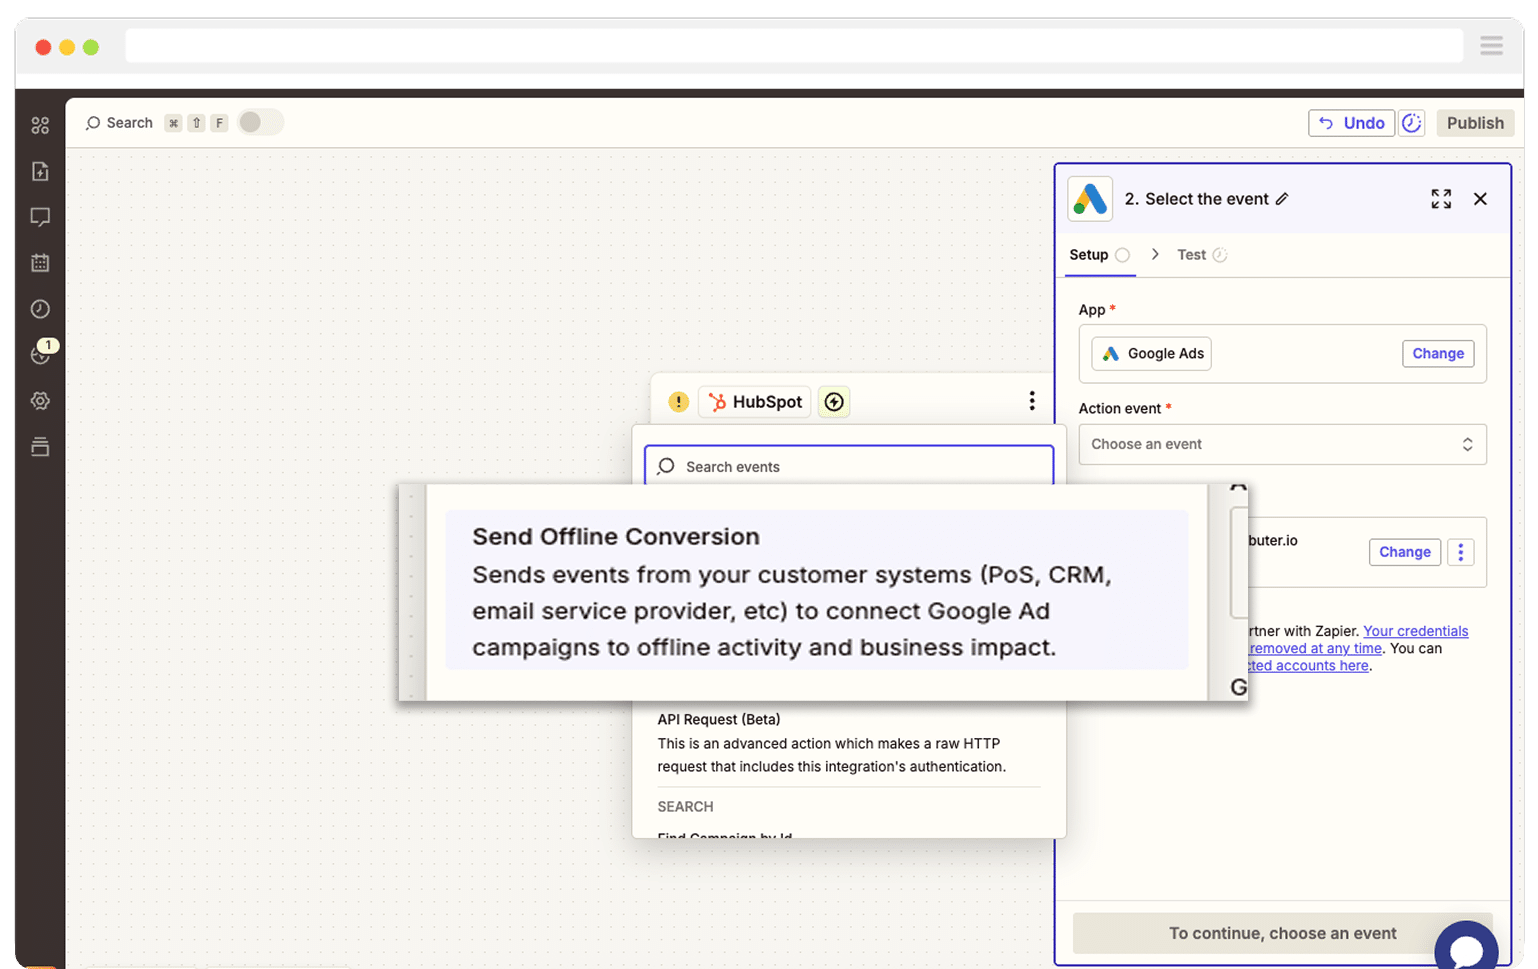
Next, select Google Ads as the Action and then select the ‘Send Offline Conversion’ as the event.
Finally, you just need to map the GCLID from your CRM (or wherever you are storing it) to the correct field in Zapier.

That’s it! You have now set up offline conversions in Google Ads. It’s a good idea to test it’s working before piling money into ads, and you can read more about how to do that here.
Why Attributer is the best way to capture the GCLID in Ninja Forms
There are other options for capturing the GCLID in Ninja Forms, so why choose Attributer?
Here’s why it’s the best approach:
1. Remembers the GCLID as visitors browse your site
Most other methods out there, including the merge tags feature in Ninja Forms, only work if the GCLID is still in the URL at the exact moment someone submits the form.
That becomes a real issue pretty quickly. For example, if someone clicks one of your Google Ads, arrives on your homepage, and then jumps over to your Contact Us page to fill in the form, the GCLID disappears from the URL and nothing gets recorded.
Attributer avoids all of that. It keeps the GCLID safely stored in the visitor’s browser, so even if they browse through a bunch of pages before submitting a form (or leave your site and come back later), the GCLID is still captured every time.
2. Captures UTM parameters as well
Attributer does not stop at capturing the GCLID. It can also collect any UTM parameters you add to your campaigns.
For example, let's say you are running ads for a residential construction company. If someone clicks one of your Google Ads and then completes a form, Attributer would pass the following information into Ninja Forms (depending on what UTM parameters tyou put behind your ads):
- Channel = Paid Search
- Channel Drilldown 1 = Google
- Channel Drilldown 2 = Home Build Campaign
- Channel Drilldown 3 = New Home Builder Sydney
- Channel Drilldown 4 = Free Project Estimate Ad
3. Captures information on users from organic channels
Attributer also provides details on leads who find your site through organic channels such as Organic Search, Organic Social, Referral, or Direct Traffic.
Sticking with the residential construction example, if someone discovers your business through a regular Google search, Attributer can pass through information such as:
- Channel = Organic Search
- Channel Drilldown 1 = Google
- Channel Drilldown 2 = www.google.com (or whatever search engine domain they used)
- Channel Drilldown 3 = Custom Home Builder Sydney (or whatever keyword they searched for, if available)
Wrap Up
If you want to collect the GCLID in Ninja Forms and push it into your CRM and other tools so you can eventually send it back into Google Ads as an offline conversion, Attributer makes the whole process simple.
It keeps the GCLID stored as people explore your website (or even if they leave and come back later), then it includes that information with every form submission.
The best part is that you can try it for free, and the setup generally takes less than 10 minutes. Start your 14-day trial today and begin capturing the GCLID in Ninja Forms right away.
Get Started For Free
Start your 14-day free trial of Attributer today!

About the Author
Aaron Beashel is the founder of Attributer and has over 15 years of experience in marketing & analytics. He is a recognized expert in the subject and has written articles for leading websites such as Hubspot, Zapier, Search Engine Journal, Buffer, Unbounce & more. Learn more about Aaron here.