
The best way to track WPForms submissions as conversions in Google Ads
Get up to 23% more recorded conversions in Google Ads by tracking your WPForms submissions the right way.

Use Attributer to capture the GCLID and other identifiers in WPForms submissions, then send them back to Google Ads as a conversion. This can happen either straight away when the form is submitted, or later when the lead becomes a customer in your CRM.
Google Ads is one of the most effective ways to bring new leads into your business. But setting up proper conversion tracking? That's where most marketers hit a wall.
Google Tag Manager needs custom code to listen for form submissions, then triggers, tags, variables, and a dozen other moving parts on top. Most marketers don't have the time (or the patience) to wire all that up.
And the simpler approaches (like tracking thank you page visits) can miss up to 30% of conversions. Ad blockers stop tracking scripts from firing. Safari and iOS delete tracking cookies within a couple of days. And anyone who clicks your ad on their phone but comes back on their laptop breaks the connection entirely.
So what's actually the best way to do it?
In this article, we'll walk you through the best way to track WPForms submissions as conversions in Google Ads, using an approach called server side tracking.
Why server side tracking in Google Ads matters
The common ways to track conversions in Google Ads have some serious flaws. Tracking thank you page visits or firing events through Google Tag Manager can quietly miss up to 30% of your actual conversions.
There are a few reasons this happens:
- Ad blockers - Ad blockers stop the Google Tag from running on your site, which means everything that happens on your site goes untracked.
- Browser privacy features - Browsers like Safari have built-in technologies that block Google's tag from tracking visitors beyond a day or two. So if someone clicks your ad and comes back to convert 3 days later, there is no way to know the person who just converted actually clicked your ad a few days ago.
- Multiple devices - People might click your ad on their work laptop but convert later on their home computer or phone. Traditional browser tracking can't stitch those sessions together.
Server-side tracking gets around all of this. Instead of relying on the visitor's browser (a chaotic environment full of privacy settings, ad blockers, and device changes you don't control), you send the conversion data directly to Google's servers.
This has been proven to work significantly better. In fact, Google's own data shows that server-side tracking typically results in a 23% average increase in total recorded conversions and a 10% reduction in cost per conversion (because Google's algorithms have more accurate data to learn from and can serve your ads more effectively).
How to track WPForms submissions in Google Ads using server side conversion tracking
There are actually a couple of ways to set this up, and it really comes down to when you want to fire the conversion event in Google Ads.
Option 1: When a lead submits the form
Tools like Converly make it easy to send server side conversions to Google Ads every time someone submits a WPForms form on your site.
Instead of wrestling with Google Tag Manager, writing custom code to listen for form submissions, extracting the lead's data, hashing it with SHA 256, and sending it to Google's API, Converly gives you a simple, visual builder for putting the whole conversion flow together.
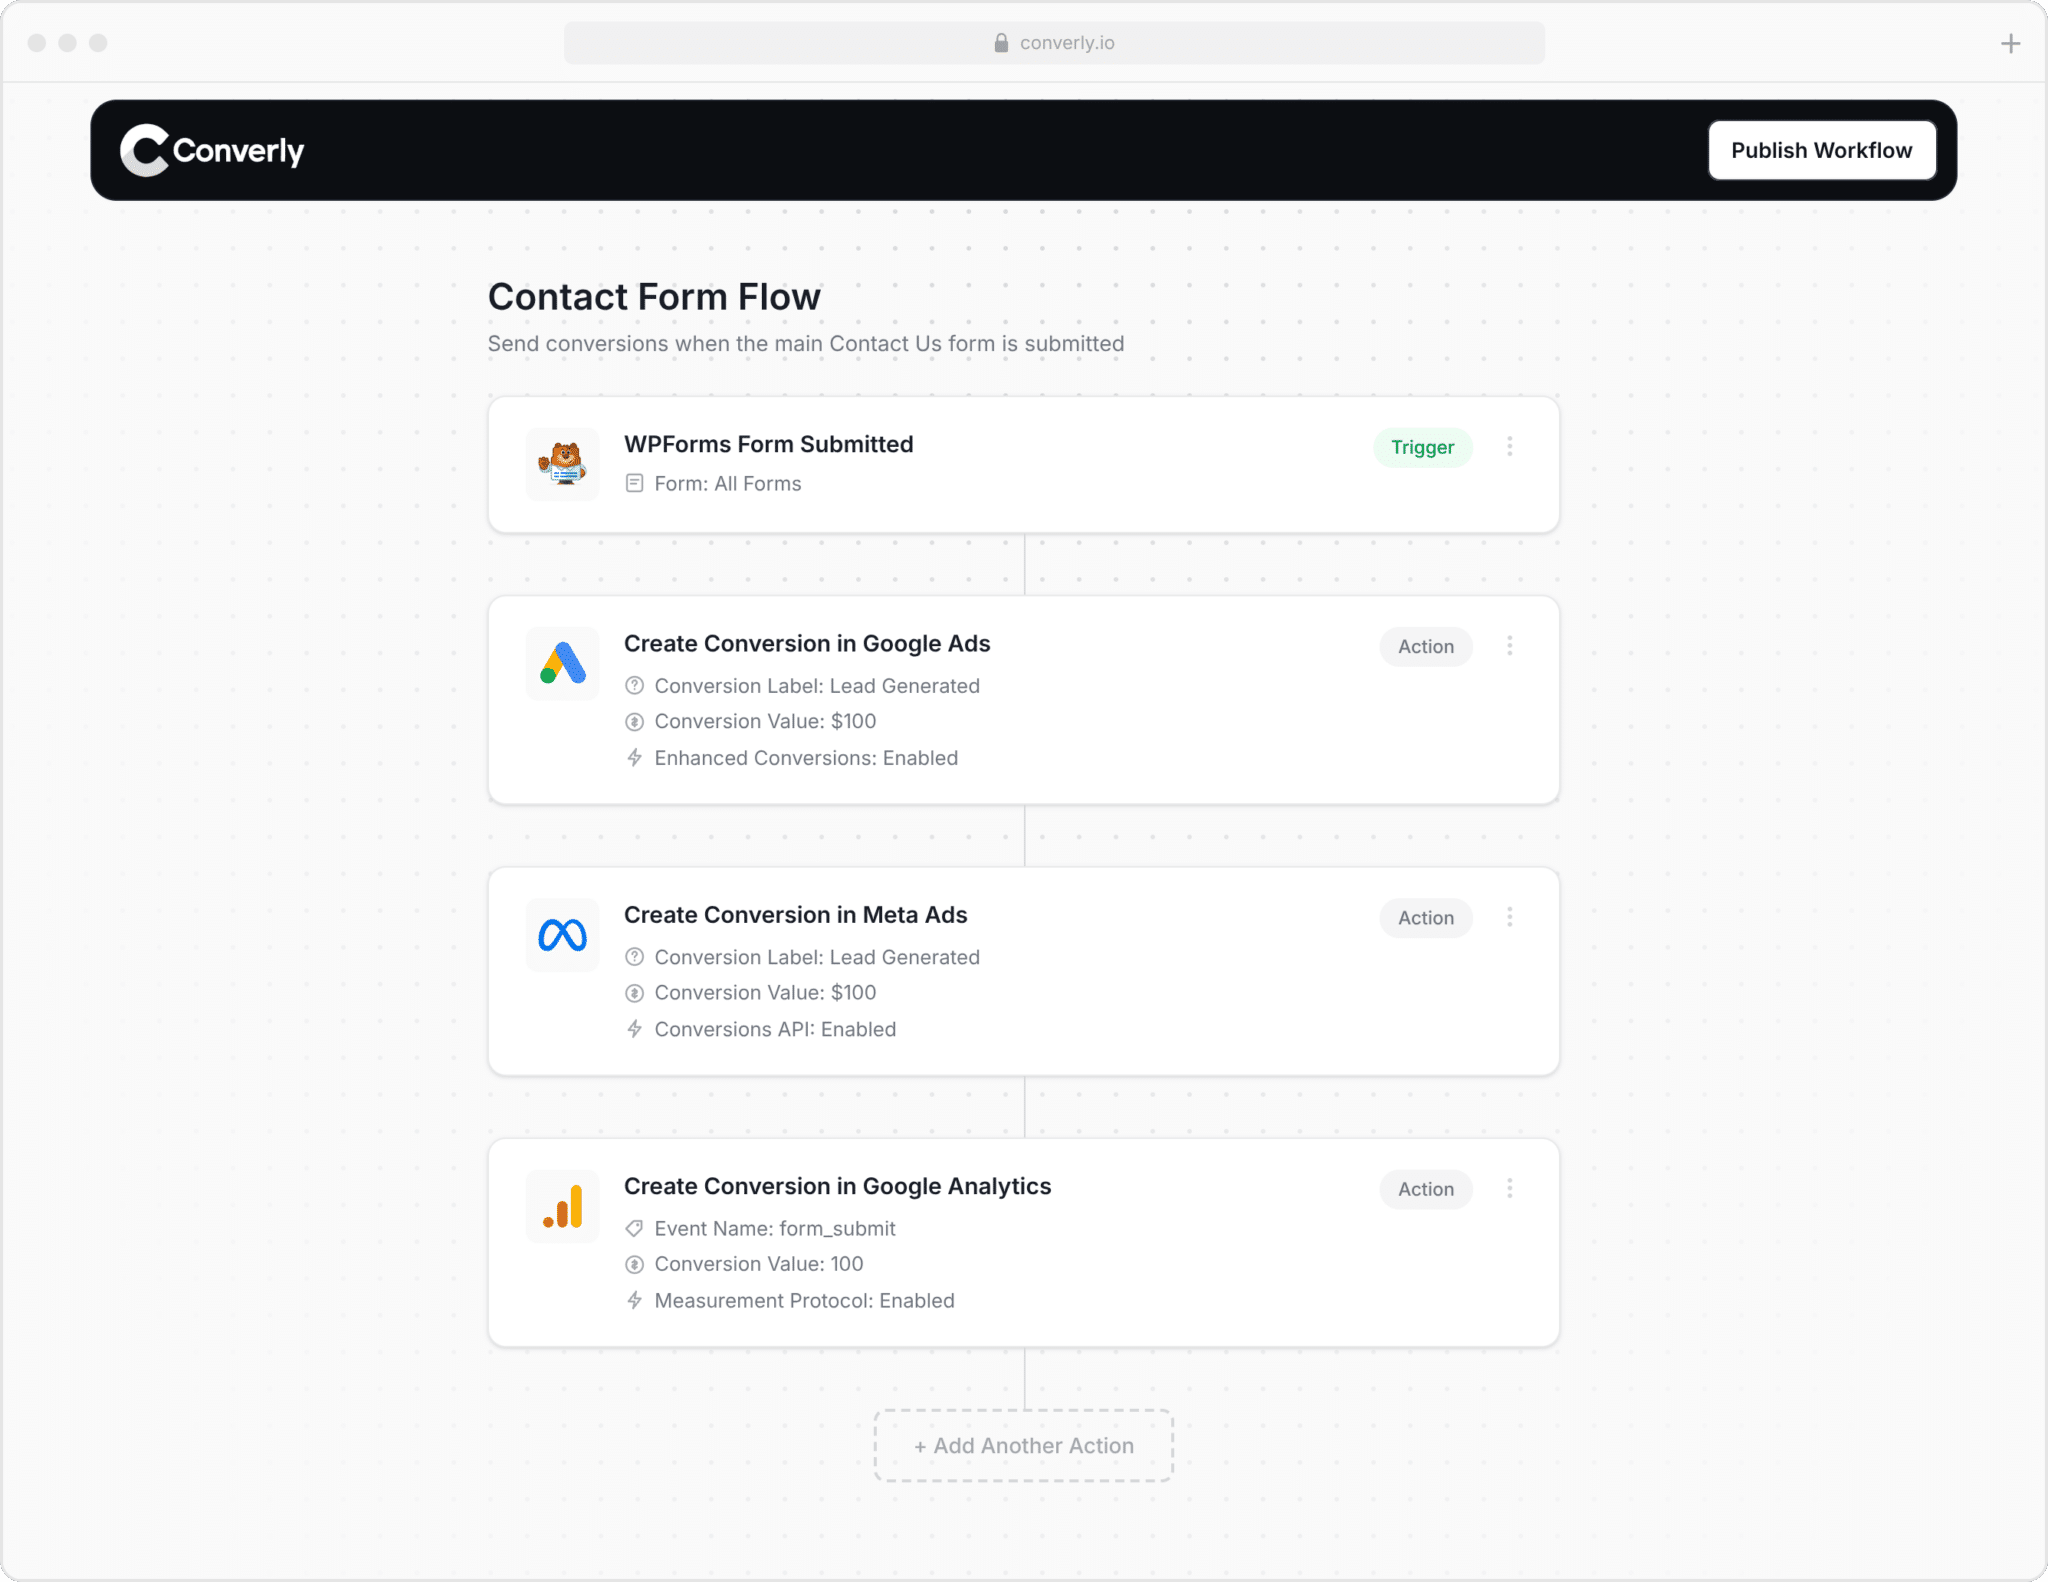
You pick a trigger (like a WPForms form being submitted on your site) and then pick the actions you want to happen (like firing a conversion in Google Ads).
From there, Converly automatically detects when a form gets submitted, extracts the user's name, email, phone number, etc, hashes it with SHA 256, and sends it off to Google Ads. It also captures all the extra context about the user and their visit (the GCLID, GBRAID, WBRAID, User Agent, and more) and sends that along with the conversion, giving Google the best possible chance of matching the conversion back to the exact campaign, ad, and keyword that originally brought the lead in.
The end result is all the benefits of server side tracking (a 23% average increase in total recorded conversions, a 10% reduction in cost per conversion) without ever needing to write custom code, learn what SHA 256 is, or figure out how to send events to Google's API.
Option 2: When a lead becomes a customer
If you generate leads through WPForms and send them through to a CRM like Salesforce, Pipedrive, or HubSpot, you can also send conversions back to Google Ads later in the sales cycle (when a lead becomes a paying customer, for example).
The way this works is pretty straightforward: capture some extra information with each form submission, pass it to your CRM, and fire a conversion back to Google Ads later when the right milestone is reached. Here's how it works step by step:
1. Install Attributer on your website and add a hidden field

To get started, sign up for a 14 day free trial of Attributer. You'll be given a small snippet of code to install on your website.
Next, you need to add a series of hidden fields to your WPForms forms, including:
- GCLID
- WBRAID
- GBRAID
- User Agent
WPForms has a drag and drop form builder that makes this easy. Open the form you want to edit, drag a Hidden Field (found under Fancy Fields) onto the form for each of the 4 values above, and give each one the field name Attributer expects. You'll find the exact field names to use in Attributer's help docs. One note: the Hidden Field is a Pro feature in WPForms, so you'll need a Pro or higher license to use it.
2. Attributer writes data into the hidden fields
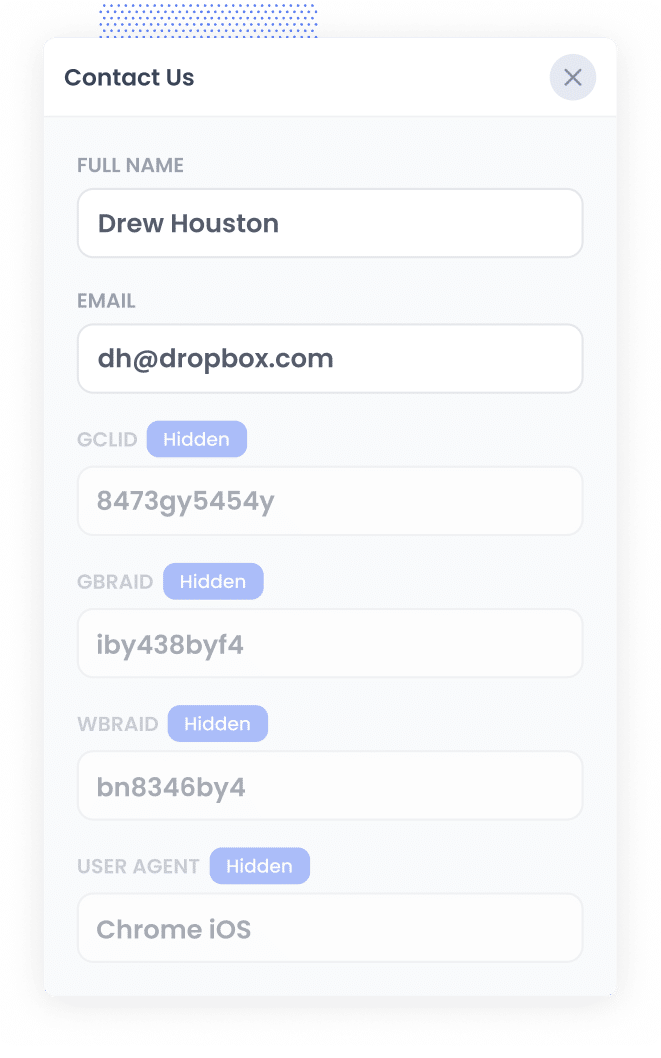
Once the Attributer code is live on your site, it'll start tracking where every visitor came from.
When someone clicks one of your Google Ads and lands on your site, Attributer grabs all the identifiers Google Ads needs for a server side conversion (the GCLID, GBRAID, WBRAID, User Agent, and so on) and stores them in the visitor's browser.
Then when that visitor submits a WPForms form on your site, Attributer automatically writes those values into the hidden fields you added earlier, and they get captured along with the rest of the form submission.
3. Data is sent to your CRM
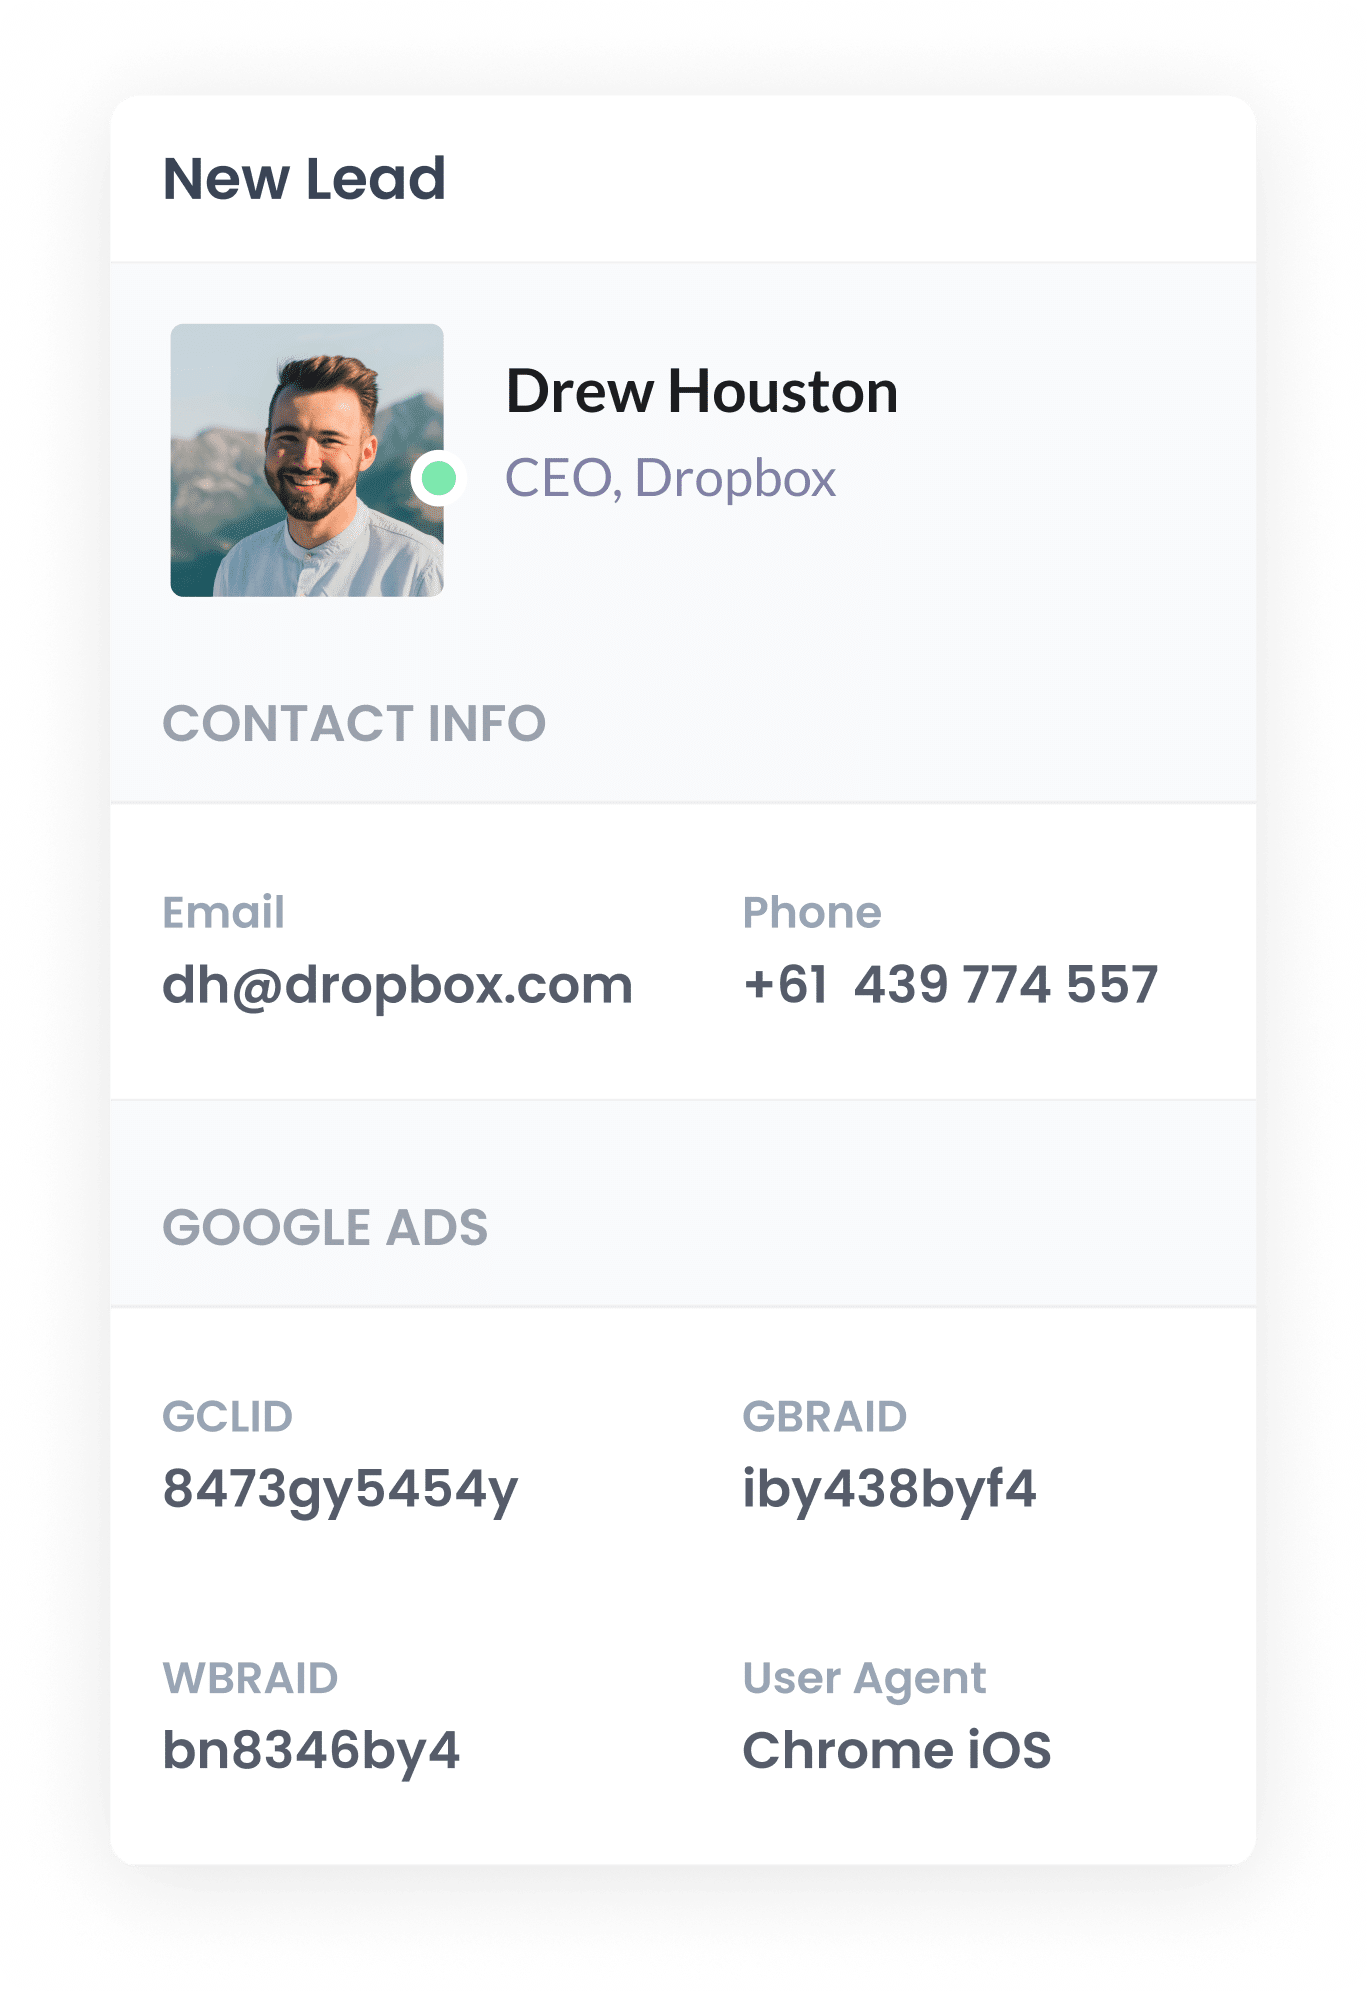
Once the data is captured with the form submission, you can send it to your CRM alongside the lead's name, email, phone number, and anything else they entered. WPForms has native addon integrations for most of the major CRMs (Salesforce, HubSpot, Zoho, Pipedrive, ActiveCampaign, and more), and a Zapier addon for everything else.
From there, the data lives on the contact or lead record in your CRM, ready to use when the conversion needs to be fired back to Google Ads.
4. Send the data to Google Ads
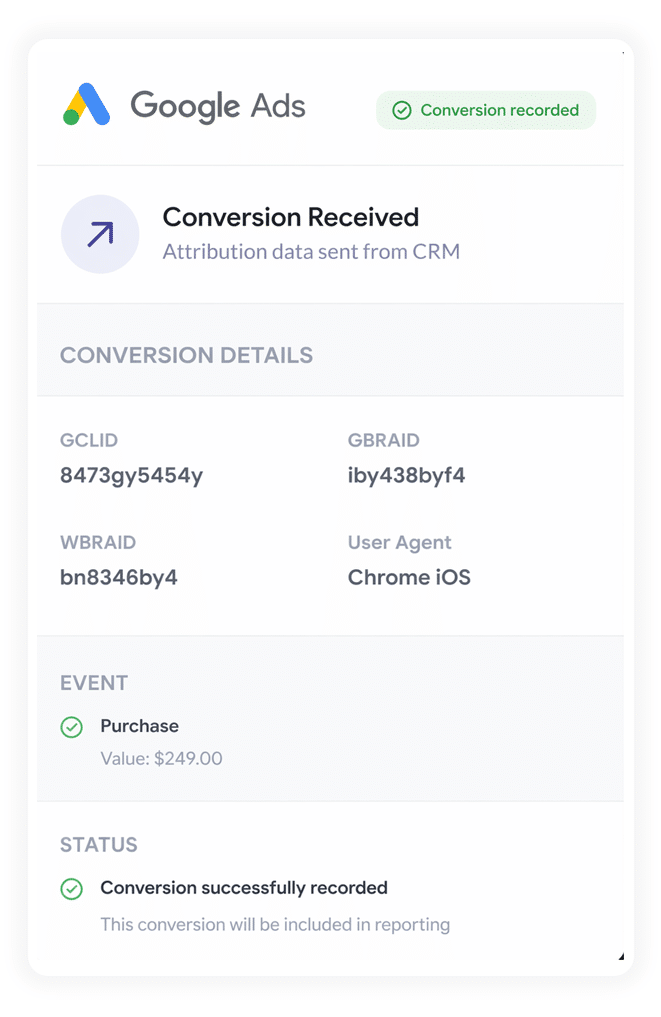
When the lead hits a milestone in your CRM (a new deal being created, a deal being closed, the lead becoming a paying customer, etc), that's when you send the data back to Google Ads to mark the conversion.
Zapier and Make are great for this. They connect to just about any CRM, and you can set them up to trigger a Google Ads conversion at any point in the journey. They also give you a clean visual interface for mapping the data Attributer captured (the GCLID, GBRAID, WBRAID, User Agent, and so on) to the right fields in Google Ads.
Why sending server side conversions to Google Ads is the best approach
At a high level, server side tracking beats client side tracking (tracking things that happen in the browser) because the data you get is much more accurate.
With client side tracking, everything depends on the visitor's browser, which is a chaotic environment you don't control. Server side tracking moves the conversion event onto a server, creating a controlled environment that privacy settings and ad blockers can't interfere with.
Here are the 4 main reasons server side tracking is the most effective way to track conversions:
1. Overcomes ad blockers
Traditional tracking (like tracking thank you page visits or using Google Tag Manager) relies on scripts that have to load in the visitor's browser. Ad blockers and privacy focused browsers routinely stop those scripts from firing.
And recent research suggests that more than 30% of internet users are now running some sort of ad blocker.
Server side tracking sidesteps this entirely. The conversion data is sent directly to Google's servers, so ad blockers never get a chance to stop it. Every lead gets counted.
2. Bypasses Safari & iOS privacy limitations
Apple's Intelligent Tracking Prevention (ITP) deletes tracking cookies within a couple of days. That means if someone clicks your ad today but doesn't convert until next week, the connection between the original click and the conversion is gone and the conversion cannot be attributed to your Google Ads campaigns.
With server-side tracking, you can use the lead's email as a permanent identifier that links them back to their original ad click, no matter how long ago that click happened.
3. Works across devices
It's pretty common for a lead to first visit your site on their phone while they're out and about, but wait until they're sitting at a laptop to fill out a form.
Traditional browser tracking can't connect those two sessions because they happen on different devices. But when you send identity data (name, email, and so on) from the server, Google can stitch those visits together and give your ads the credit they deserve for starting the journey.
4. Eliminates duplicate and messy data
On top of everything else, browser-based tracking is prone to other glitches: double-counting from page refreshes, missing data when pages load slowly, and lost events when someone's connection drops mid-load.
Server-side tracking is much more precise because it only fires a conversion when a form is actually successfully submitted (not when someone happens to load a thank-you page). That means the conversion counts in Google Ads line up much more closely with the real lead numbers in your CRM.
3 reports you can run when you properly send conversions to Google Ads from WPForms
Over my 15 years running marketing for various companies, I've spent millions on Google Ads and run hundreds of reports to track how those campaigns were performing.
Below are 3 of the reports I've found most useful over the years for understanding which campaigns are actually paying off:
1. Conversions by Keyword
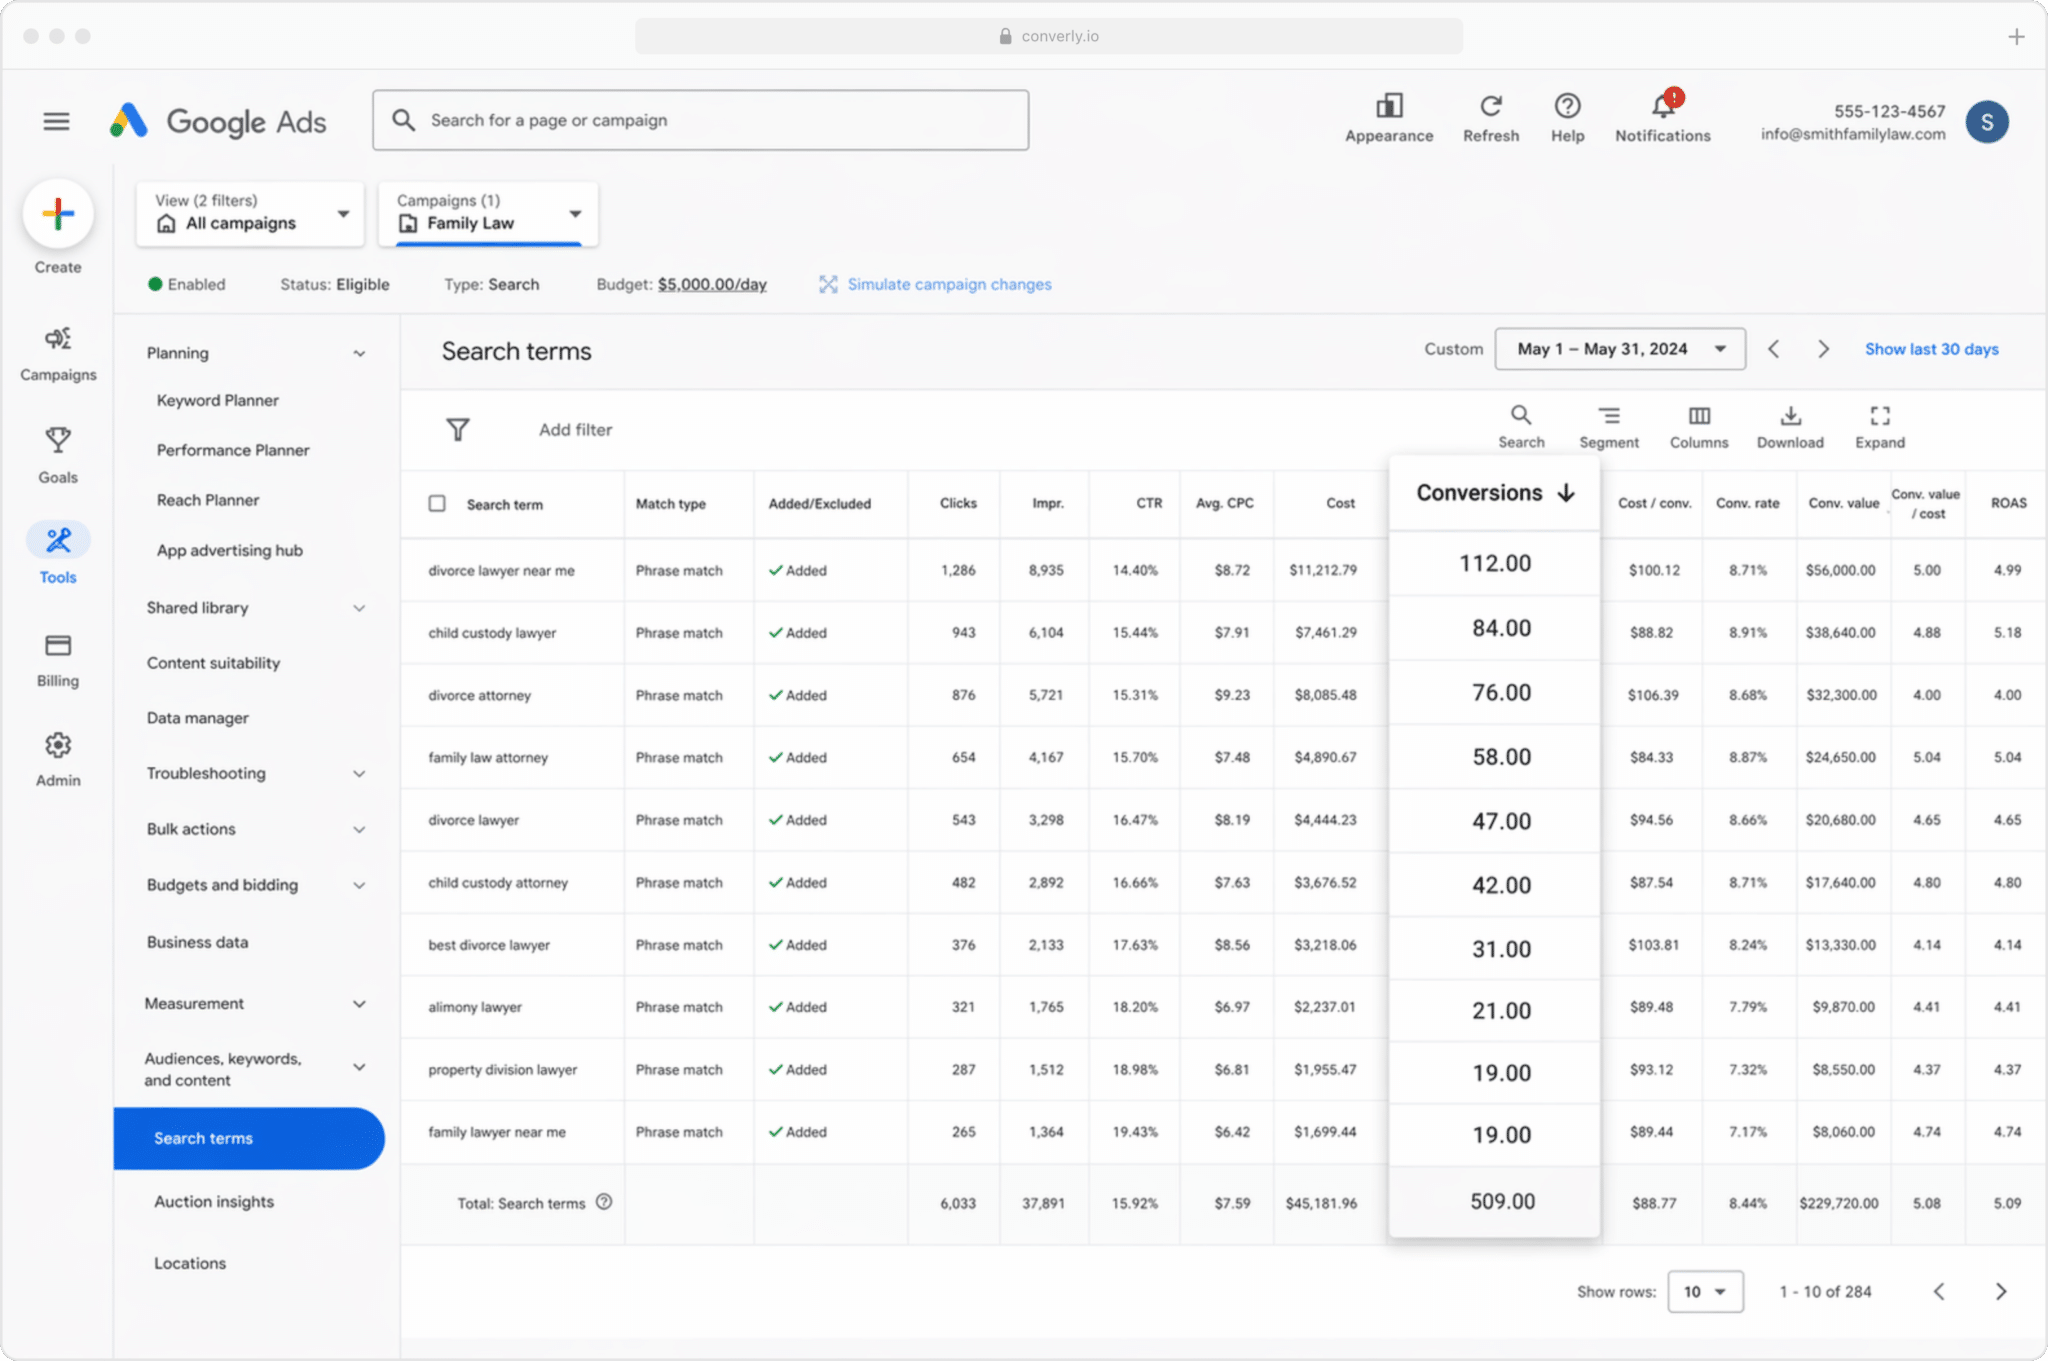
Like most businesses running Google Ads, you're probably bidding on multiple keywords across a handful of different campaigns (maybe for the different services you offer, like personal injury law versus family law).
If so, this report shows you which specific keywords are generating actual conversions for your business, rather than just impressions and clicks that never turn into real leads.
It's the fastest way to figure out which keywords are profitable and which ones aren't, so you know exactly where to put more budget for the best return.
2. Conversion Value by Campaign
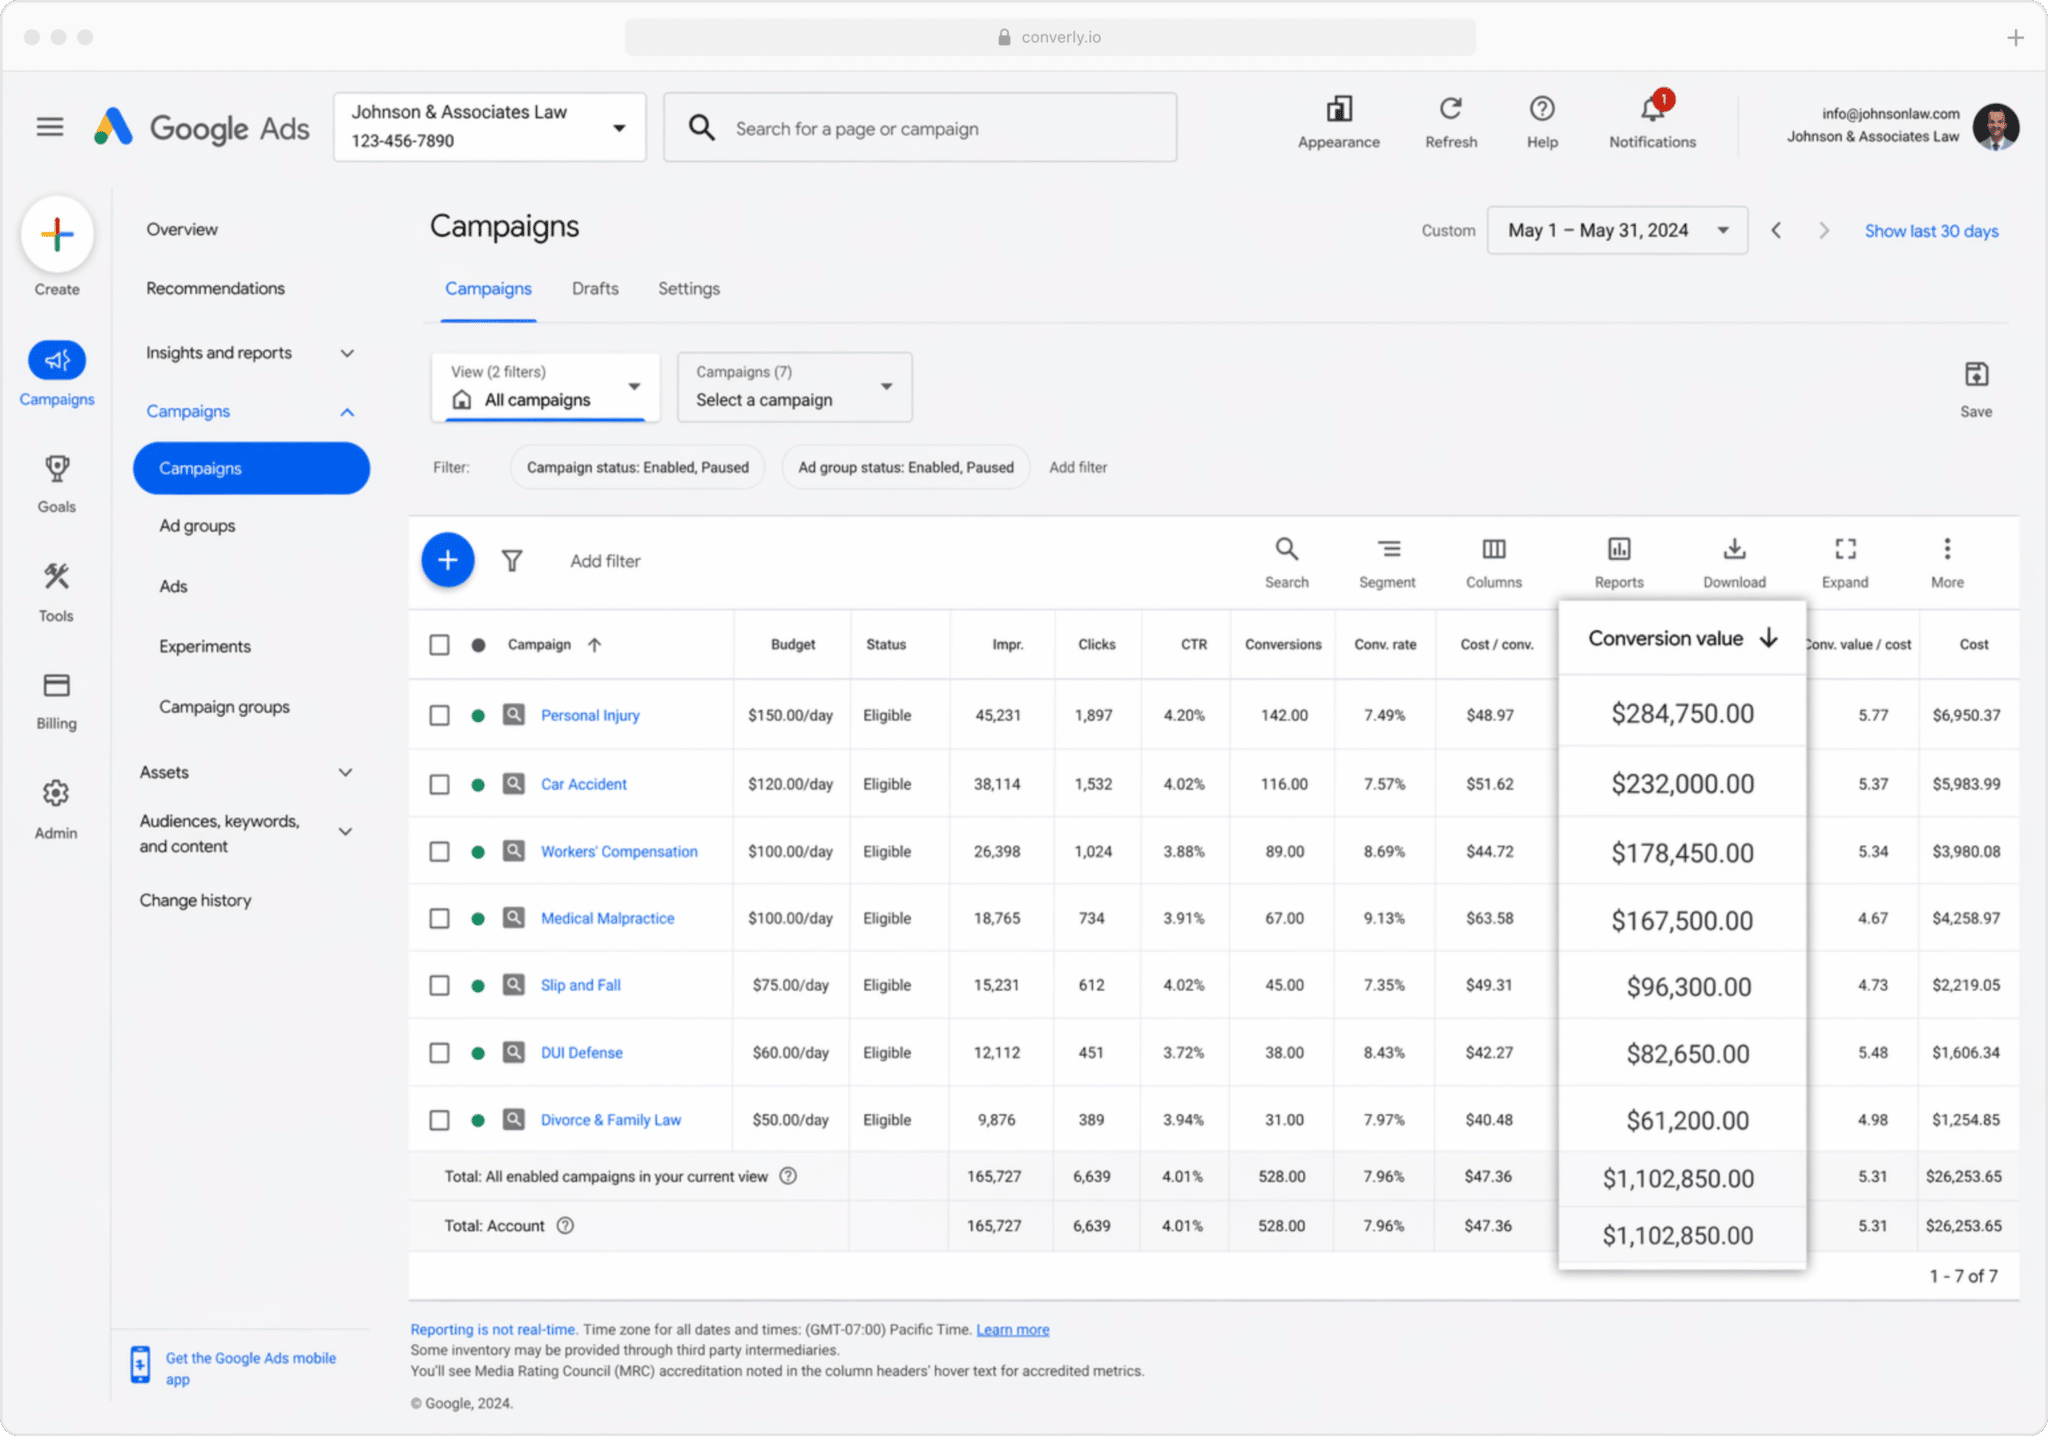
When you're sending conversions back to Google Ads from your CRM, you can also include the value of each conversion (pulled directly from the value of the deal or opportunity in your CRM).
This matters because not all customers are equal. If you run a law firm, a new customer from your 'contract review' campaign is probably nowhere near as profitable as a new customer from your 'litigation' campaign, so treating them as equivalent distorts the real picture.
When you pass a conversion value from your CRM to Google Ads, you can run reports that show exactly how much revenue each campaign has generated. That makes it much easier to decide where to put more budget and where to pull back.
3. Conversions by Geography
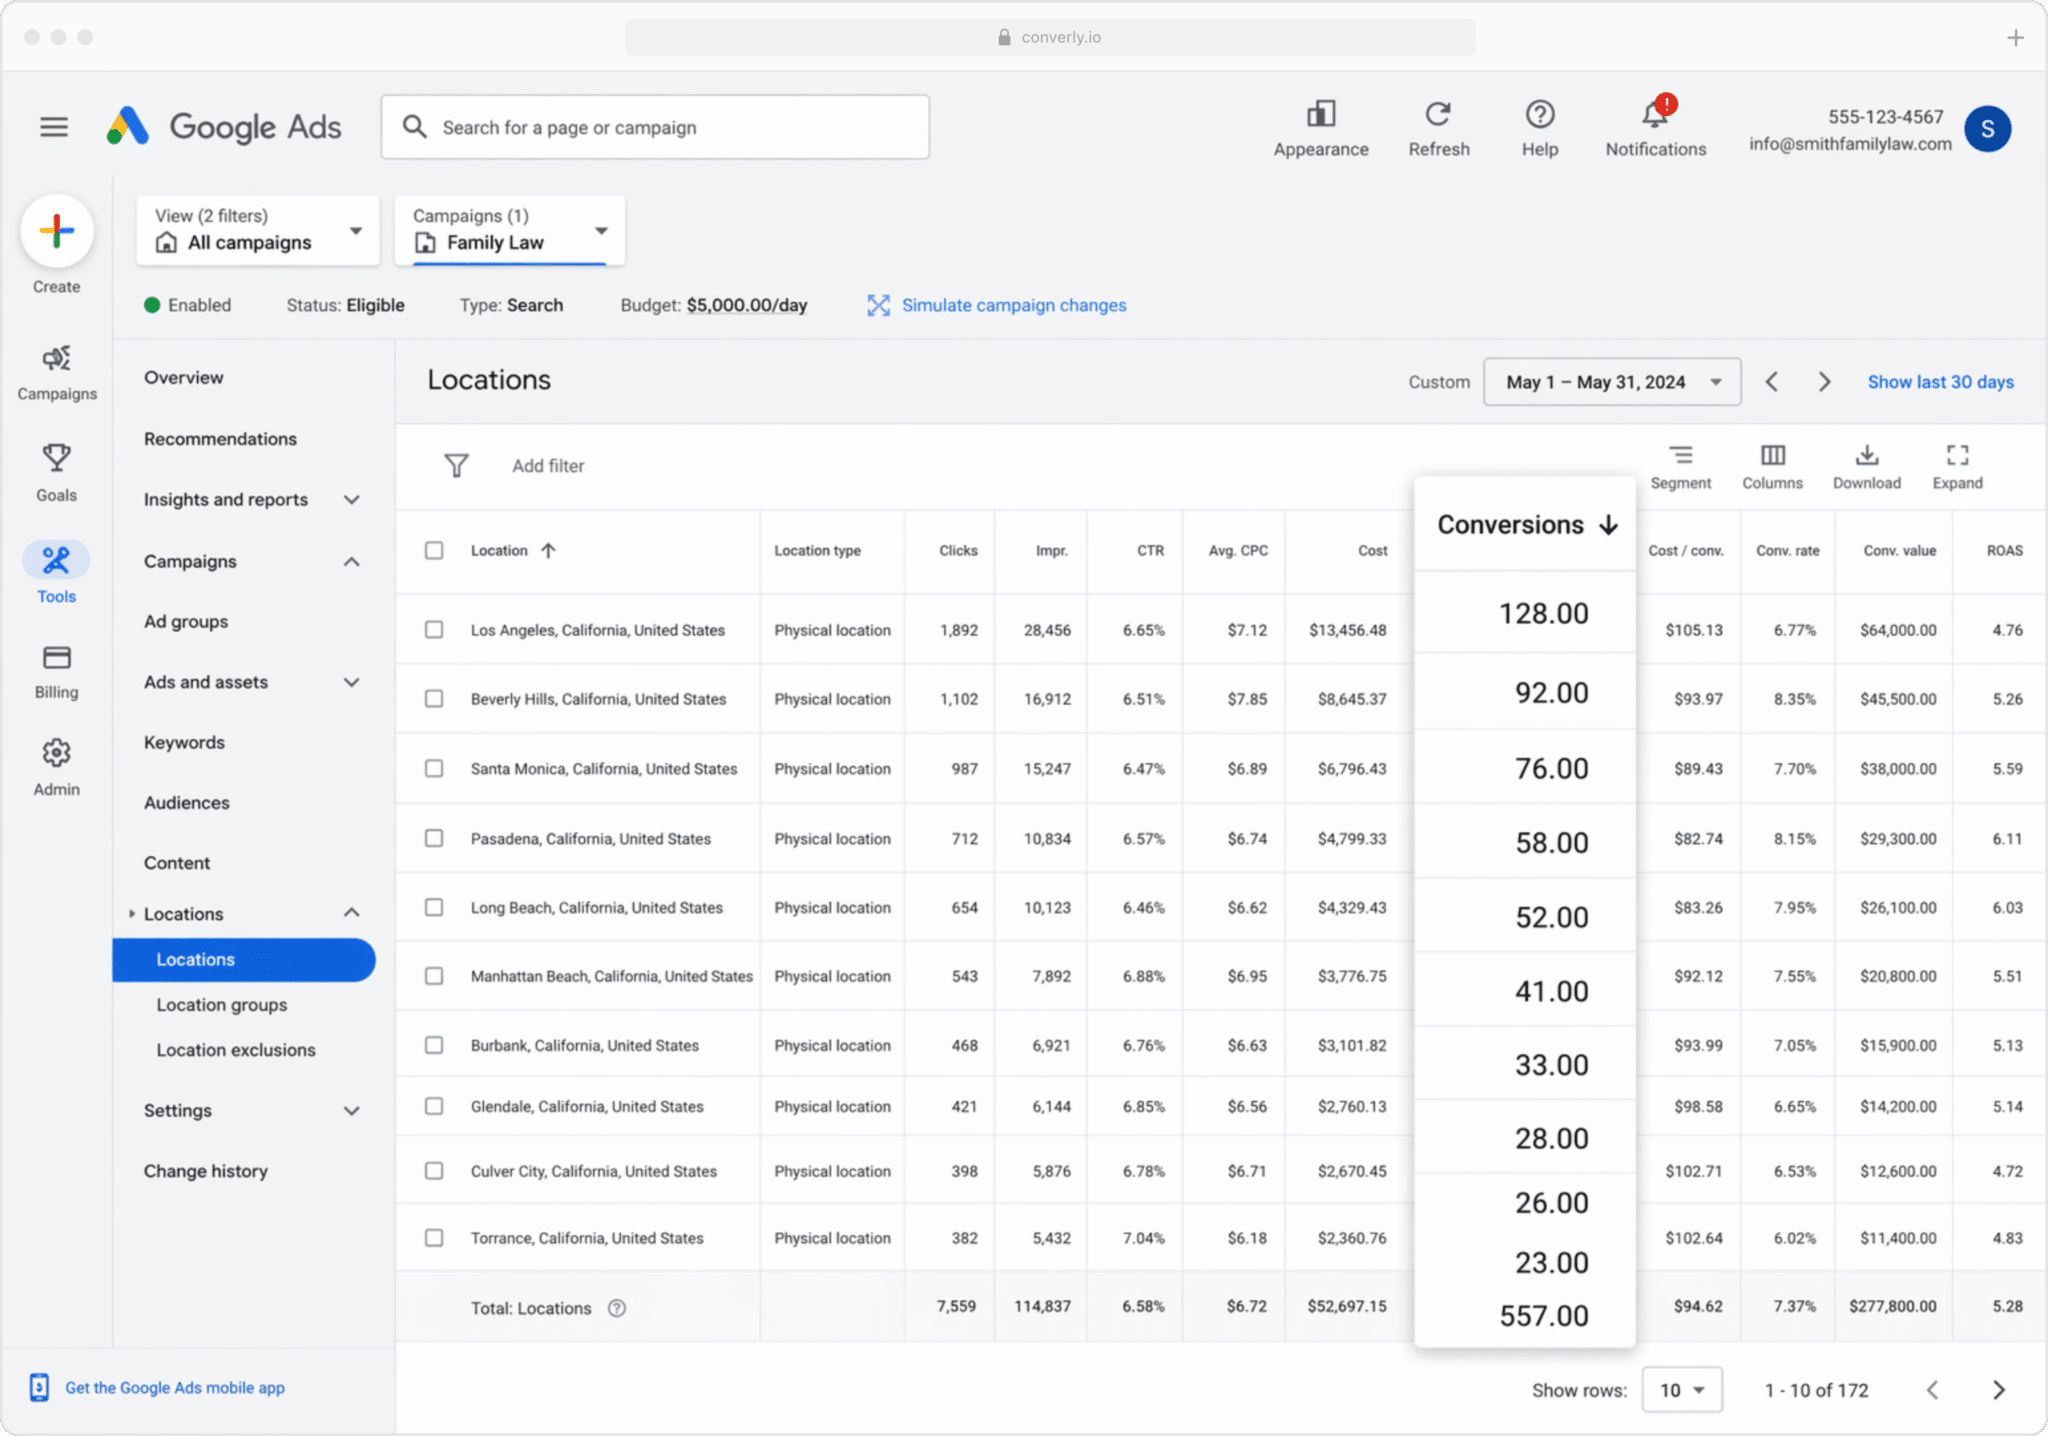
This one is especially useful for businesses that serve a local market (boutique law firms, accounting firms, construction companies, etc). It shows how many conversions each geographical region generated.
You can view this at a high level (country, state, or city), or drill down to a specific postcode. That lets you see whether your leads are actually coming from your target service areas, or whether you're wasting budget on clicks from suburbs too far out to profitably serve.
Once you've got this data, you can use Google's Location Bid Adjustments to sharpen up your results. Tell Google to bid more aggressively in the postcodes that produce your most profitable customers, and lower bids (or stop spending altogether) in the areas that generate clicks but never fill out your forms.
Wrap up
Sending conversions to Google Ads can dramatically improve the results you're getting. It gives you the data you need to make manual adjustments (like bidding more on certain keywords or geographies), and it also feeds Google's algorithms the data they need to make smarter automated bidding decisions.
But it only works if the conversion data is accurate. If you're tracking thank you page visits or firing events in the browser through Google Tag Manager, you're sending incomplete data, and your Google Ads performance will suffer for it.
So whether you fire the conversion on form submission or when the lead becomes a customer, make sure you're sending it server side. That's where Attributer and WPForms come in.
Get Started For Free
Start your 14-day free trial of Attributer today!

About the Author
Aaron Beashel is the founder of Attributer and has over 15 years of experience in marketing & analytics. He is a recognized expert in the subject and has written articles for leading websites such as Hubspot, Zapier, Search Engine Journal, Buffer, Unbounce & more. Learn more about Aaron here.