
3 ways to send conversions to Meta Ads from HubSpot
Learn the 3 different ways to set up conversion tracking in Meta Ads when you use HubSpot as your CRM and/or marketing tool
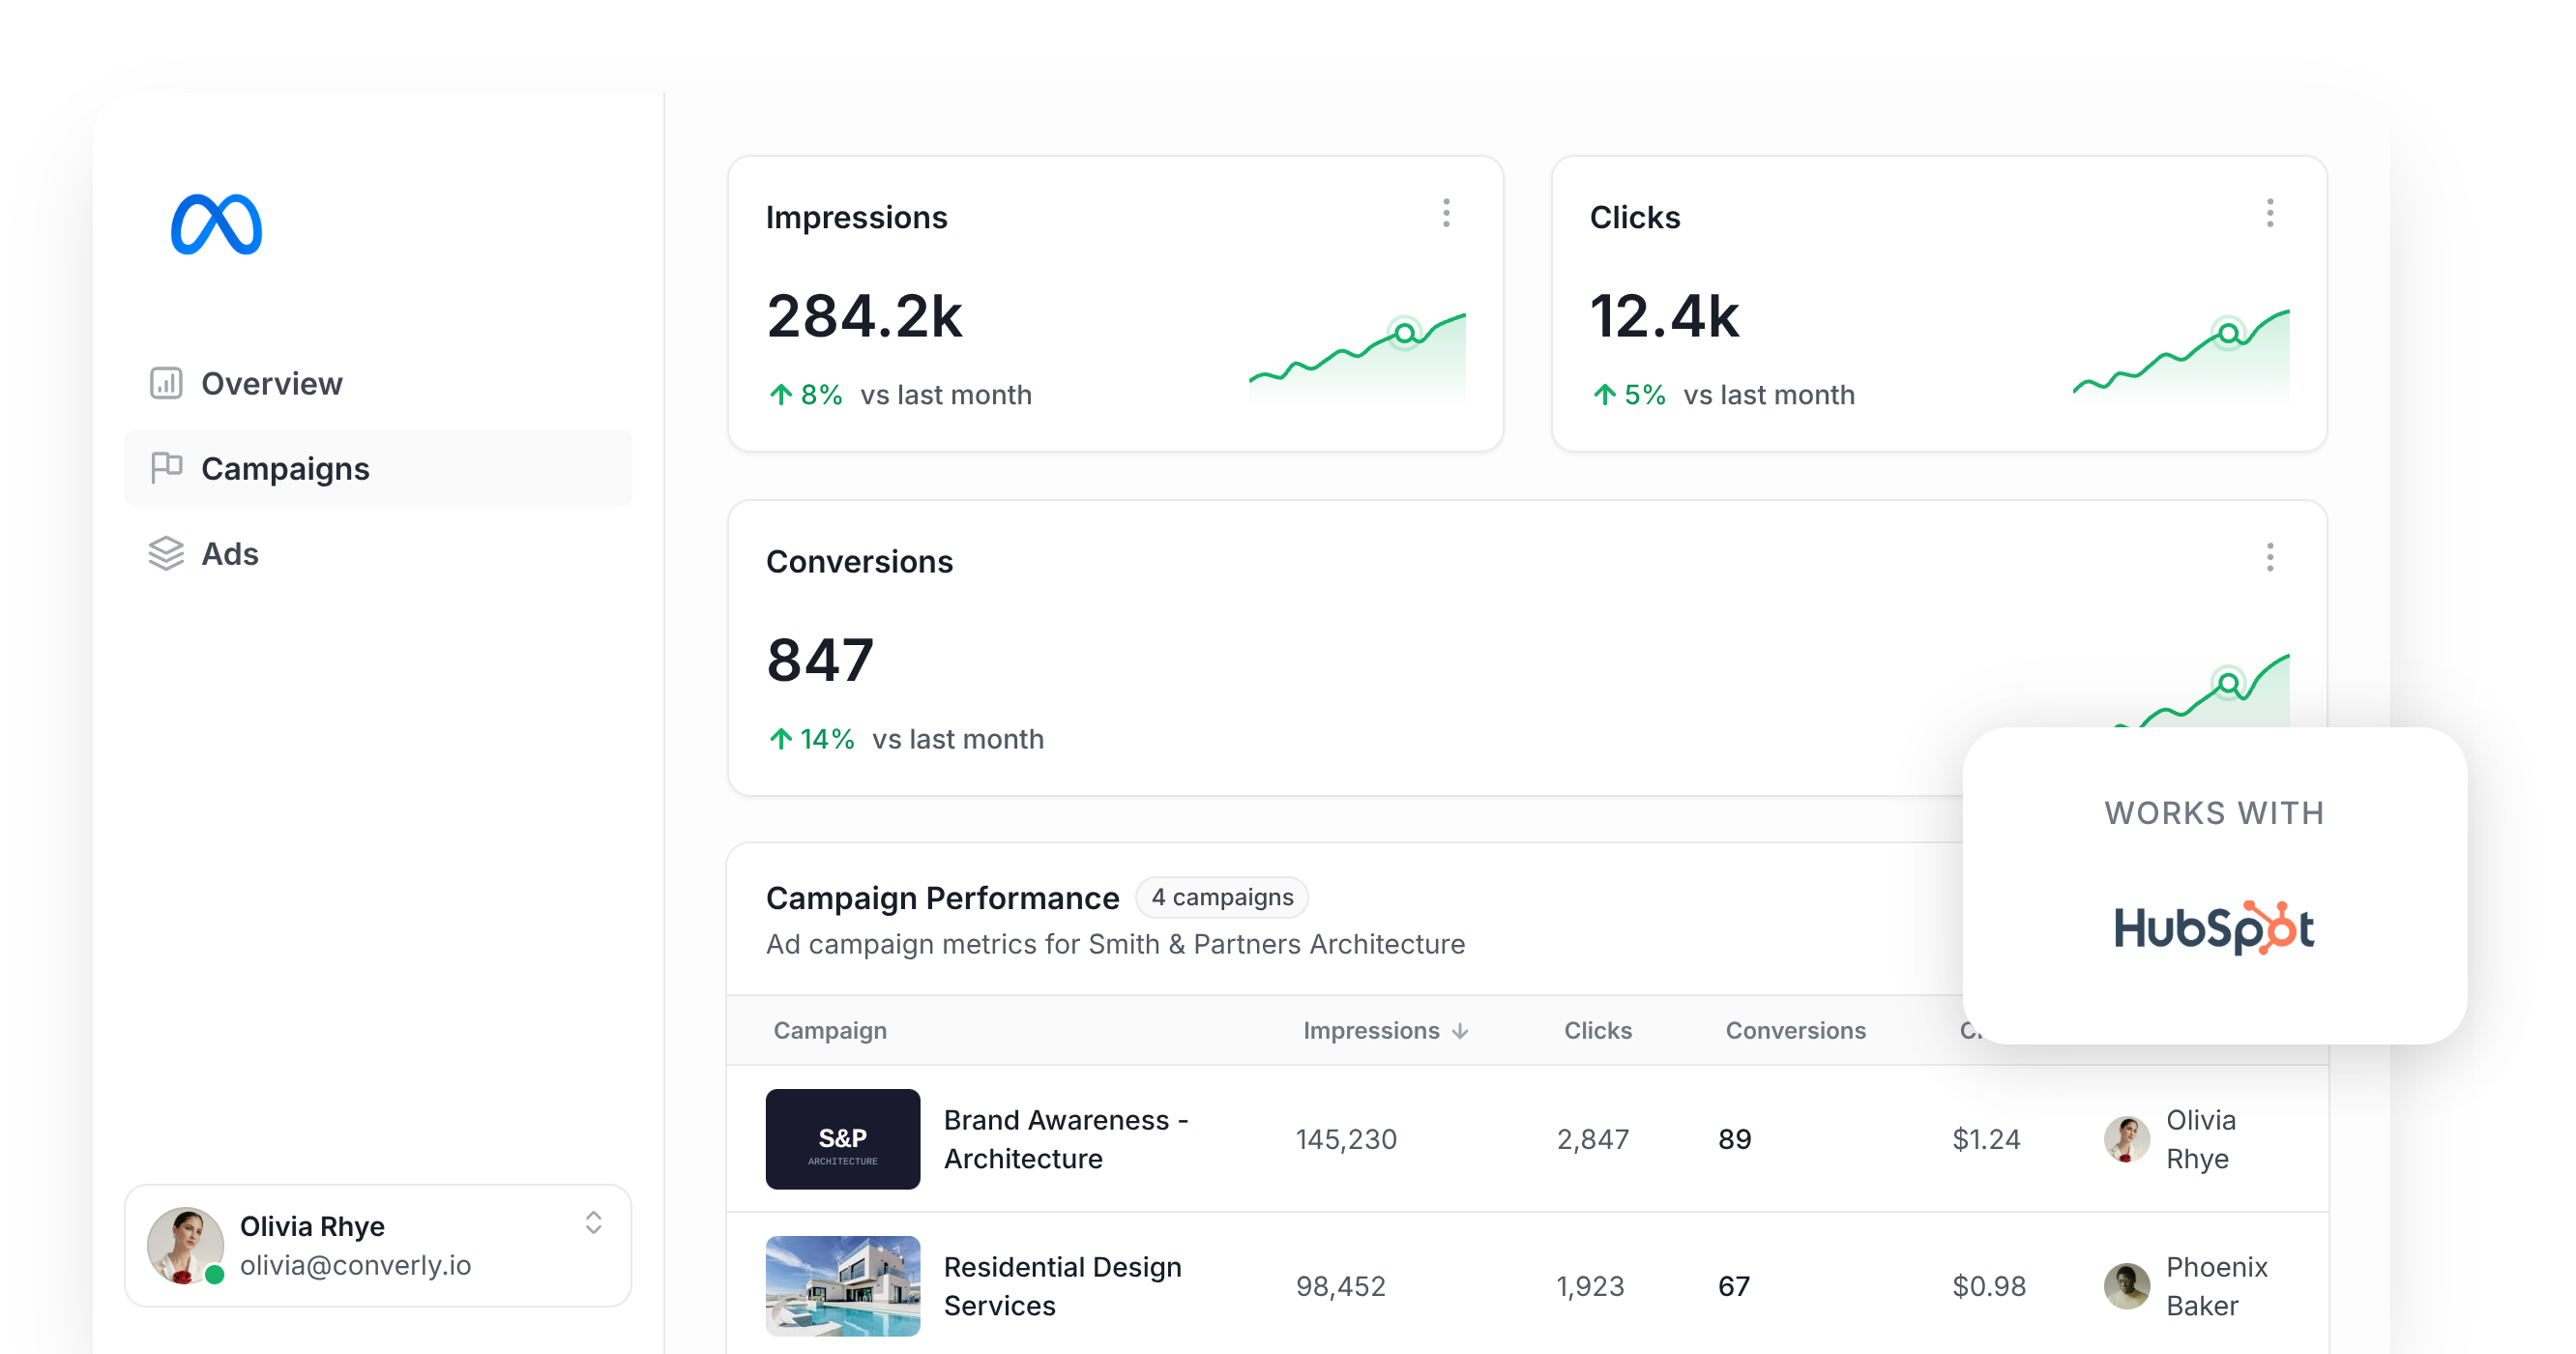
There are 3 ways to send conversions from HubSpot to Meta Ads. Use Converly when a form is submitted, use Attributer plus Zapier when a contact becomes a customer, or use Meta's Conversions API for CRM if you run Lead Ads. The right one comes down to where your leads come from and how much volume you have at each stage.
Are you using Meta Ads to generate new leads and customers for your business?
If so, setting up conversion tracking so you can see how many leads and customers came from your campaigns helps you understand which ones are working and which ones aren't.
And even more importantly, it gives Meta the data it needs to understand who is converting and who isn't, so it can serve your ads to the right people moving forward (and hopefully get you more leads at a lower cost).
In this article, we'll walk through 3 different ways to send conversions to Meta Ads from HubSpot. We'll also cover the scenarios where each one works best, so you can pick the right path for your business.
3 ways to send conversions to Meta Ads from HubSpot
There are a few different ways to send conversions to Meta Ads from HubSpot, and the best one for you depends on how you actually get leads from Meta and when you want to send the conversion back.
Method 1: Using Converly
Best for sending conversions to Meta when the lead first submits a form on your website
Converly is a dedicated conversion tracking tool that makes it easy to send a conversion to Meta when a lead submits a form, books a meeting or starts a chat on your site.
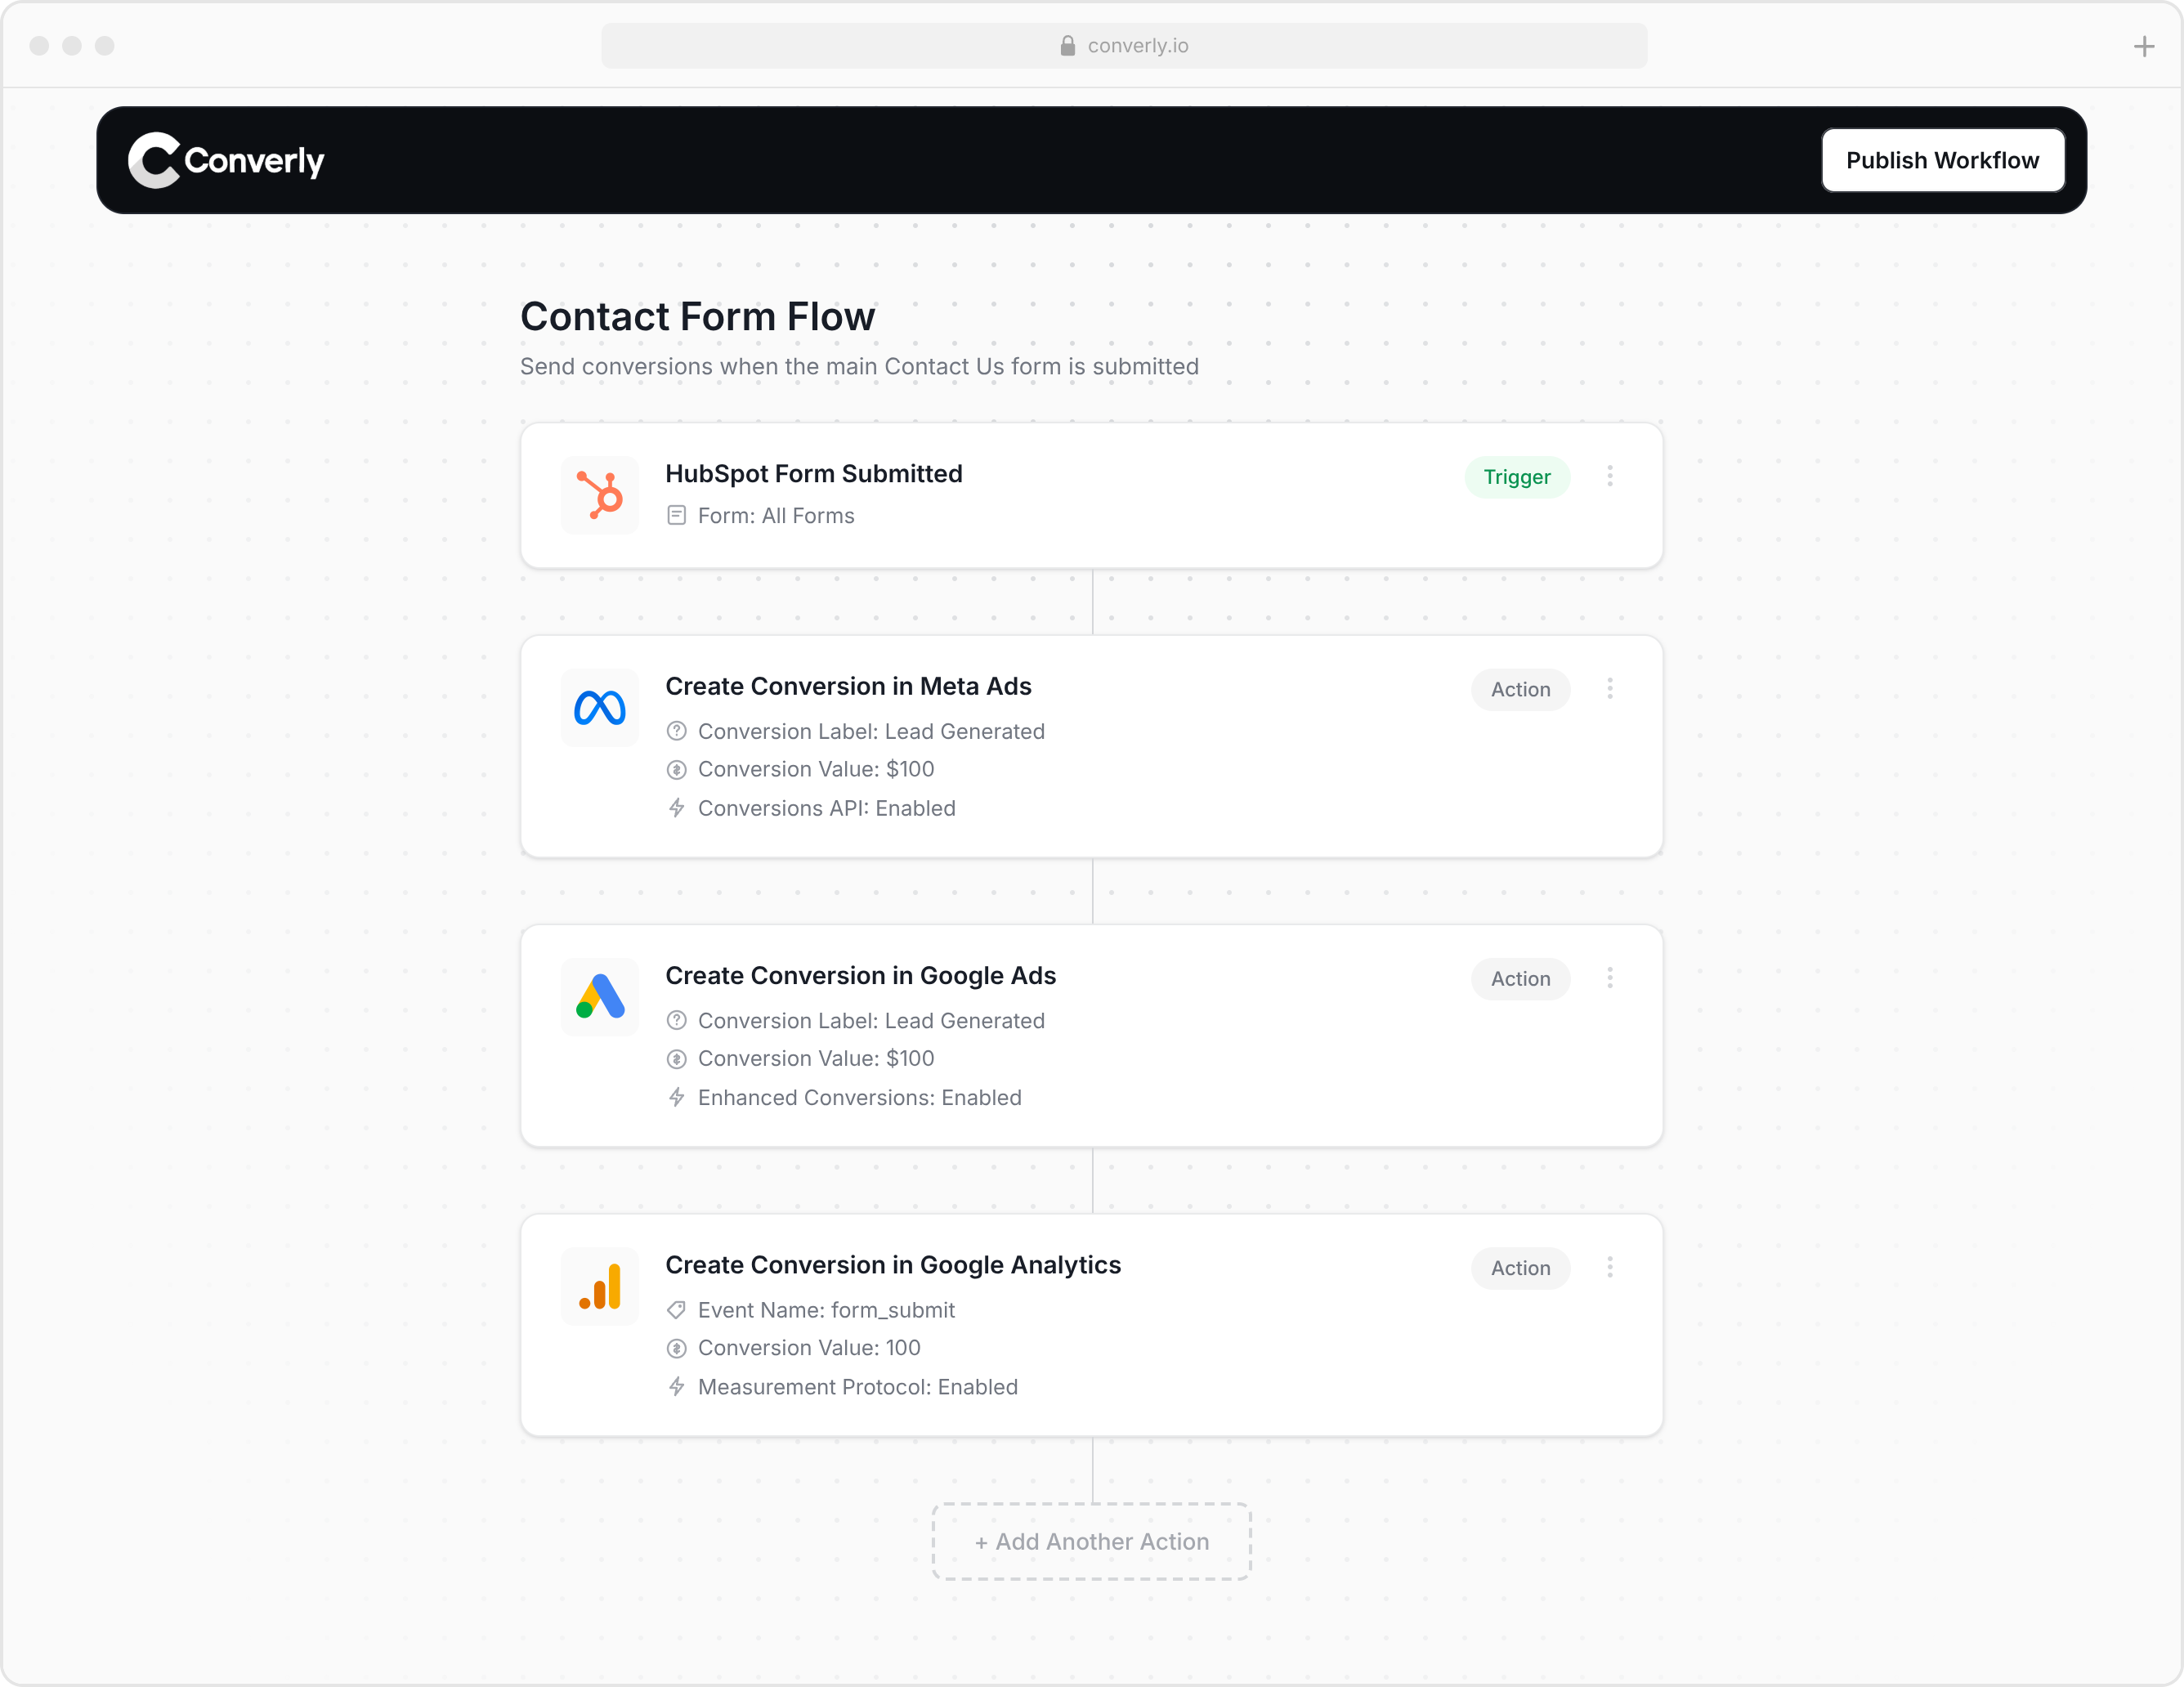
As you can see from the screenshot above, it's really easy to use. You pick a trigger (like when a lead submits a form on your site) and then pick an action (like sending a conversion to Meta Ads, sending a conversion to Google Ads, and so on).
Converly works with HubSpot Forms, HubSpot Meetings and HubSpot Chat, as well as a heap of third-party form and booking tools like Typeform, Jotform and Calendly. Regardless of which one you use, it works in roughly the same way. It listens for the form submission/meeting booking, grabs the lead's name, email and phone, grabs all the Facebook identifiers (the FBCLID, the _fbc and the _fbp), and sends them over to Meta's Conversions API as a server-side conversion.
Because it sends the data server-side, includes the lead's name, email and phone, and passes those Facebook identifiers, you should end up with an Event Match Score of 9 or 10. That is Meta's rating for how good your conversion tracking setup is (If you track something basic like thank you page visits, you would be lucky to score a 3).
Converly also gives you a full conversion log that shows every conversion it captured, what data was sent to Meta, whether it was received successfully, and more.
When to use this approach
- When you get a low volume of new customers each month. Meta ideally wants 50+ conversions per ad set per week. If you're not closing 50 new deals a week, your best bet is to send the conversion when the lead first submits the form, because that's where you have the most volume.
- When your sales cycle is longer than 7 days. Meta has a 7-day click attribution window, so it only counts conversions that happen within 7 days of the ad being clicked. If it takes longer than 7 days to go from ad click to closed deal, you're better off sending the conversion when the lead first submits the form (because if you wait for the deal to close before sending the conversion, then you'll miss the window).
- When you just want a simple setup. This is by far the easiest option to set up. It's a couple of clicks and takes about 5 minutes, so if you're just getting started with Meta Ads this is probably the best place to start.
Method 2: Use Attributer + Zapier
Best for sending conversions to Meta when a contact is qualified, a deal is created, or the contact converts into a customer
If you'd rather send a conversion to Meta at a later stage in the sales cycle (like when a Deal is first created against the contact, or when the Deal closes), you can do that using Attributer and Zapier.
Here's how it works.
1. Install Attributer on your website and add a Contact Property to HubSpot
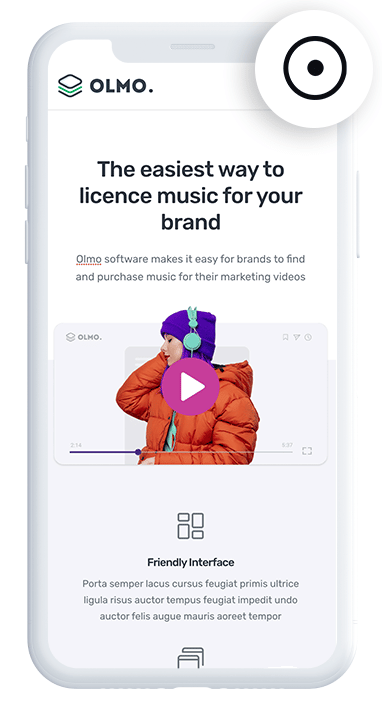
To get started, sign up for a 14-day free trial of Attributer. You'll be given a small snippet of code to install on your website.
Once that's done, go into your HubSpot Settings, open Contact Properties, and add a few new properties:
- FBCLID
- FBC
- FBP
For context, these are the identifiers Meta uses to tie the actions someone takes on your website back to the original ad they clicked. So the goal is to capture them, store them on the contact record, and then send them back to Meta when you trigger the conversion.
2. Attributer writes data into the hidden fields
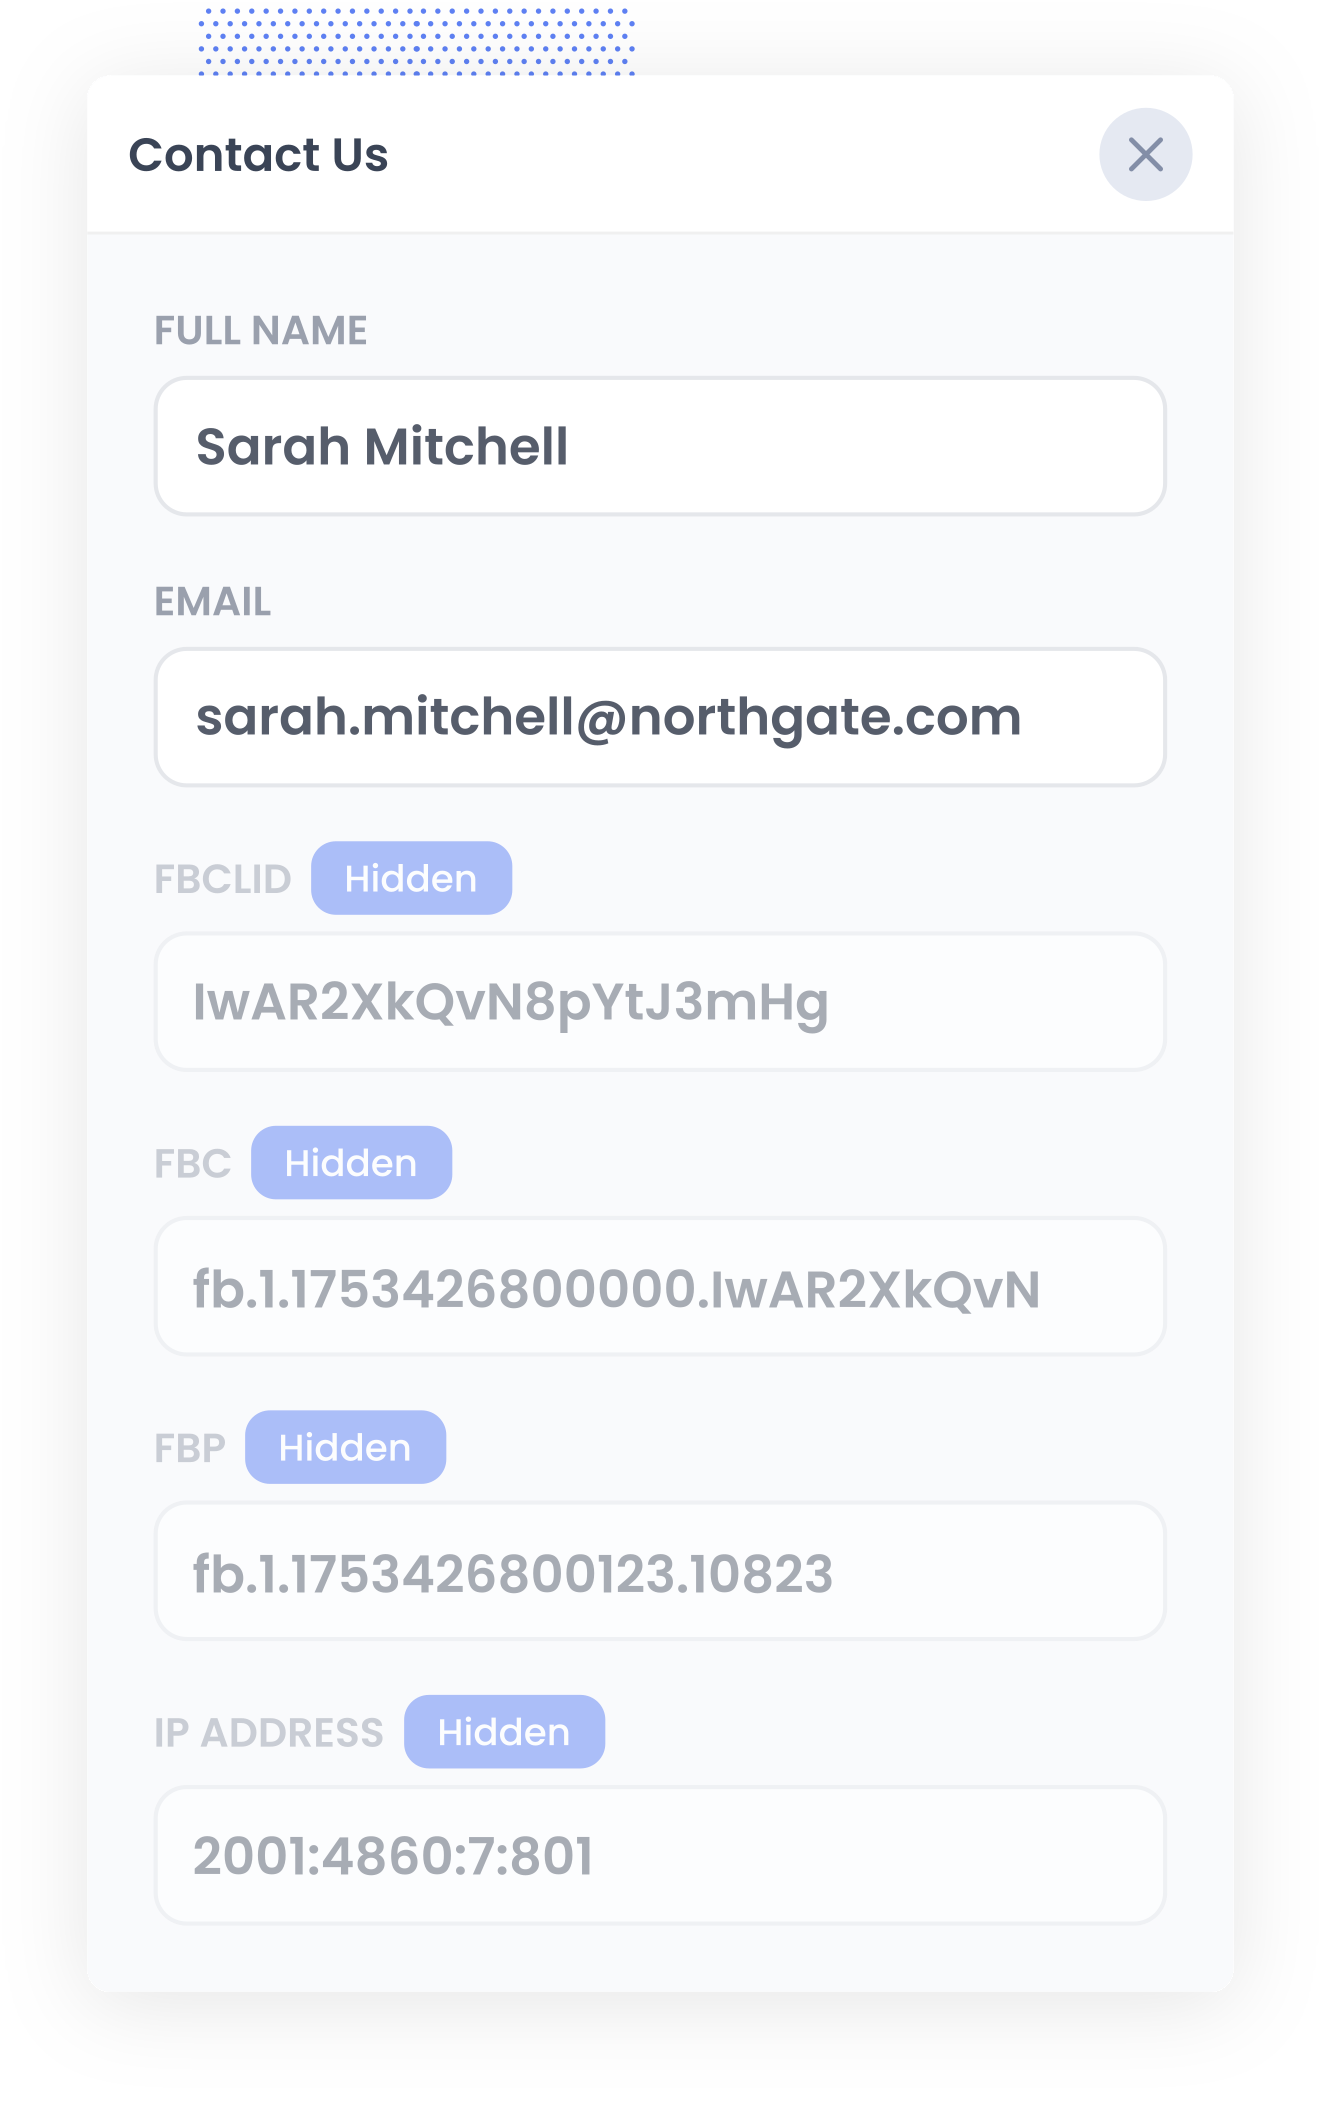
When a visitor lands on your site from a Meta ad, Attributer captures the identifiers Meta needs (the FBCLID, the _fbc and the _fbp) and stores them in the visitor's browser.
Then, once they fill out a form on your website, Attributer passes those values through to HubSpot using its Identify functionality, which is basically just a way to programmatically attach extra data to a form submission.
3. Data lands on the contact record
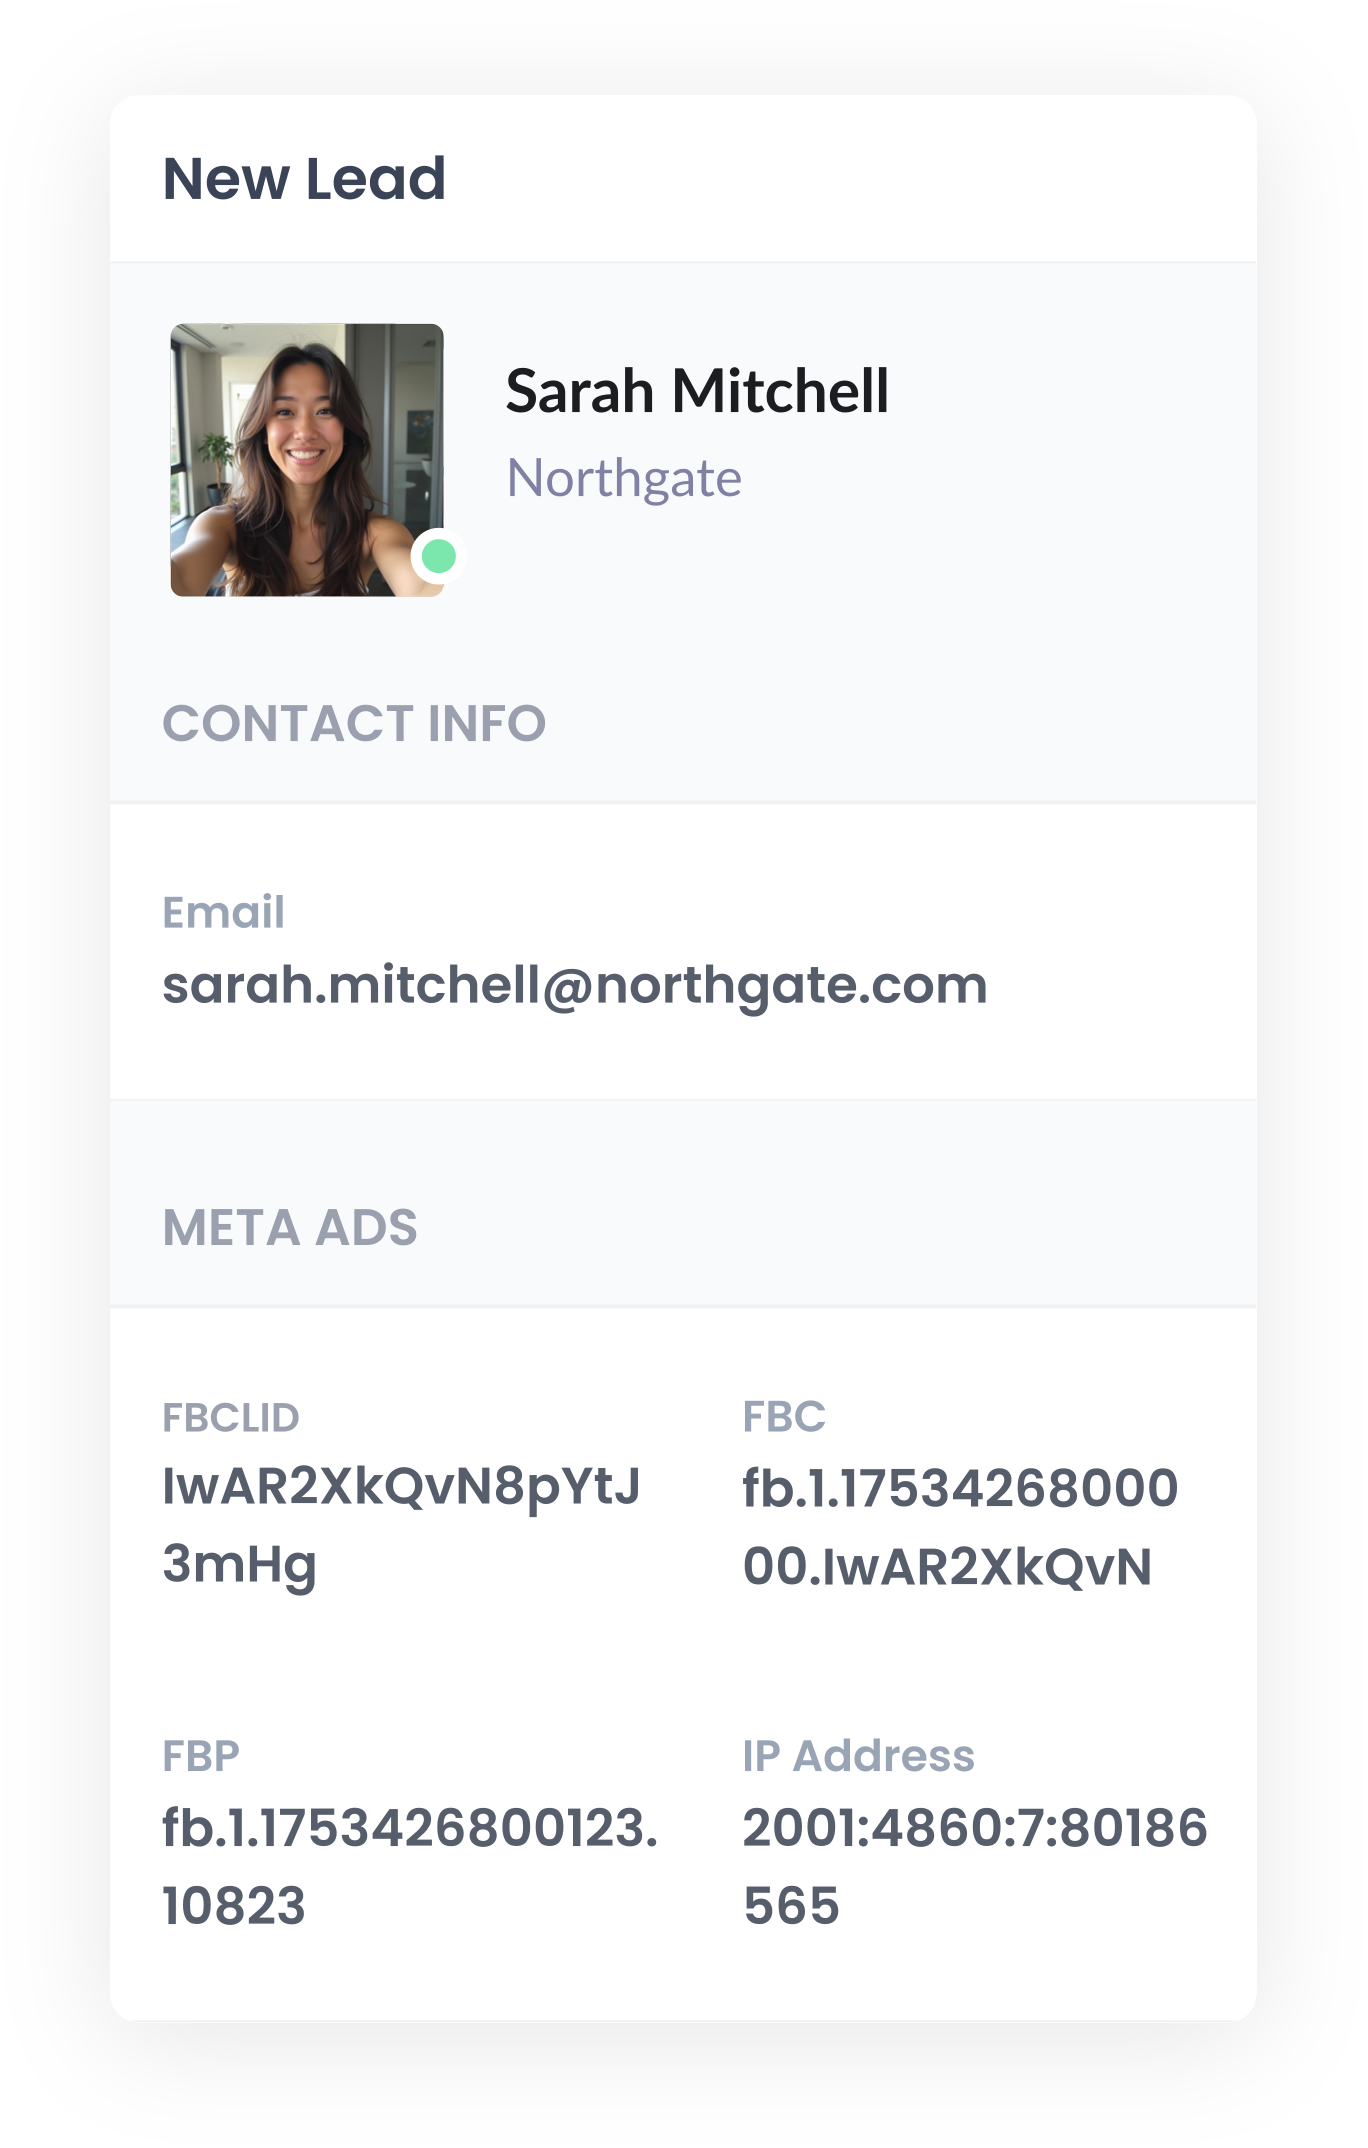
Because HubSpot Forms, HubSpot Meetings and HubSpot CRM are part of the same platform, submitting the form or booking a meeting automatically creates or updates a contact record, which means the Facebook identifiers will be added to the Contact along with the name, email, phone number and anything else they typed into the form.
If you're capturing leads with a third-party tool instead (like Gravity Forms, Typeform or Calendly), you can use its built-in HubSpot integration or a tool like Zapier to get the details across.
From there, the data sits on the contact record, ready to be sent back to Meta Ads once the contact reaches your chosen conversion point (like a Deal being created or won).
4. Send the data to Meta Ads
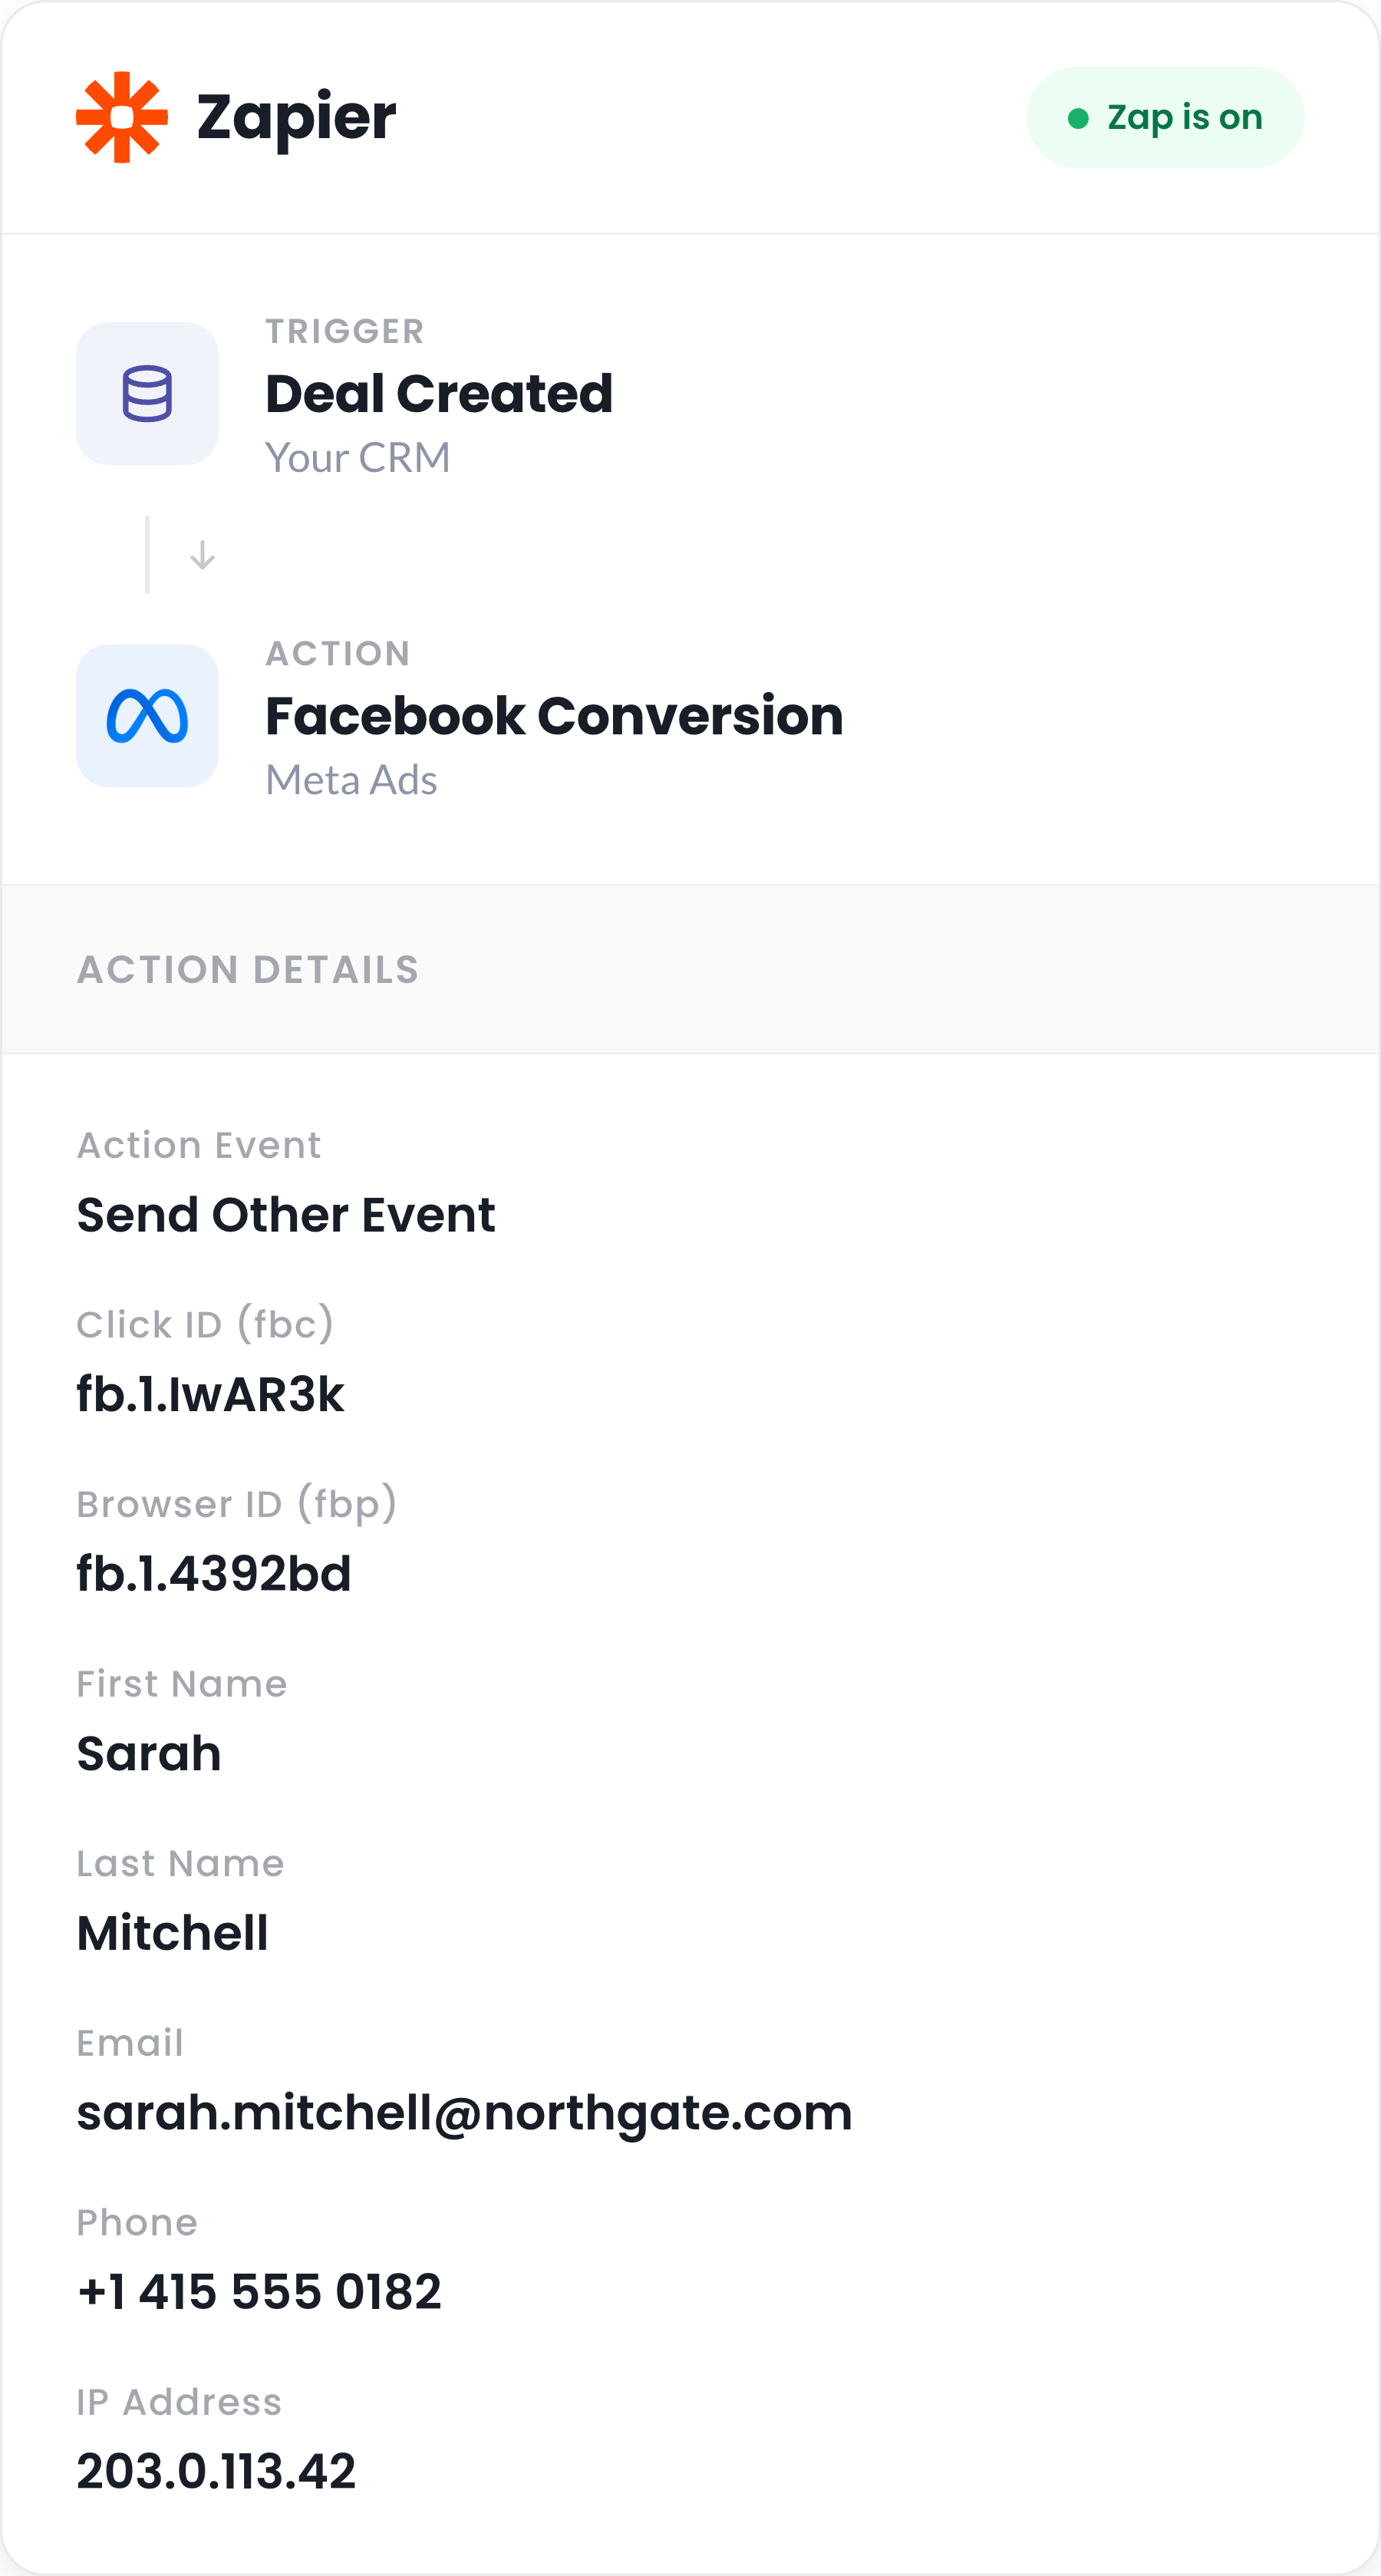
Once your chosen milestone in the sales process has been reached (like a Deal being created, or a Deal moving into the Closed Won stage), you can send the conversion back to Meta Ads.
Tools like Zapier are ideal for this. You simply create a Zap and set the trigger to be whatever stage in the sales process you want to send the conversion back to Meta (like when a Deal is created).
You then select Facebook Conversions as the Action and 'Send Other Event' as the Action Event. This is the only one that allows you to map the fbclid, fbp and fbc across, which is important because otherwise you are relying on email address to match the conversion back to the user, and many people have old email addresses associated with their Facebook accounts that will be different to the one they entered into your form.
Finally, you map the fields as follows:
- Attributer's fbc field to the Click ID (fbc) in Zapier
- Attributer's fbp field to the Browser ID (fbp) field in Zapier
Capturing and sending these identifiers is what pushes your Event Match Score up to a 9 or 10, and dramatically increases the number of conversions Meta can match back to real people.
When to use this approach
- When lead quality is your problem, not lead volume. If your Meta campaigns generate plenty of contacts but your sales team says they're mostly junk, then sending the conversion only when a contact is qualified or a Deal is created lets Meta's algorithms learn what a good, qualified lead looks like for your business. They'll then do a better job of serving your ads to qualified buyers in the future.
- When your contacts get qualified quickly. Meta's 7-day click attribution window applies here too. If your sales team reviews and qualifies contacts within a day or two, that's comfortably inside the window, so you can use the contact's lifecycle stage becoming Sales Qualified Lead (or a Deal being created against it) as the moment you send the conversion back to Meta.
- When you have decent volume at that later stage. Meta's algorithm needs around 50 conversions per ad set per week to optimize properly. If your sales team is moving 50+ contacts to Sales Qualified Lead, or you're creating that many Deals per week, then the Attributer plus Zapier approach works nicely.
Method 3: Use the Conversions API for CRM
Best for businesses that use Lead Ads and want to tell Meta which of their leads were actually good
When you advertise on Facebook or Instagram, you can either send people to your site or have them fill out a form inside the ad itself. This ad format is known as Lead Ads.
Meta prefills the form with details from the user's Facebook or Instagram account, and when they submit it, the leads can be sent straight to your CRM.
It's very well documented that Lead Ads significantly increase the volume of leads you get from Meta, but they tend to be poor quality. There are a couple of reasons for this:
- It's easy to submit the form by accident, so you'll often get leads who have no idea they even gave you their details.
- Their contact details are often unusable. The form is prefilled with the email from their Facebook account, which is frequently an old email address they no longer check.
- The person has never visited your website or researched your product. So even if they did mean to contact you, and you did get usable details, they're often not a great fit for your business because they're not that familiar with your product or service.
To address this, Meta introduced a way to pass back information on which of these leads were actually good and which weren't. Meta then uses that to learn who is a good fit for your business and serve your ads to more people like them.
To set this up, store the Meta Lead ID on the contact record in HubSpot as each new lead comes in. Then, when a contact reaches a point in your sales process that signals it was actually a good one (like its lifecycle stage becoming Sales Qualified Lead, or a Deal being opened), you can use Zapier to send that signal back to Meta.
Start by creating a Zap that is triggered by whatever action in HubSpot shows the contact is high quality (like the lifecycle stage changing to 'Sales Qualified Lead').
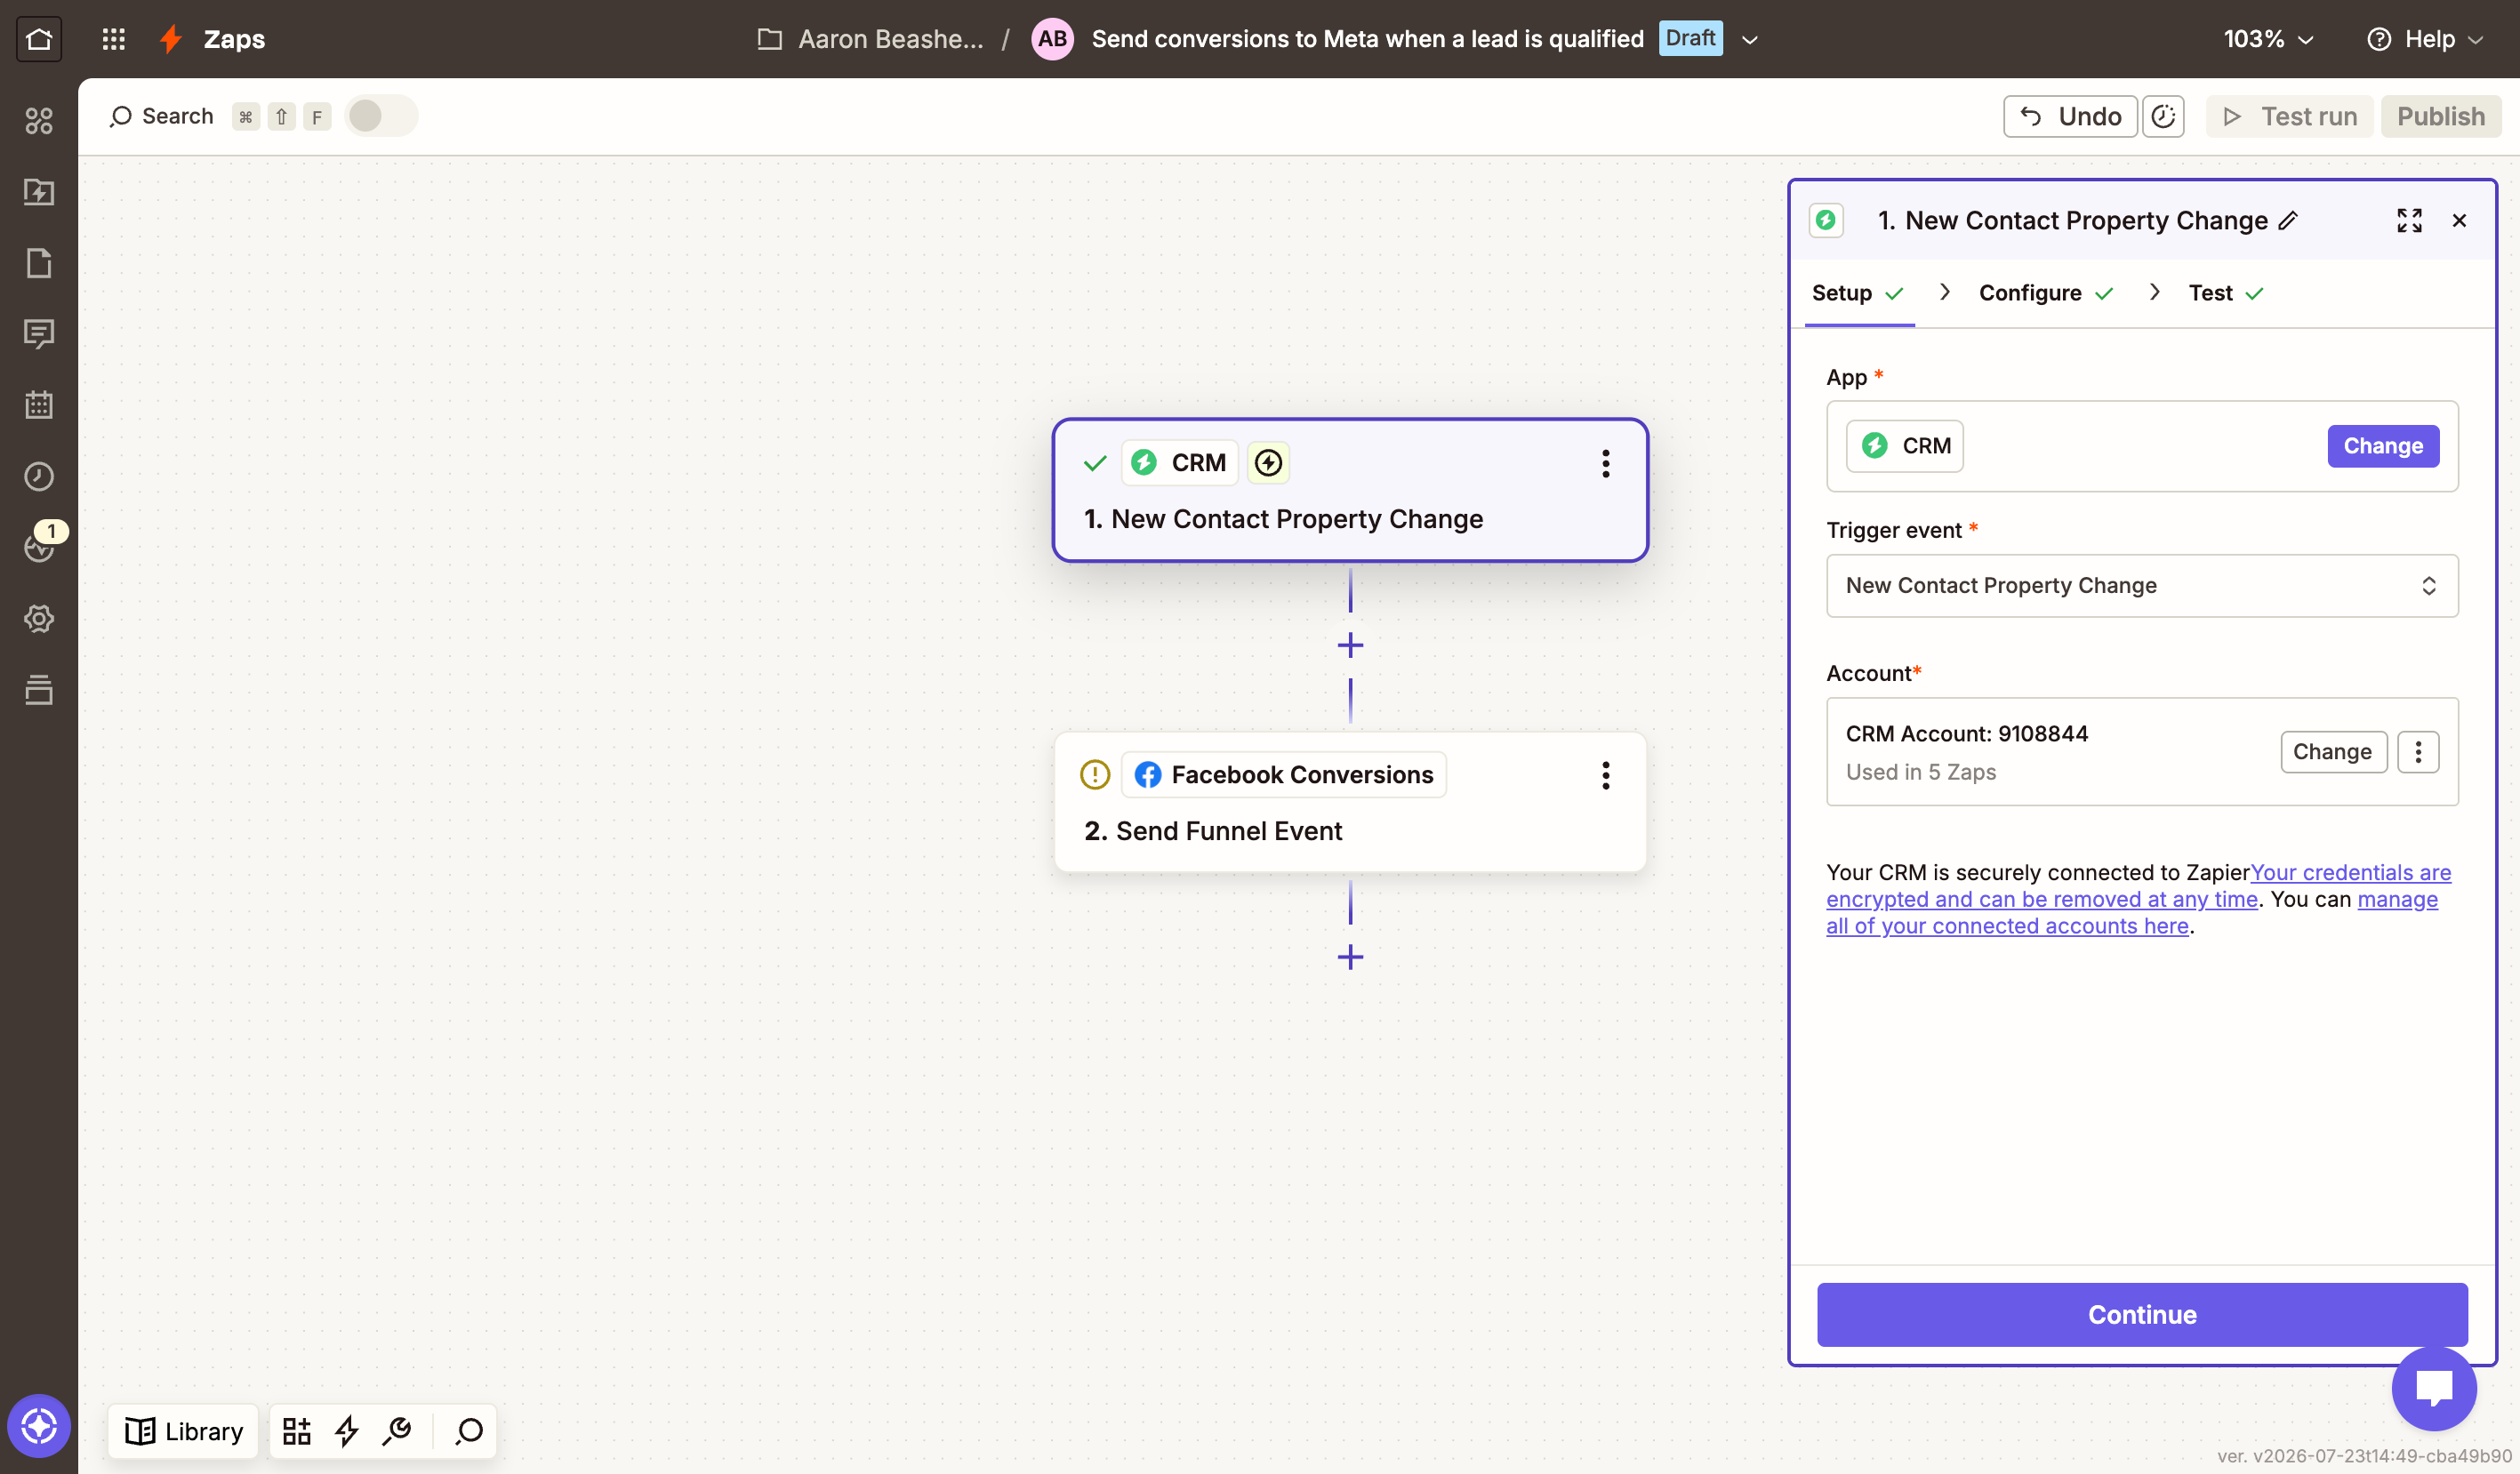
Then create a new action in your Zap, select Facebook Conversions as the tool, and select Send a Funnel Event as the action. Configure it by mapping the Meta Lead ID, Contact Email and Contact Phone from HubSpot.
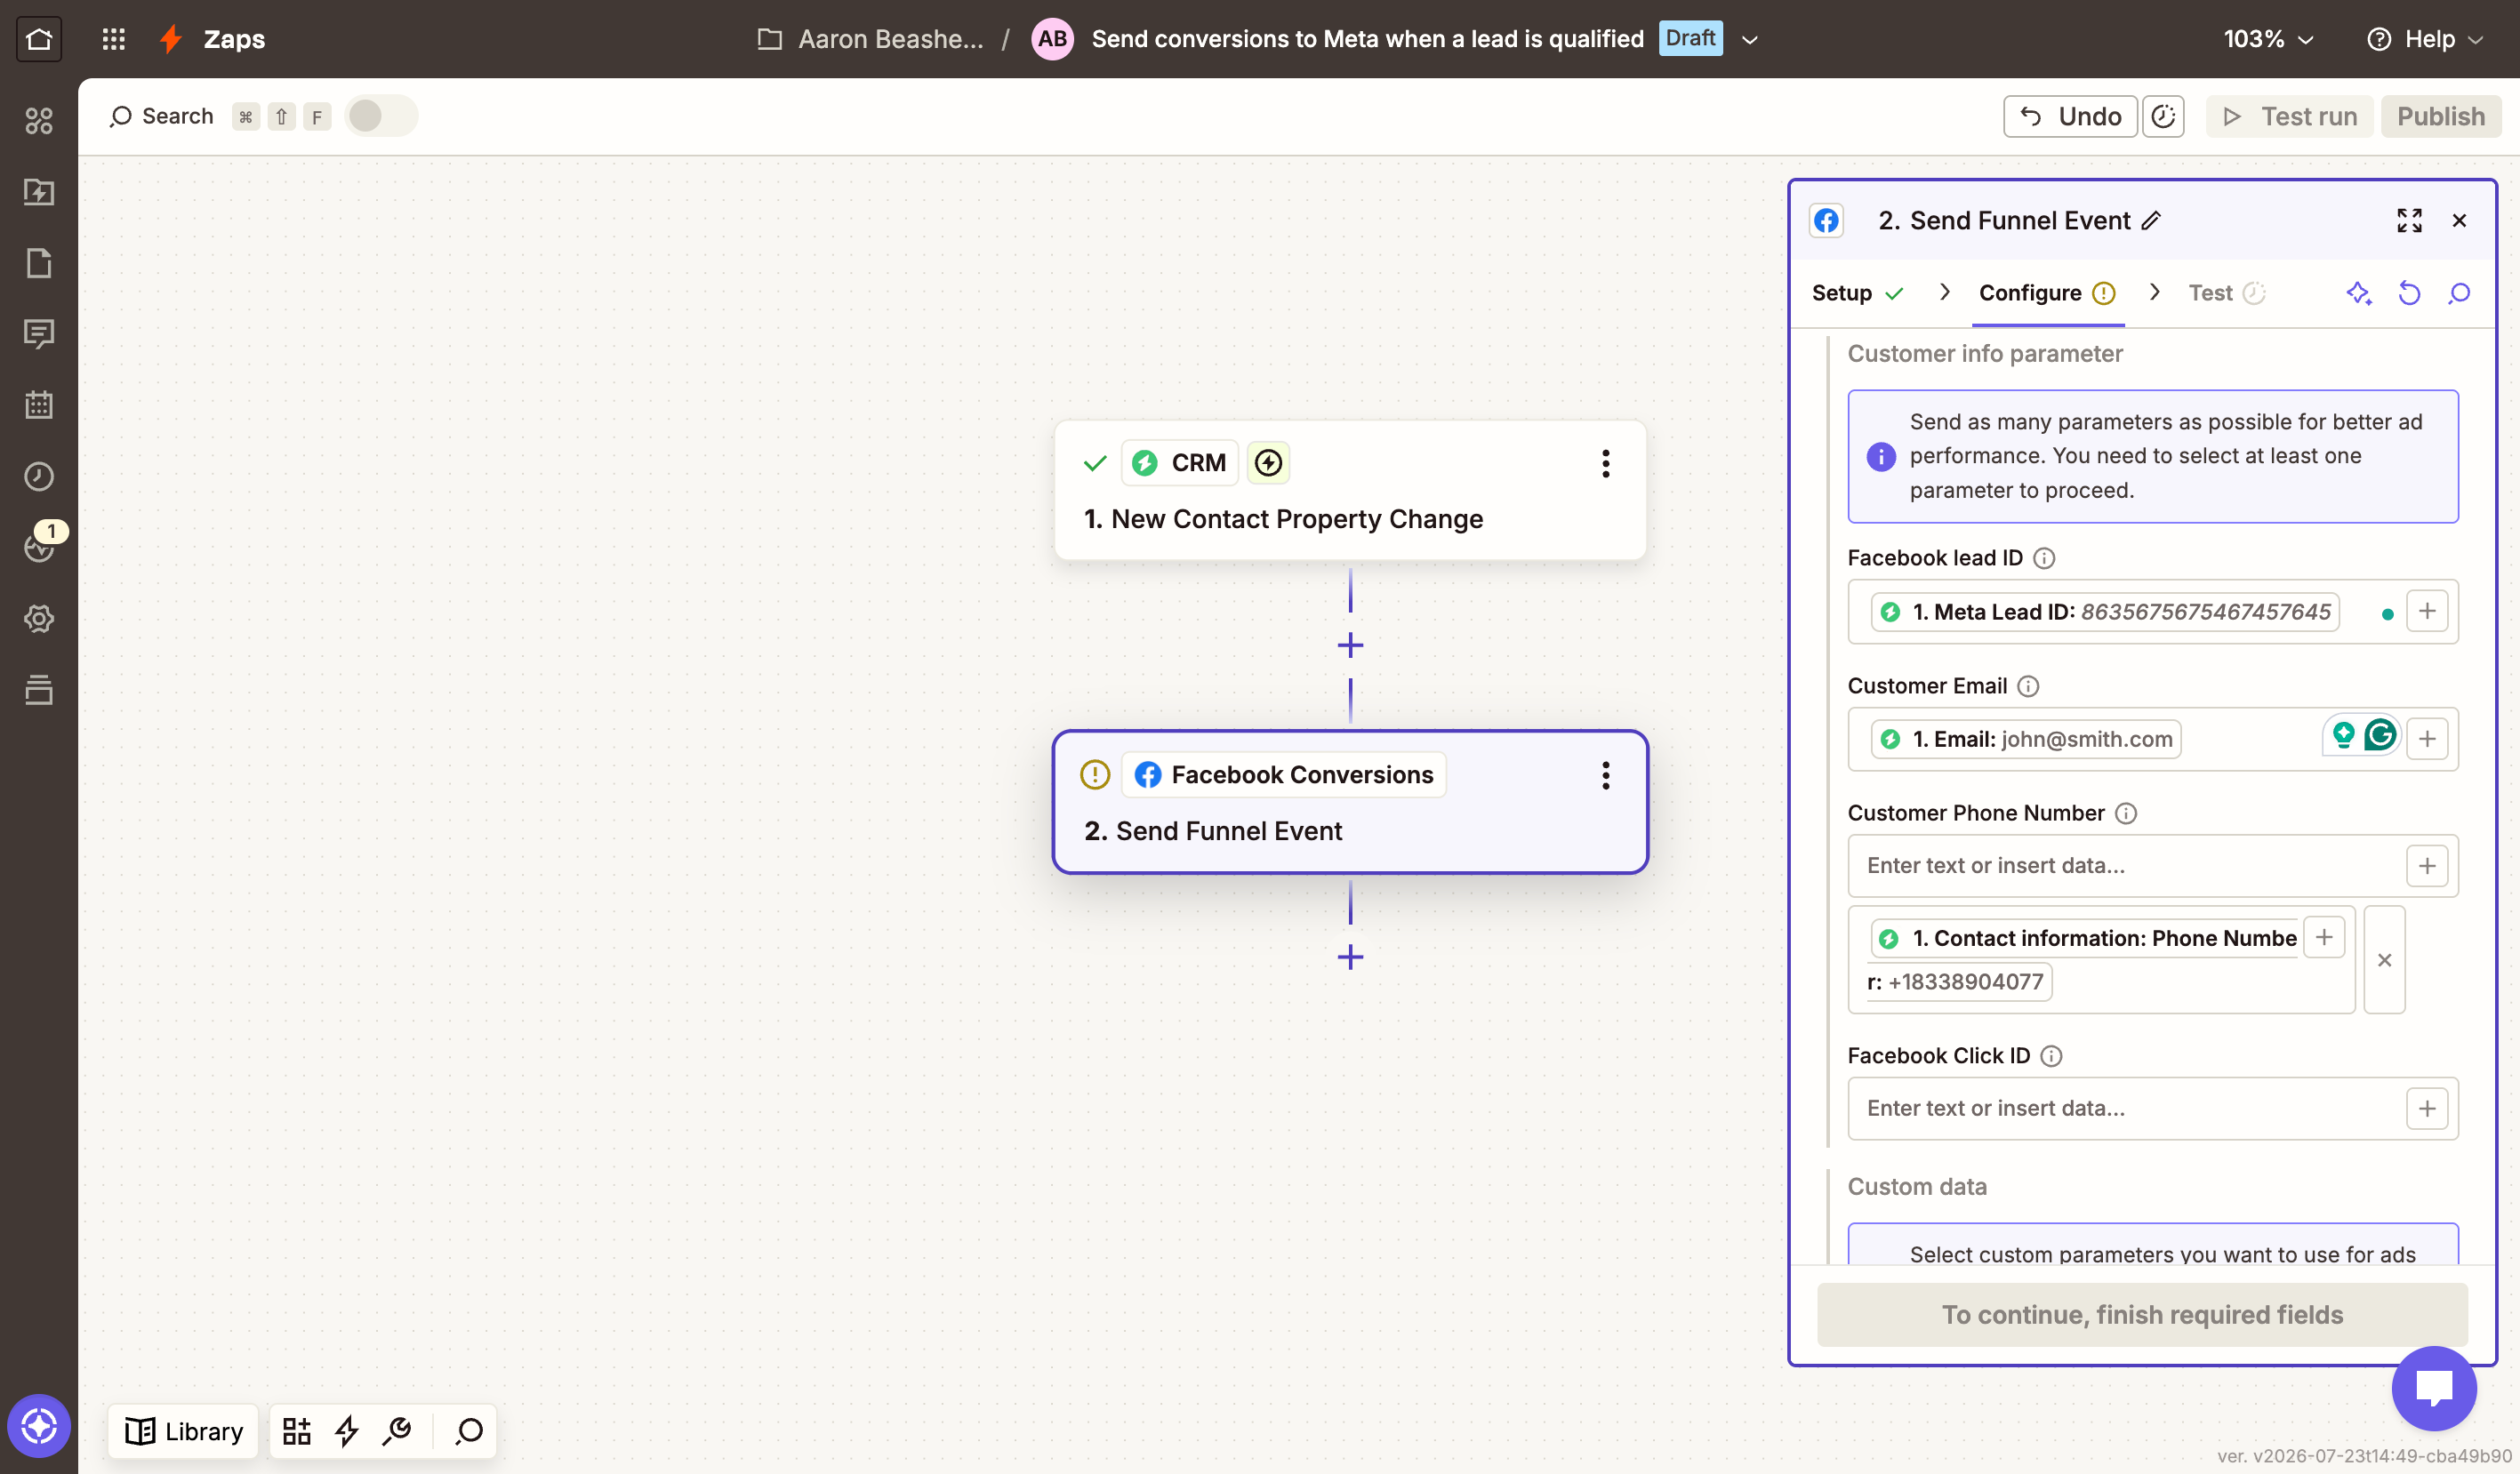
Once your Zaps are live, real contacts need to move through your sales process for a week or so before you can finish the setup. Meta wants to see around 50 stage updates within a 7-day period.
Once Meta has seen enough data, head back to Events Manager, open your dataset and go to the Settings tab. You'll find a section for the conversion leads integration that shows your progress and, when you're ready, lets you configure your sales funnel. This is where you tell Meta the stages of your sales process, what order they happen in, and which stage means "this was a good lead" (the stage you want Meta to optimize for).
When to use this approach
- When you're running Lead Ads (Instant Forms). This method is built specifically for Lead Ads. It's built around the Meta Lead ID, which only exists for leads that filled out a form inside Facebook or Instagram. If you're sending leads to your website and they complete forms there, this isn't for you. Use Method 1 or 2 instead.
- When you're getting plenty of leads but your sales team says they're junk. By telling Meta which contacts went on to be qualified, you teach the algorithm the difference between a qualified lead and someone who submitted the form by accident, and it uses that to better target your ads. Meta's own numbers claim advertisers see around 21% lower cost per quality lead once this feedback loop is running.
- When your contacts get qualified within a few weeks (even if deals take months to close). Meta wants the stage you optimize for (like the lifecycle stage becoming Sales Qualified Lead) to happen within 28 days of the lead coming in, and it stops accepting updates on leads older than 90 days. So as long as your sales team triages new contacts within days, you're fine, regardless of how long your actual sales cycle is.
- When you have enough lead volume to feed it. Meta won't activate the sales funnel until it has seen around 50 CRM events across 7 days, spread over at least 2 stages, sent consistently. In practice that suits businesses generating a few hundred Lead Ad leads a month with a sales team that actually keeps HubSpot up to date. If your volume is lower, the funnel configuration will simply never unlock.
Which method is right for you?
Choosing between these methods isn't really a matter of preference. It comes down to 2 questions. Where do your leads come from (your website or Lead Ads inside Facebook), and how much volume do you have at each stage of your sales process. Here's the cheat sheet:
| Your situation | Best method | Why |
|---|---|---|
| Leads come from forms on your website, and you get fewer than 50 qualified leads per week | Method 1: Converly | The form submission is the highest volume point in your funnel, so it's the best signal to feed Meta's algorithm. It also always lands inside Meta's 7-day attribution window, and it's a 5 minute setup. |
| Leads come from forms on your website, you get plenty of contacts but the quality is poor, and your sales team qualifies them within a day or 2 | Method 2: Attributer + Zapier | Sending the conversion when a contact is qualified (rather than when they submit a form) teaches Meta what a good lead looks like for your business, so it can go find more of them. It works because fast qualification keeps the conversion inside the 7-day window. |
| Leads come from forms on your website and you want to see which campaigns produce actual deals and revenue (not just leads) | Methods 1 + 2 together | Use Converly to send the form submission conversion (that's what Meta optimizes on), and use Attributer plus Zapier to also send deal created and deal won events. Those extra events give you columns in Ads Manager showing leads and deals side by side for every campaign, and let you build audiences of actual customers. |
| Leads come from Lead Ads (forms inside Facebook or Instagram), you get 150+ leads a month, and your sales team keeps HubSpot up to date | Method 3: Conversions API for CRM | This is the only method built for Lead Ads. It uses the Meta Lead ID to tell Meta which leads your sales team qualified, and Meta's own numbers claim around 21% lower cost per quality lead once the feedback loop is running. |
| Leads come from Lead Ads, but you only get a handful of leads a week | Consider sending traffic to your website instead | Method 3 never activates below roughly 50 CRM events a week, so at low volumes the Lead Ads feedback loop simply isn't available to you. Sending people to a landing page on your site instead opens up Methods 1 and 2. |
The simplest way to think about it is this. Send conversions from the point in your funnel that has enough volume for Meta to learn from, using the method that matches where your leads come from.
Wrap up
Sending conversions to Meta Ads from HubSpot is a great way to tell Meta which clicks turned into leads and customers, so it can learn what your ideal customer looks like and serve your ads to more people like them.
But as you can see, the approach differs a lot depending on how you get leads from Meta and the volume you're working with. So make sure to pick the right one for your circumstances.
Get Started For Free
Start your 14-day free trial of Attributer today!

About the Author
Aaron Beashel is the founder of Attributer and has over 15 years of experience in marketing & analytics. He is a recognized expert in the subject and has written articles for leading websites such as Hubspot, Zapier, Search Engine Journal, Buffer, Unbounce & more. Learn more about Aaron here.