The easiest way to track your Google Ads campaigns in Keap
Know which of your Google Ads campaigns are generating leads, opportunities and customers by tracking Google Ad campaigns in Keap.

Looking for a way to track how many leads & customers you are getting from your Google Ads campaigns?
Tools like Google Analytics are a great way to see how many website visitors you got, but to truly understand how your campaigns are performing you need to be able to track how many leads & customers you get.
In this article, we'll show you how to use a tool called Attributer to send Google Ads data into Keap and use it to run reports that show which of your Google Ads campaigns are actually generating leads & customers for your business.
What is Attributer?
Attributer is basically a piece of code you set up on your site.
When a visitor arrives at your site, it will look at a bunch of technical information to establish where they came from.
Attributer will then group each visitor according to a series of channels like Paid Social, Paid Search, organic search, etc., and store this information as a cookie in the visitor’s browser.
Once that visitor submits a form on your site, the channel information will be sent into Keap by Attributer alongside all the data entered by the lead in your form (e.g., their name, email, company, etc.)
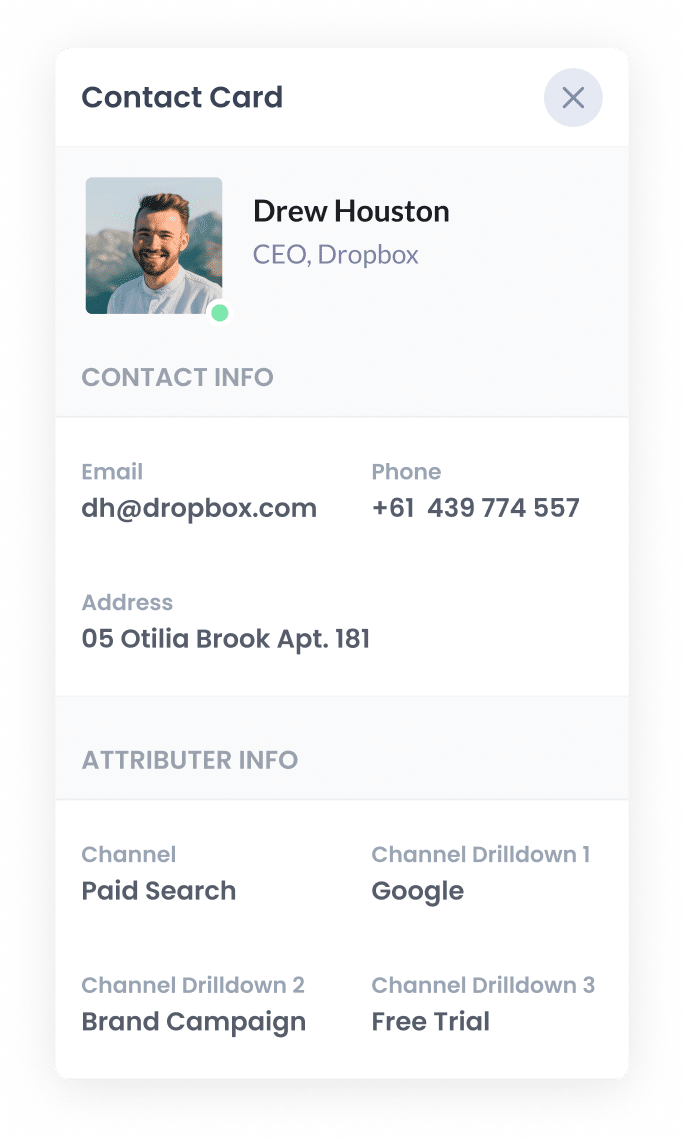
So once a new lead enters Keap from one of your Google Ad campaigns, it may look like this:
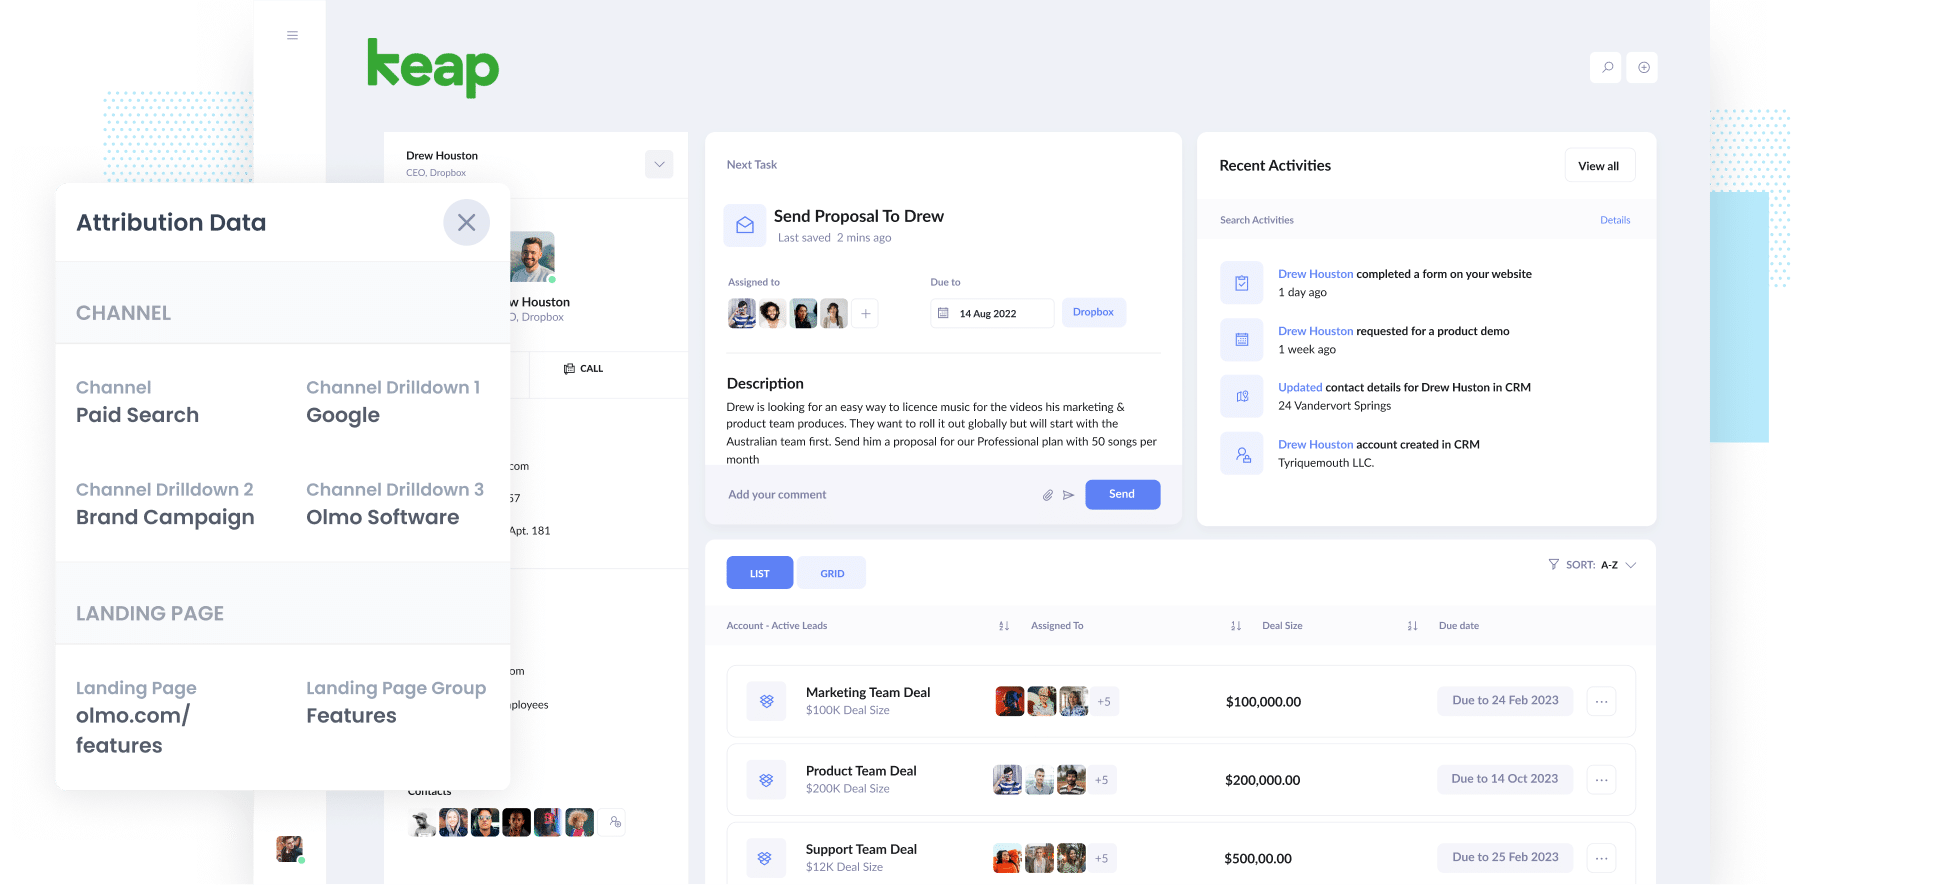
As you can see in the image above, Attributer has sent through the fact the lead came from ‘Paid Search’ as well as other information like the ad group name, campaign name, etc.
4 simple steps to track your Google Ads campaigns in Keap
Attributer makes it easy to track Google Ads campaigns in Keap. Here’s how it works:
1. Add UTM parameters to your Google Ads campaigns
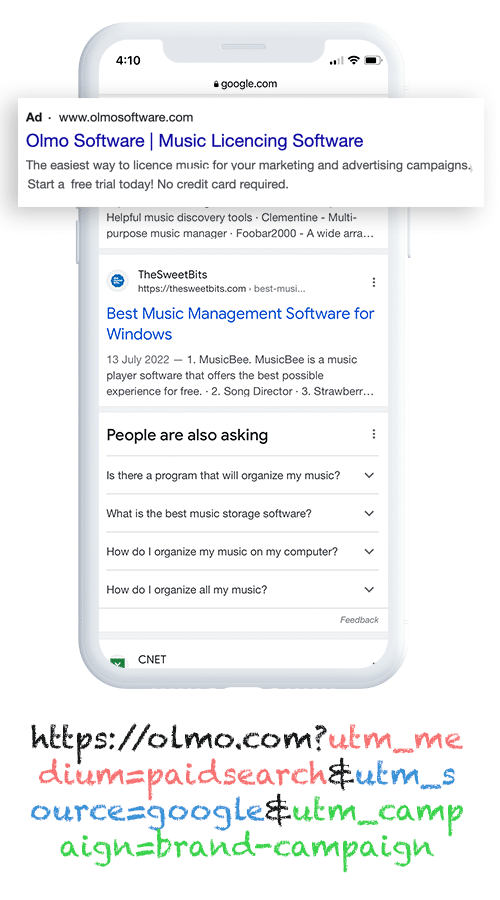
To kick off your Google Ad campaign tracking in Keap, you must add UTM parameters to each ad.
If it’s your first time hearing of UTM parameters, it’s totally fine. They’re just extra text you add at the end of the URLs you send to people from your campaigns.
For example, if the page you want to send is attributer.io/integrations/keap, then your final URL with UTM parameters may look something like this:
attributer.io/integrations/keap?utm_medium=paidsearch&utm_source=google&utm_campaign=brand-campaign
You can include whatever information you want in the UTM parameters, but best practice for Google Ads is the following:
- UTM Medium = Paid search
- UTM Source = Google
- UTM Campaign = The name of your Google Ads campaign
- UTM Term = The name of the ad group the ad belongs to
- UTM Content = The specific ad
Tagging your URLs with UTM parameters is simple. There are also free tools readily available online that can help you build them.
2. Add hidden fields to your forms
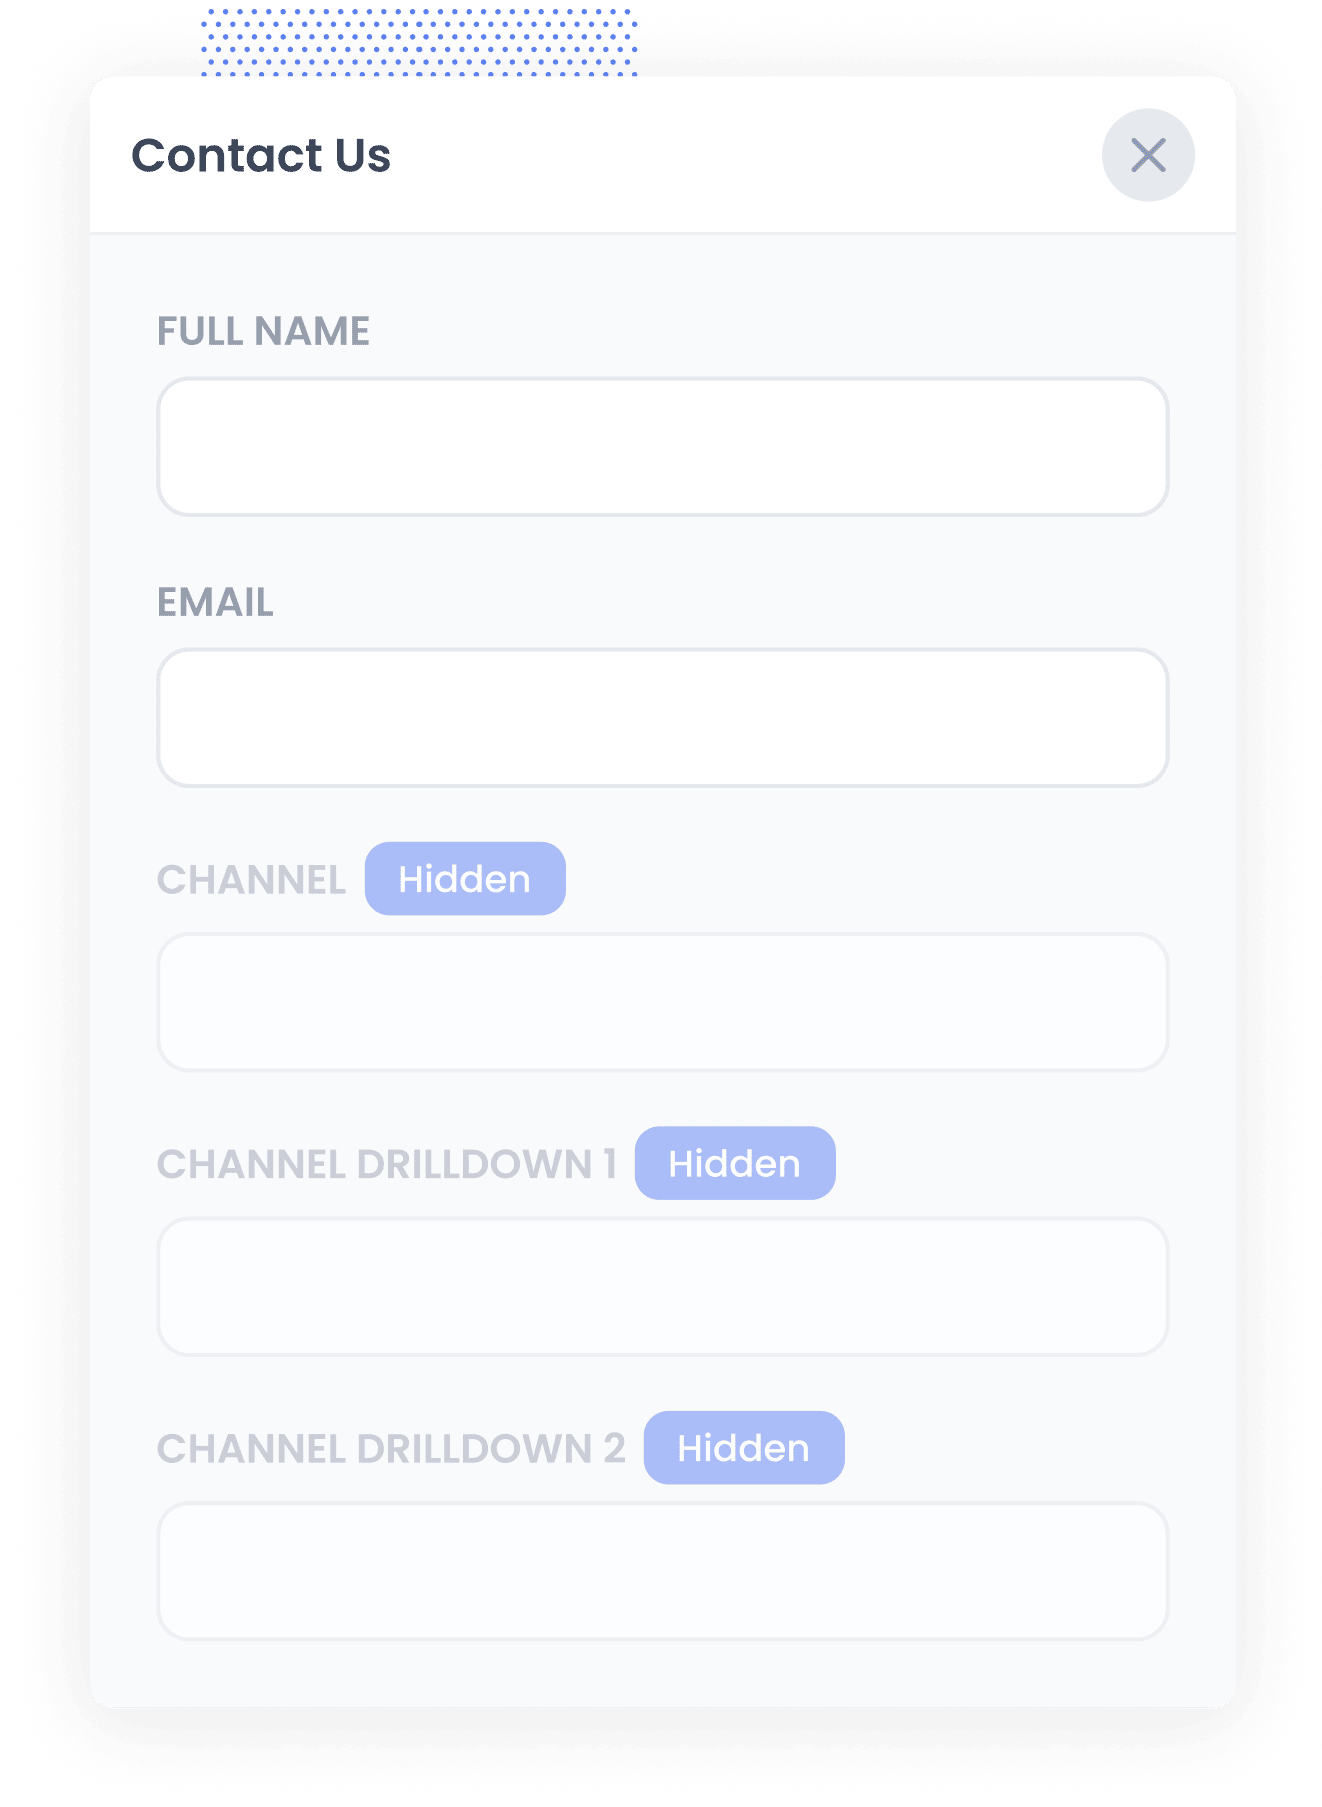
Once you've added the UTM parameters, the next steps is to add a number of hidden fields to your lead capture forms.
These fields you’re about to add aren’t visible to the end user and simply allow tools such as Attributer to write information into them without the user seeing anything.
The hidden fields that you need to add are the following:
- Channel
- Channel Drilldown 1
- Channel Drilldown 2
- Channel Drilldown 3
- Landing Page
- Landing Page Group
Adding hidden fields is easy with most form-building tools, including Keap forms, Gravity Forms, Jotform, Typeform, etc. You can usually just drag and drop a ‘hidden’ field type into your form. Steps to do this for different form builders can be seen here.
3. Attributer writes Google Ads data into the hidden fields
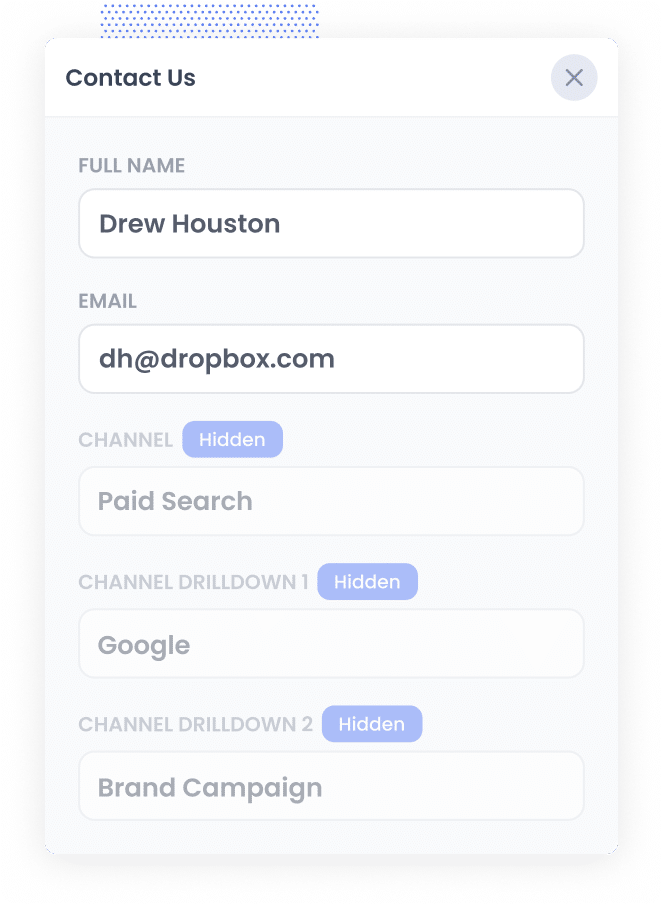
Now when one of your website visitors completes a form, Attributer writes the Google Ads data (taken from the UTM parameters) into the hidden fields.
For instance, let’s pretend I was a marketer at a fictitious company called Olmo Software. If someone arrives at my site from one of my brand campaigns in paid search, Attributer would then populate the hidden fields as such:
- Channel = Paid search
- Channel Drilldown 1 = Google
- Channel Drildown 2 = Brand campaign
- Channel Drilldown 3 = Free account ad
The visitor’s first landing page (e.g., olmo.com/features/music-licencing) and the first landing page group (e.g., features) are also captured alongside the values from the UTM parameters.
4. Google Ads data is sent into Keap
Ultimately, all of the Google Ads data from the UTM parameters, along with the lead’s name, email, phone, etc., are sent into Keap every time a visitor submits a form on your site.
When the data is inside Keap, you can build a report using Keap’s native reporting tools or a BI tool like Tableau or Looker to run more advanced reports there.
Why using Attributer is better than capturing raw UTM parameters
There are other options when it comes to capturing UTM parameters and using them to track your Google Ads in Keap, so why choose Attributer instead?
Here’s why:
1. Captures all traffic
Attributer passes through attribution information on ALL your leads, not just those that come from your Google Ads.
This includes leads that come from Organic Search, Organic Social, Paid Social, Direct Traffic & more.
Being able to see where all your leads are coming from means you can make better decisions about how to spend your marketing budget (for instance, if you see that most of your leads are coming from Organic Search but most of your budget is going to Google Ads, it may be time to rethink your ad spend).
2. Remembers the data
Other tools for capturing UTM parameters in Keap require them to be on the page where the form is completed.
For instance, imagine someone clicks on one of your Google Ads and is taken to your homepage. They then click on the ‘Get A Demo’ button and are taken to a different page to complete your demo request form.
This means that the page they completed a form isn’t the same as the one they initially landed on, so the UTM parameters are lost.
This won’t happen with Attributer because it stores the UTM parameters as a cookie in the user’s browser. So no matter what page the user completes a form on, Attributer will always send the UTM parameters you put behind your Google Ads into Keap.
3. Provides cleaner data
Other methods of capturing UTM parameters in Keap will simply capture the raw UTM parameters as they appear in the URL, which can result in messy data.
For instance, imagine some of your Google Ads campaigns are tagged with UTM_Source= Google.com (capital G), others with UTM_Source= google (lowercase, no domain), and others with UTM_Source= adwords.
Although it seems strange, this can be quite common if multiple people or agencies have managed your ads over time.
If you send this raw UTM data into Keap and tried to use it to run reports, the results will show up as three different sources that you need to stitch together manually.
You won’t have to deal with this with Attributer because it was built to expect inconsistencies and would ultimately appoint these leads to the 'Paid Search' channel regardless.
4. Records landing page data
Have you ever been curious about the number of leads and customers that your blog attracts?
On top of capturing the Google Ads data, Attributer also captures the landing page (i.e., attributer.io/blog/capture-utm-parameters) and the landing page category (i.e., /blog).
With this information, you can run reports that show how many leads your blog (for instance) is generating as a whole, as well as drill down into which blog posts are generating the most leads & customers.
3 example reports you can create when you capture Google Ads data in Keap
If you're using Attributer to capture Google Ads data into Keap, then it opens up a whole world of reporting you can do.
Having run hundreds (maybe thousands) of reports in the past to see how different campaigns were performing, I thought I'd share some of the reports I find the most insightful:
1. Leads by channel
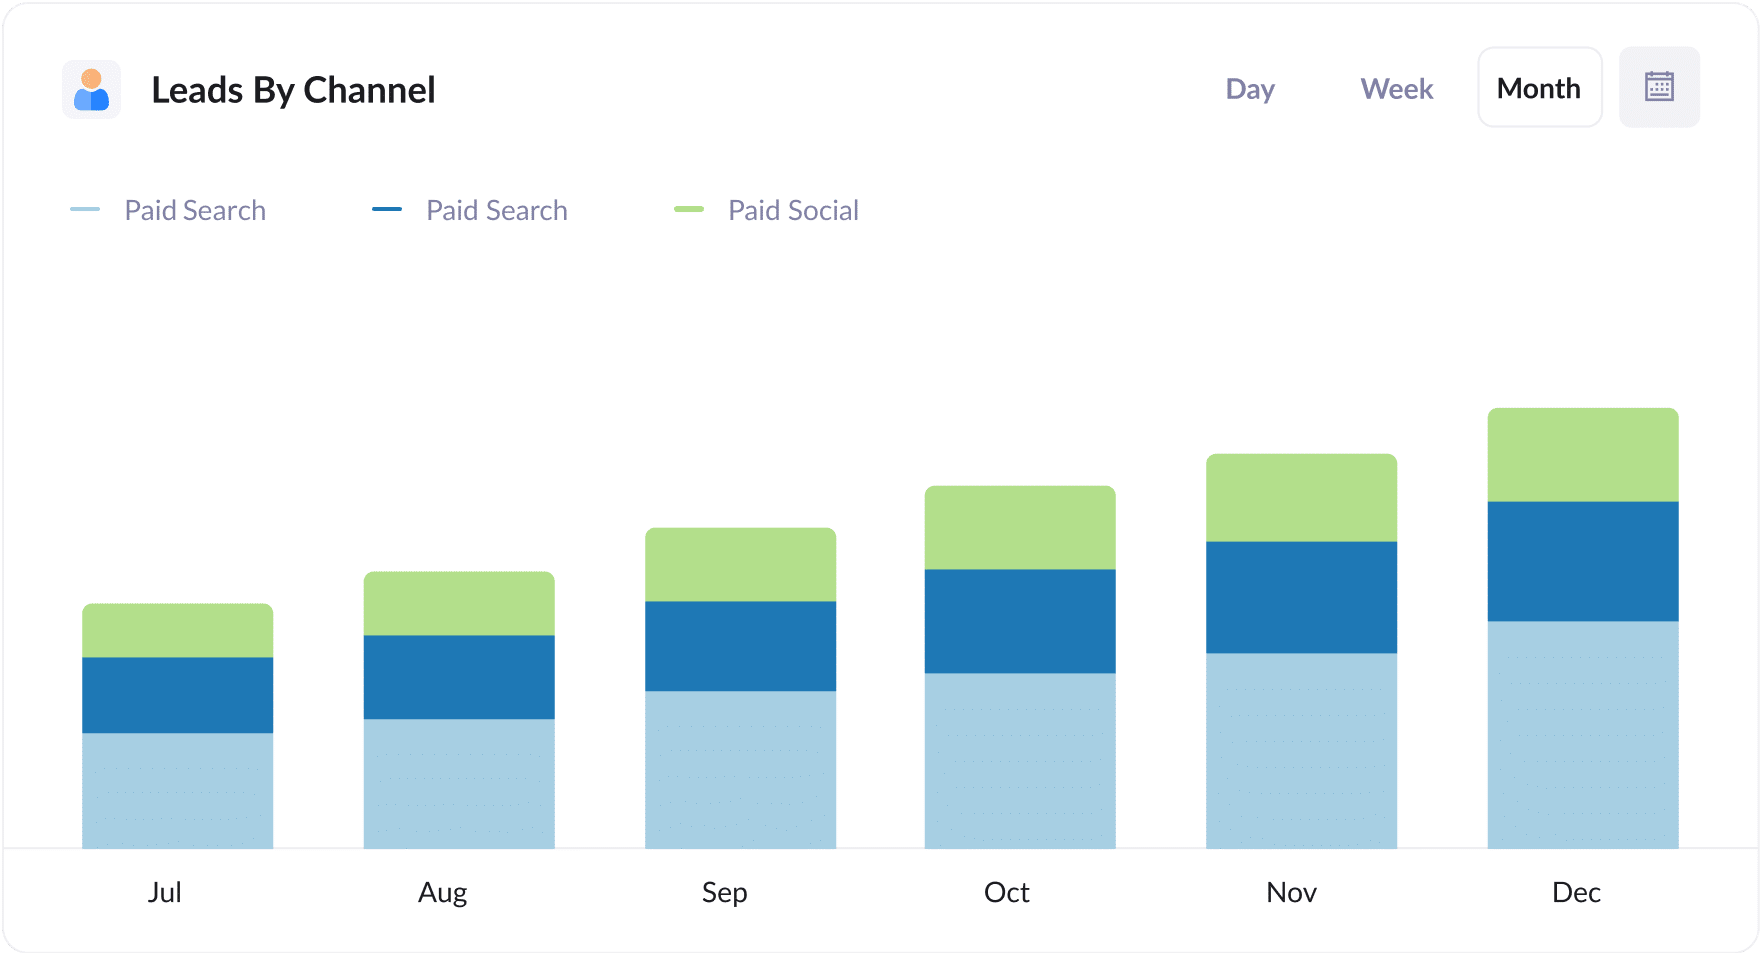
As mentioned earlier, Attributer captures the source of ALL your leads, not just those from your Google Ad campaigns.
That means you can easily run reports like this one, which show you how many leads you've generated each month broken down by the channel they came from (I.e. Organic Search, Paid Search, Paid Social, etc).
This report can be useful for understanding where your leads are coming from and can help you prioritize your marketing efforts (I.e. putting more time into SEO if you see that most of your leads are coming from Organic Search).
2. Customers by campaign
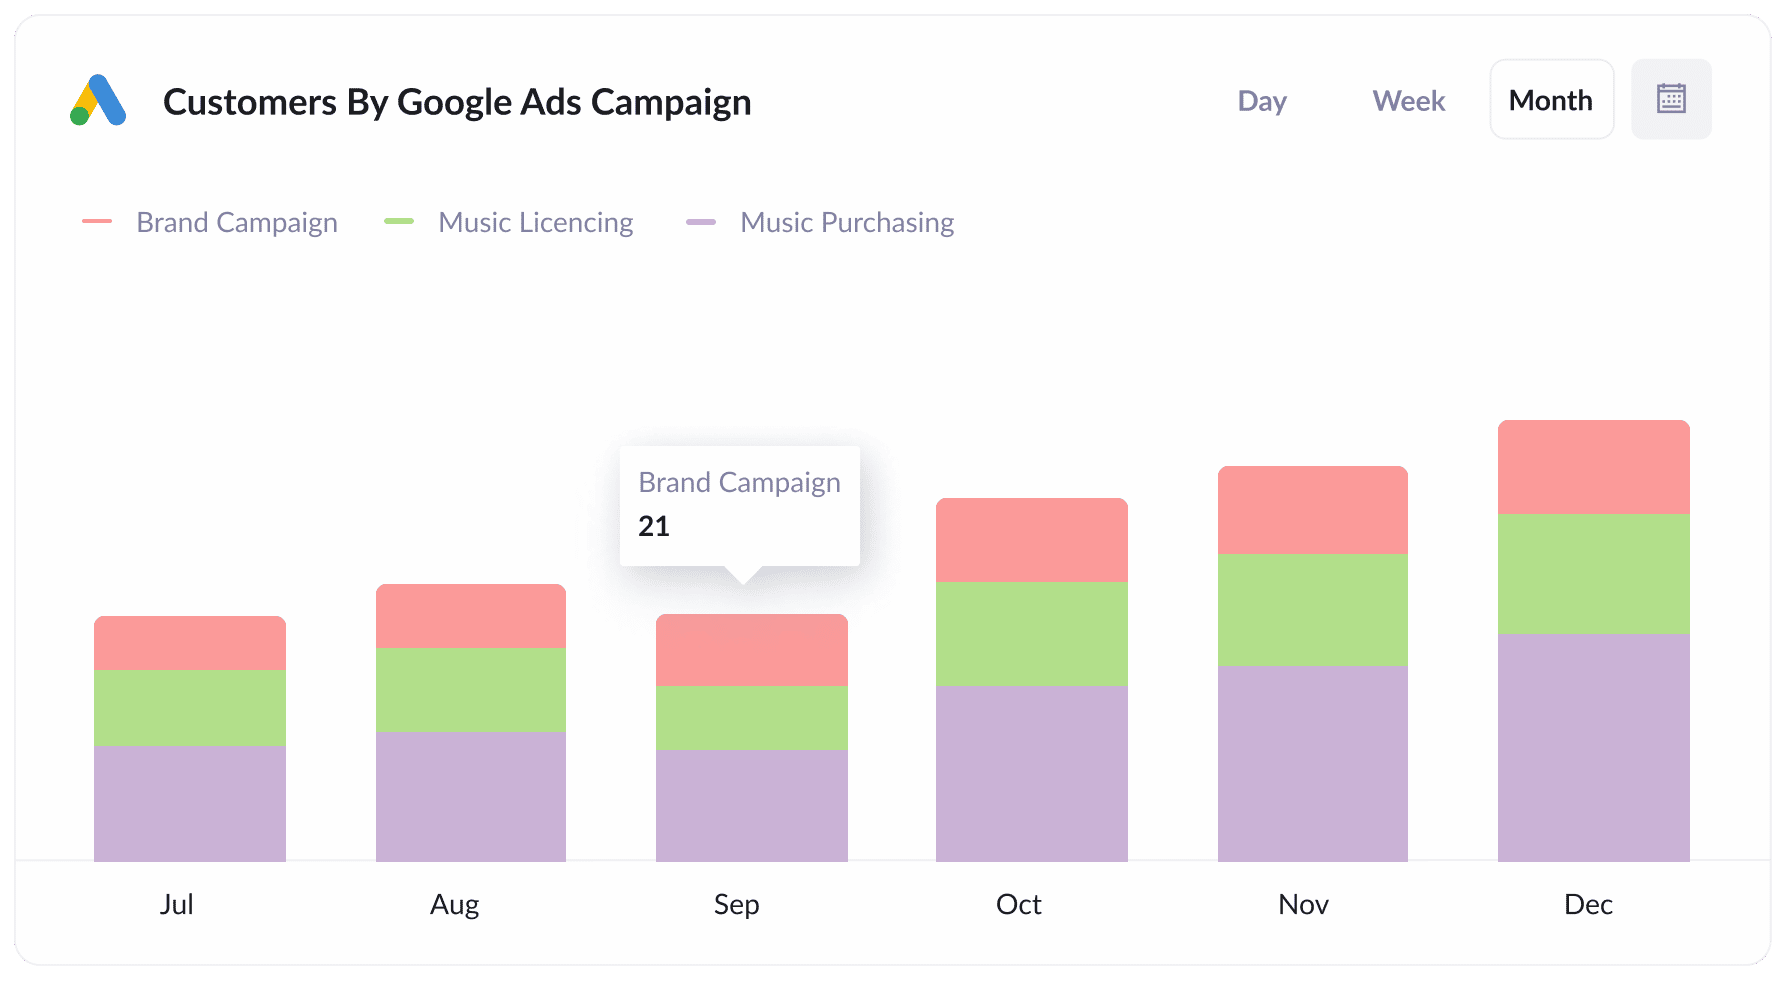
This report displays the number of customers you've received each month from your Google Ads, broken down by the campaign they came from.
It can help you understand which campaigns are generating the most customers for your business (and ultimately which ones you should be doubling down on to help grow).
3. Revenue by campaign, ad group or ad
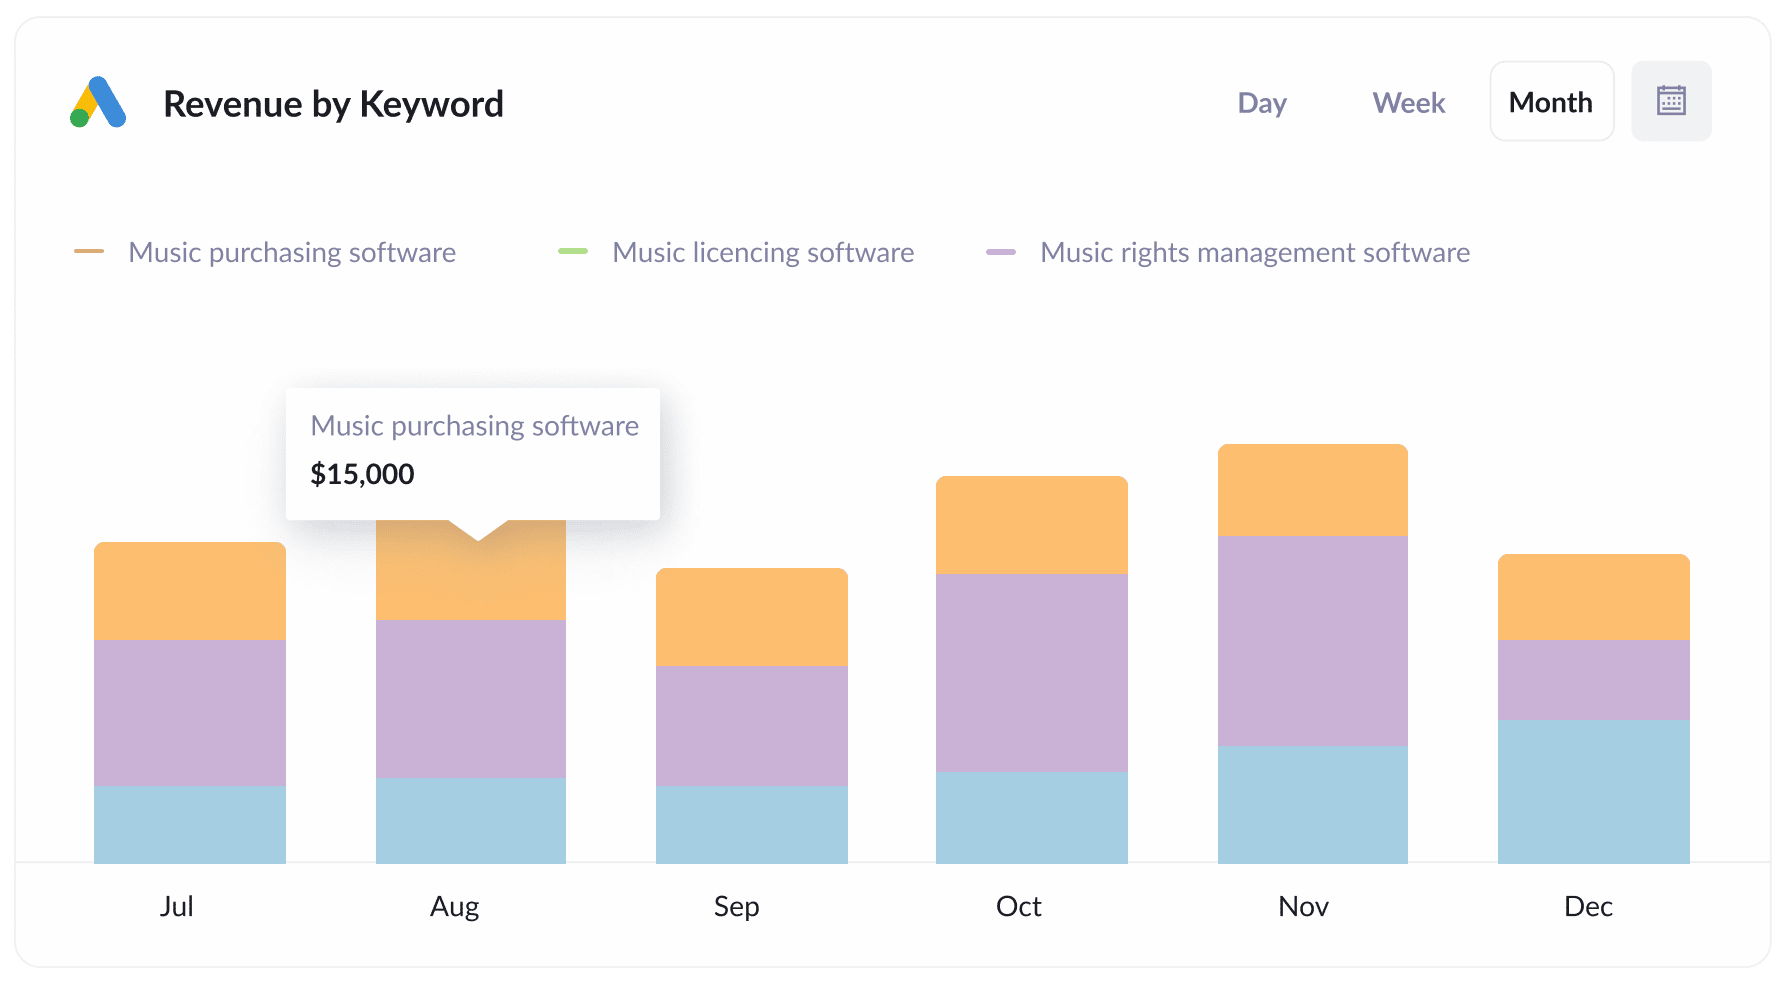
This report shows how much revenue you're generating each month by the keyword the customer found you through.
This can help you understand which of the keywords you are bidding on is performing best (and ultimately which ones you should increase bids on to get more customers & revenue).
Wrap up
If you want to be able to track how many leads & customers you are getting from your Google Ads, then using Attributer with Keap is a good solution.
Attributer will capture the UTM parameters behind your Google Ad campaigns and send them to Keap, where you can run reports that show the campaigns where your leads and customers have come from.
On top of that, it will also provide you with information on leads that come from other channels, allowing you to track the source of ALL your leads.
Best of all, it’s free to get started and usually only takes about 15-20 minutes to set up. What are you waiting for? Start your free trial today.
Get Started For Free
Start your 14-day free trial of Attributer today!

About the Author
Aaron Beashel is the founder of Attributer and has over 15 years of experience in marketing & analytics. He is a recognized expert in the subject and has written articles for leading websites such as Hubspot, Zapier, Search Engine Journal, Buffer, Unbounce & more. Learn more about Aaron here.