The best way to track Elementor Forms submissions as conversions in Google Ads
Increase your recorded Google Ads conversions by up to 23% by tracking Elementor Forms submissions server-side.

Capture the GCLID, GBRAID, and other Google Ads identifiers in your Elementor Forms with Attributer, then fire them back to Google Ads as a server side conversion (either at form submission or later when the lead converts in your CRM).
Most businesses get a meaningful chunk of their leads from Google Ads. The trouble is, knowing which ads are actually doing the work is harder than it should be.
That's because the standard approaches for setting up conversion tracking are either painful or unreliable.
Setting up Google Tag Manager means writing custom code, configuring triggers, mapping variables, and stitching the whole thing together. Most marketers don't have the budget or the bandwidth for that.
Meanwhile, the easy approach (firing a conversion when someone hits a thank you page) silently misses up to 30% of your actual conversions. Ad blockers stop the script from loading. Safari throws away the cookie within days. Anyone who clicks on mobile but converts on desktop falls through the cracks.
Fortunately, there's a better way.
In this article, we'll walk you through how to send covnersions directly to Google Ads (using something called server-side tracking) whenever someone submits an Elementor form on your website.
Why server side tracking in Google Ads matters
Most Google Ads conversion tracking is broken in ways that aren't obvious. The standard methods (Google Tag Manager events, thank you page hits) drop somewhere between 20% and 30% of your real conversions. You don't see them disappear; you just see lower conversion numbers in Google Ads than you should.
There are three main reasons this happens:
- Ad blockers: A growing share of internet users are running an ad blocker, and any tracking script that runs in the browser is the first thing those blockers kill. The Google Tag never fires, the conversion never gets recorded.
- Browser privacy features: Safari, Firefox, and others now actively delete tracking cookies after a couple of days. So if a lead clicks your ad on Monday and converts on Friday, the cookie that ties them together is already gone by Tuesday afternoon.
- Multiple devices: A lead clicks your ad on their phone over lunch, then comes back on their laptop that evening to fill in the form. Browser-based tracking can't connect those two sessions because they happen on different devices, so the original ad click never gets credit.
Server-side tracking dodges every one of those failures. Instead of asking the visitor's browser to phone home with a conversion event, the conversion is sent directly to Google Ads' servers. There's no script for ad blockers to kill, no cookie for Safari to delete, and the lead's email can stitch sessions across devices.
The numbers back it up. Google's own data shows server-side conversion tracking typically lifts recorded conversions by 23% on average, and reduces cost per conversion by around 10% (because Google's automatic bidding algorithms have more accurate conversion information to work with).
How to track Elementor Forms submissions in Google Ads using server side conversion tracking
There are multiple ways you can send conversions server-side to Google Ads, and it largely depends on when you want to send them.
Option 1: When a lead submits the form
For teams that want to fire the conversion right away (the moment the form is submitted, rather than waiting for a CRM milestone), Converly is the easiest way to make it happen.
Converly is a tool that makes it easy to send server-side conversions to Google Ads, Meta Ads, and other ad platforms when someone submits a form on your site.
It's designed for non-technical folk and strips away all the complexity. There's no Google Tag Manager configuration to wrestle with, no custom JavaScript to hook into Elementor's form submission event, no SHA 256 hashing to do by hand, no Google Ads API to learn.

Setting it up takes a few clicks. You simply pick the trigger (like when an Elementor form is submitted) and pick the actions you want to happen (like creating a conversion in Google Ads), and you're done.
From there, Converly watches your site for Elementor form submissions. When one happens, it pulls the lead's identifying details (name, email, phone), runs them through the SHA-256 hashing Google Ads requires, and pushes all the data (along with the GCLID, GBRAID, WBRAID, and User Agent) to the Google Ads API.
The result is the full benefit of server-side tracking (the 23% lift in recorded conversions, the 10% drop in cost per conversion) without ever writing a line of code or learning what SHA 256 is.
Option 2: When a lead becomes a customer
Firing the conversion at form submission works for high intent forms (a sales demo request, for example), but it's not ideal for everything. If you're generating top of funnel leads through Elementor Forms and pushing them through a real sales pipeline in Salesforce, Pipedrive, or HubSpot, you probably don't want to count every form fill as a conversion. You want to count the ones that get qualified by your sales team, or actually go on to become a customer.
That's where this approach comes in. Capture the right data on the form, send it through to your CRM with the rest of the lead's details, then fire the Google Ads conversion later, once the lead has hit whatever milestone in your sales process means 'this one was worth it'. Here's the breakdown:
1. Install Attributer on your website and add a hidden field
Start by signing up for a 14 day free trial of Attributer. After signing up, you'll be given a snippet of code to install in the head of your site.
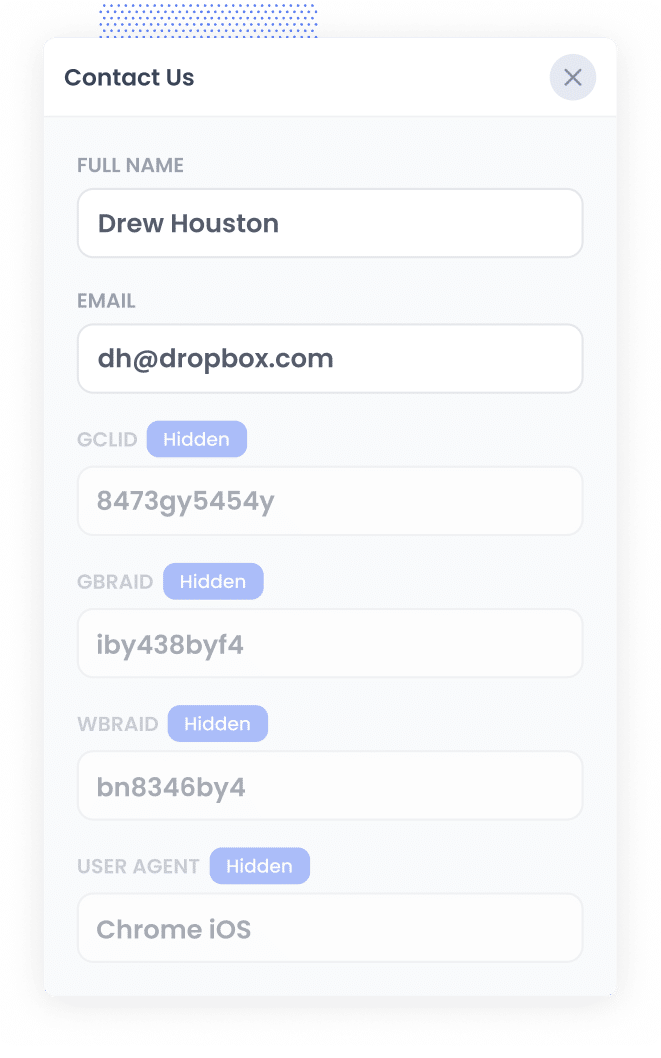
The Google Ads identifiers you need to capture are:
- GCLID
- WBRAID
- GBRAID
- User Agent
For each one, you need a corresponding hidden field on your Elementor form. To add them, go to the page in Elementor, select the Form widget, expand the Form Fields section in the Content panel, and click '+ ADD ITEM'. Set the Type to Hidden, and give the field the name Attributer expects (the exact names live in Attributer's docs).
2. Attributer writes data into the hidden fields
With the code installed and the hidden fields added, Attributer takes over.
Every time a visitor arrives on your site, Attributer checks whether they came from a Google Ads click. If they did, it grabs the GCLID and the other identifiers Google needs to attribute the conversion (GBRAID, WBRAID, the User Agent string).
It then stores them so the identifiers stay with the visitor (even if they bounce around different pages or come back days later.) \
Then, when they fill out an Elementor form, Attributer writes the values straight into the hidden fields you set up in step 1 and they are captured with the form submission.
3. Data is sent to your CRM
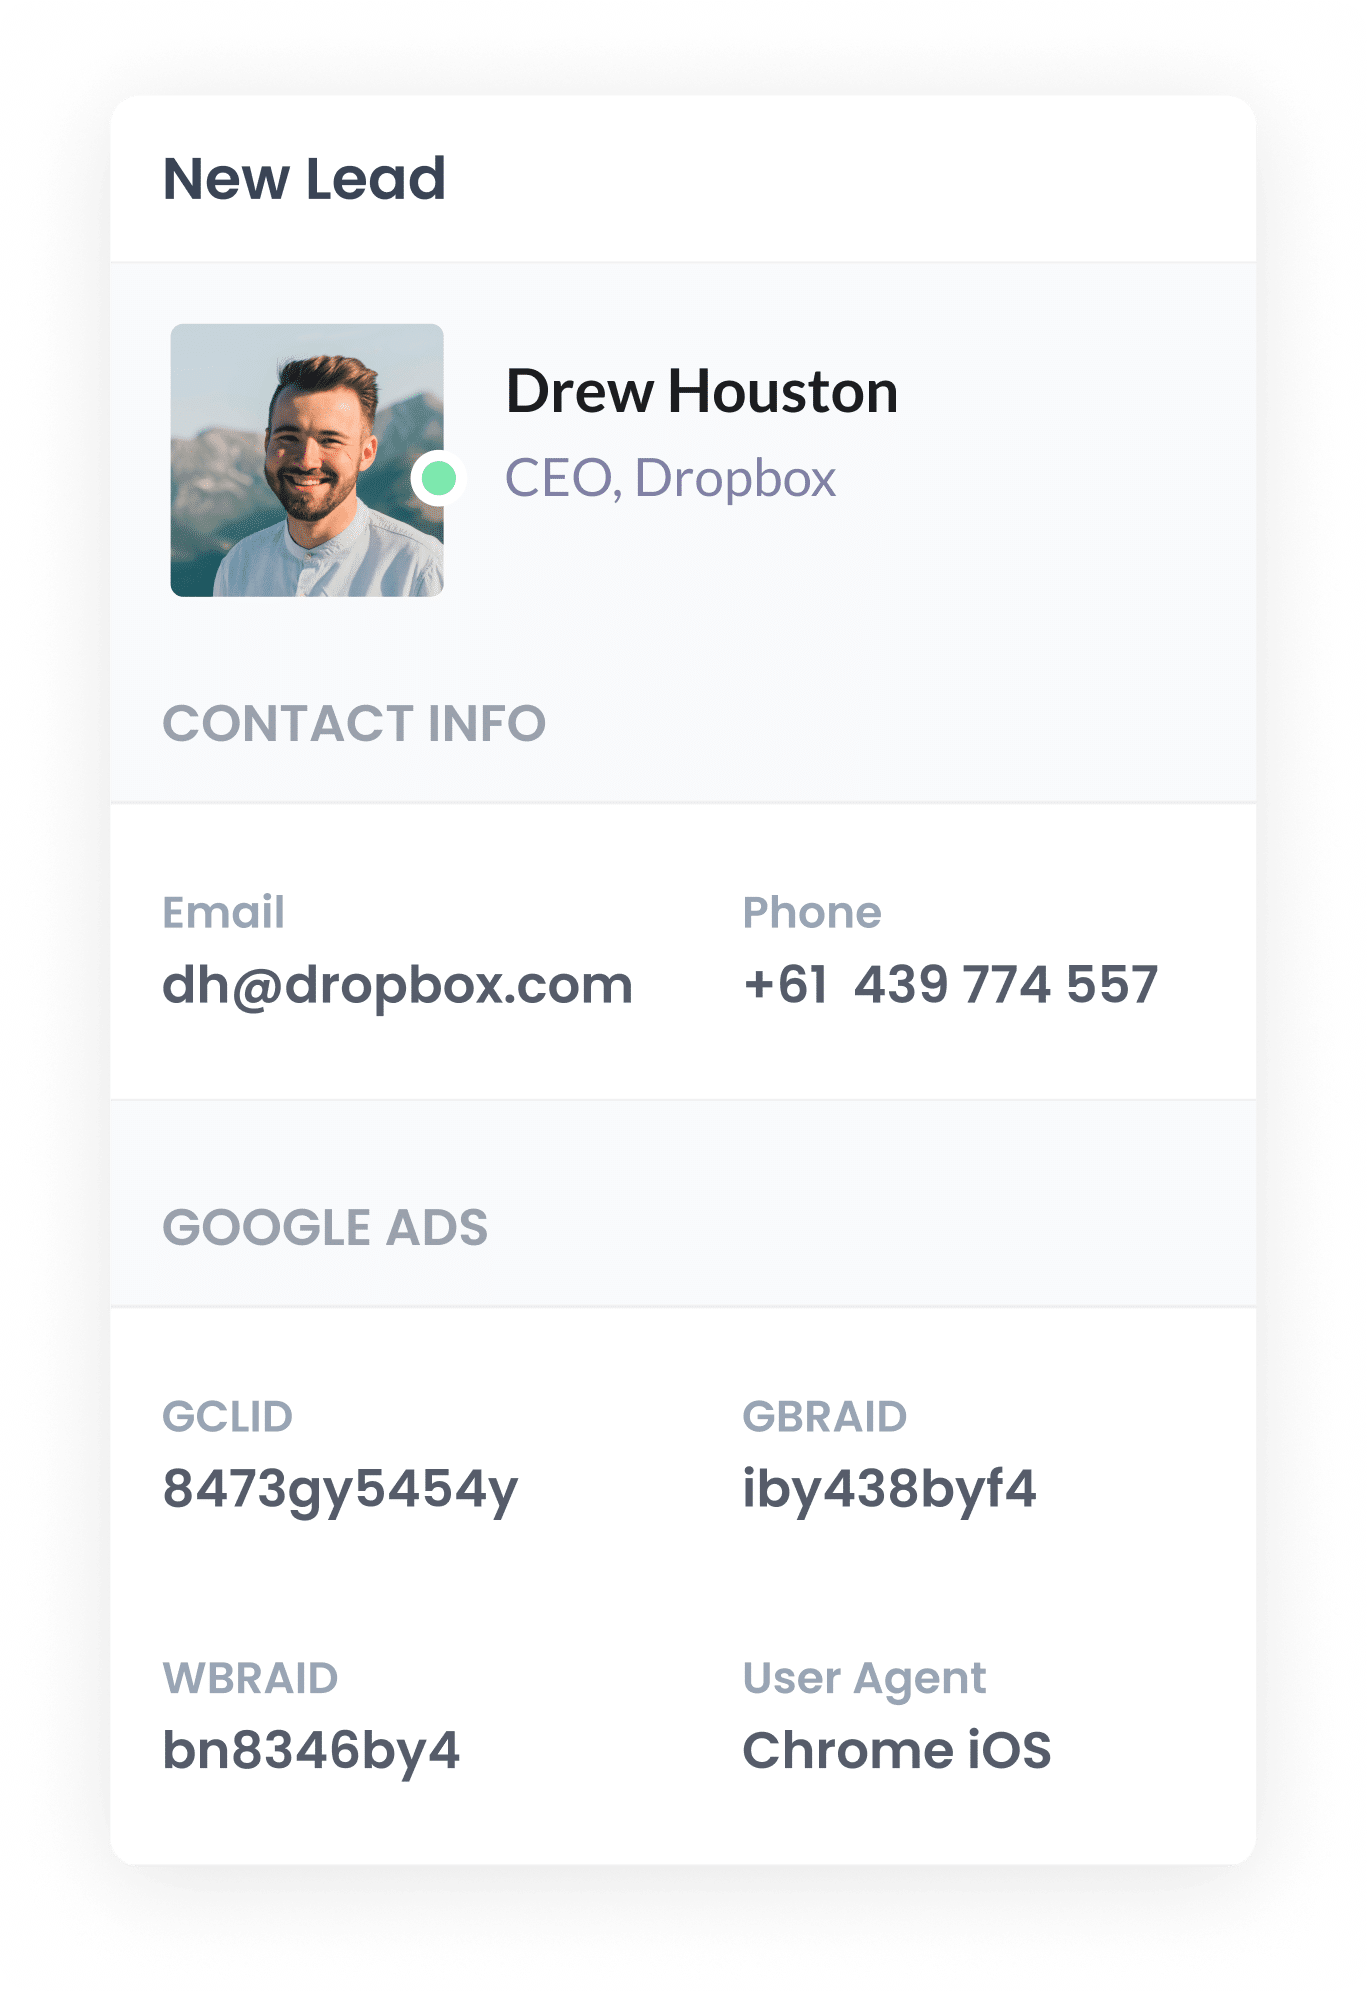
Once the data is captured with the for, submission, you can send it to your CRM (like Salesforce, HubSpot, Pipedrive, or ActiveCampaign).
Elementor makes this part easy. Open the form's Actions After Submit panel and you've got native connections for HubSpot, ActiveCampaign, Mailchimp, and Zapier (which fills in the gaps for any CRM that doesn't have a direct connector). There's also a generic Webhook action if you want to fire the data anywhere else.
Once the data lands in the CRM, it sits on the contact or lead record alongside the lead's name and email, ready to be used later when you want to fire the conversion back to Google Ads.
4. Send the data to Google Ads
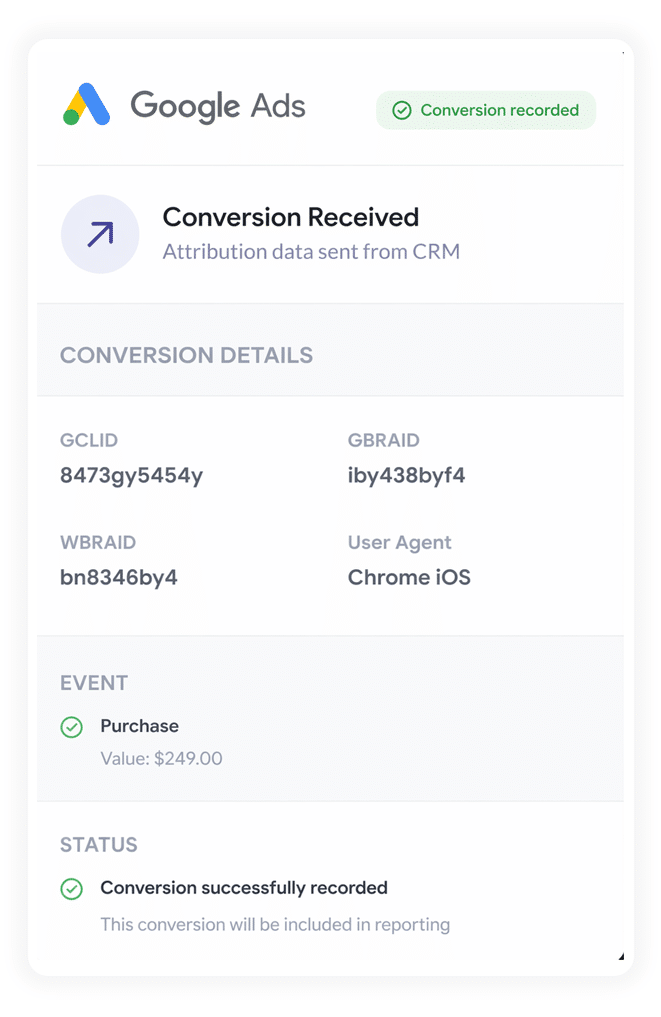
The final step is to trigger the conversion in Google Ads.
The trigger for sending the conversion is whatever signal in your CRM means 'this lead is worth tracking as a Google Ads conversion'. That might be a new deal getting created. It might be the deal moving to a specific stage. It might be the deal being marked closed won.
Whatever you decide, tools like Zapier and Make are your bets bet for sending the data back to Google Ads. Both can listen for events in just about any CRM and trigger downstream actions, including Google Ads' offline conversion endpoint. They also give you a clean visual mapper for taking the values Attributer captured (the GCLID, GBRAID, WBRAID, and User Agent) and dropping them into the right Google Ads fields without writing any code.
Why sending server side conversions to Google Ads is the best approach
Here are the 4 reasons why server-side tracking is the best way to send conversions to Google Ads:
1. Overcomes ad blockers
Ad blockers are everywhere. Recent estimates suggest that over 30% of all internet users globally use one, and that number keeps climbing.
Whenever a script runs in the browser to track a conversion (Google Tag Manager firing on a thank you page, for example), an ad blocker can stop it before it ever reaches Google. The conversion happened, but you'll never see it in your reports.
Server-side tracking happens outside the browser entirely. The conversion is sent straight to Google Ads' servers, with no script for an ad blocker to intercept. Every lead gets counted, regardless of what the visitor has installed on their machine.
2. Bypasses Safari & iOS privacy limitations
Apple's Intelligent Tracking Prevention deletes third-party tracking cookies set by ad networks like Google Ads, often within a day or two of them being set. For a lot of sales cycles, that's a problem. Your average lead doesn't convert the same day they first hit your site, so by the time they fill out a form, the cookie that linked them to your ad is long gone.
Server-side tracking solves this by sending the lead's email address straight to Google Ads' servers. Once Google Ads has the email and the original click ID, it can stitch the conversion back to the original click, no matter how many days (or weeks, or months) has passed.
3. Works across devices
Imagine a lead seeing your ad while killing time on their phone, clicking through, looking around, then closing the tab. Two days later, they remember your business, search you up on their work laptop, and fill out the form there.
If you are using browser-based tracking, those are two completely separate visitors. The original ad click is on their phone's browser, the conversion is on their laptop's browser, and there's no thread connecting the two.
Server-side tracking fixes by passing the email address of the lead directly to Google's servers, which Google then uses to match the conversion to the ad across devices. The original ad click finally gets credit for the conversion it actually drove.
4. Eliminates duplicate and messy data
Browser based tracking has a whole heap of other problems too. A page refresh on a thank you page can fire a duplicate conversion. A slow connection means the tracking pixel sometimes loads, sometimes doesn't. A user who closes the tab too fast might never trigger the event at all.
Server-side tracking, on the other hand, only fires on real form submissions. The result is one conversion per real lead. The numbers in Google Ads start lining up with the numbers in your CRM.
3 reports you can run when you properly send conversions to Google Ads from Elementor Forms
In a decade and a half of running marketing teams, I've personally spent more on Google Ads than I care to add up, and I've built more reports trying to understand what was working than I can count.
These three are the ones I keep coming back to, and each one is only possible if you've got proper conversion data flowing back into Google Ads.
1. Conversions by Keyword
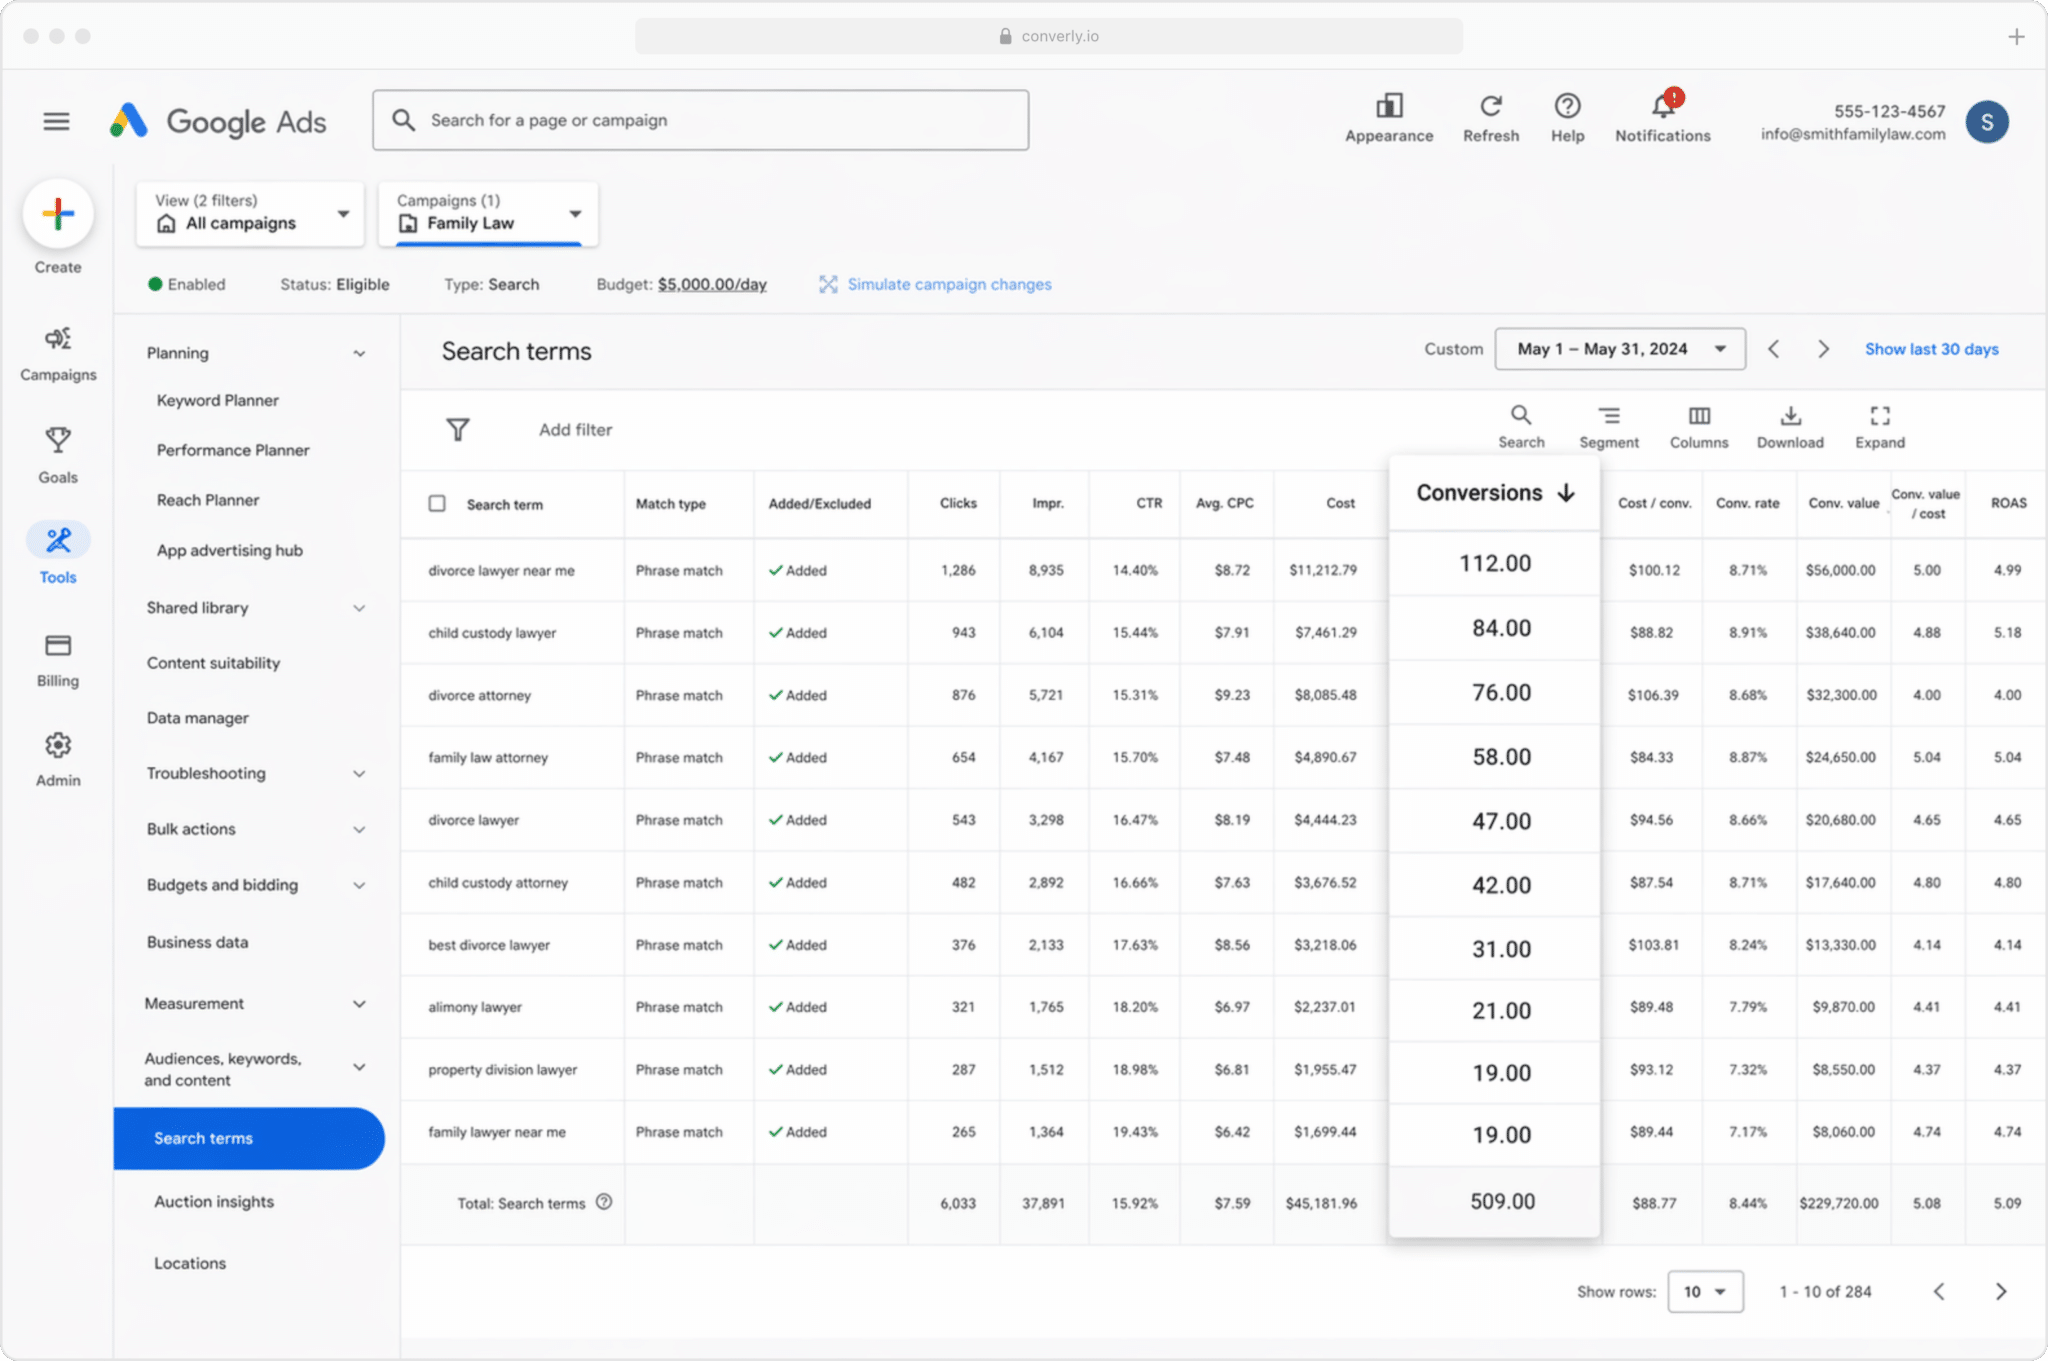
Most businesses running Google Ads are bidding on a lot of different keywords.
A roofing contractor might have one campaign for 'roof repair Atlanta', another for 'metal roof installation Atlanta', another for 'commercial roofing services'. Each campaign has its own set of keywords, and not all of them perform equally.
This report helps you see which ones are actusally working. Instead of just showing impressions and clicks, it shows you which keywords are producing real conversions.
The keywords that are getting clicks but never closing? Easy targets to cut. The keywords that are quietly producing your most profitable customers? A great opportunity to bid higher and get more leads.
2. Conversion Value by Campaign
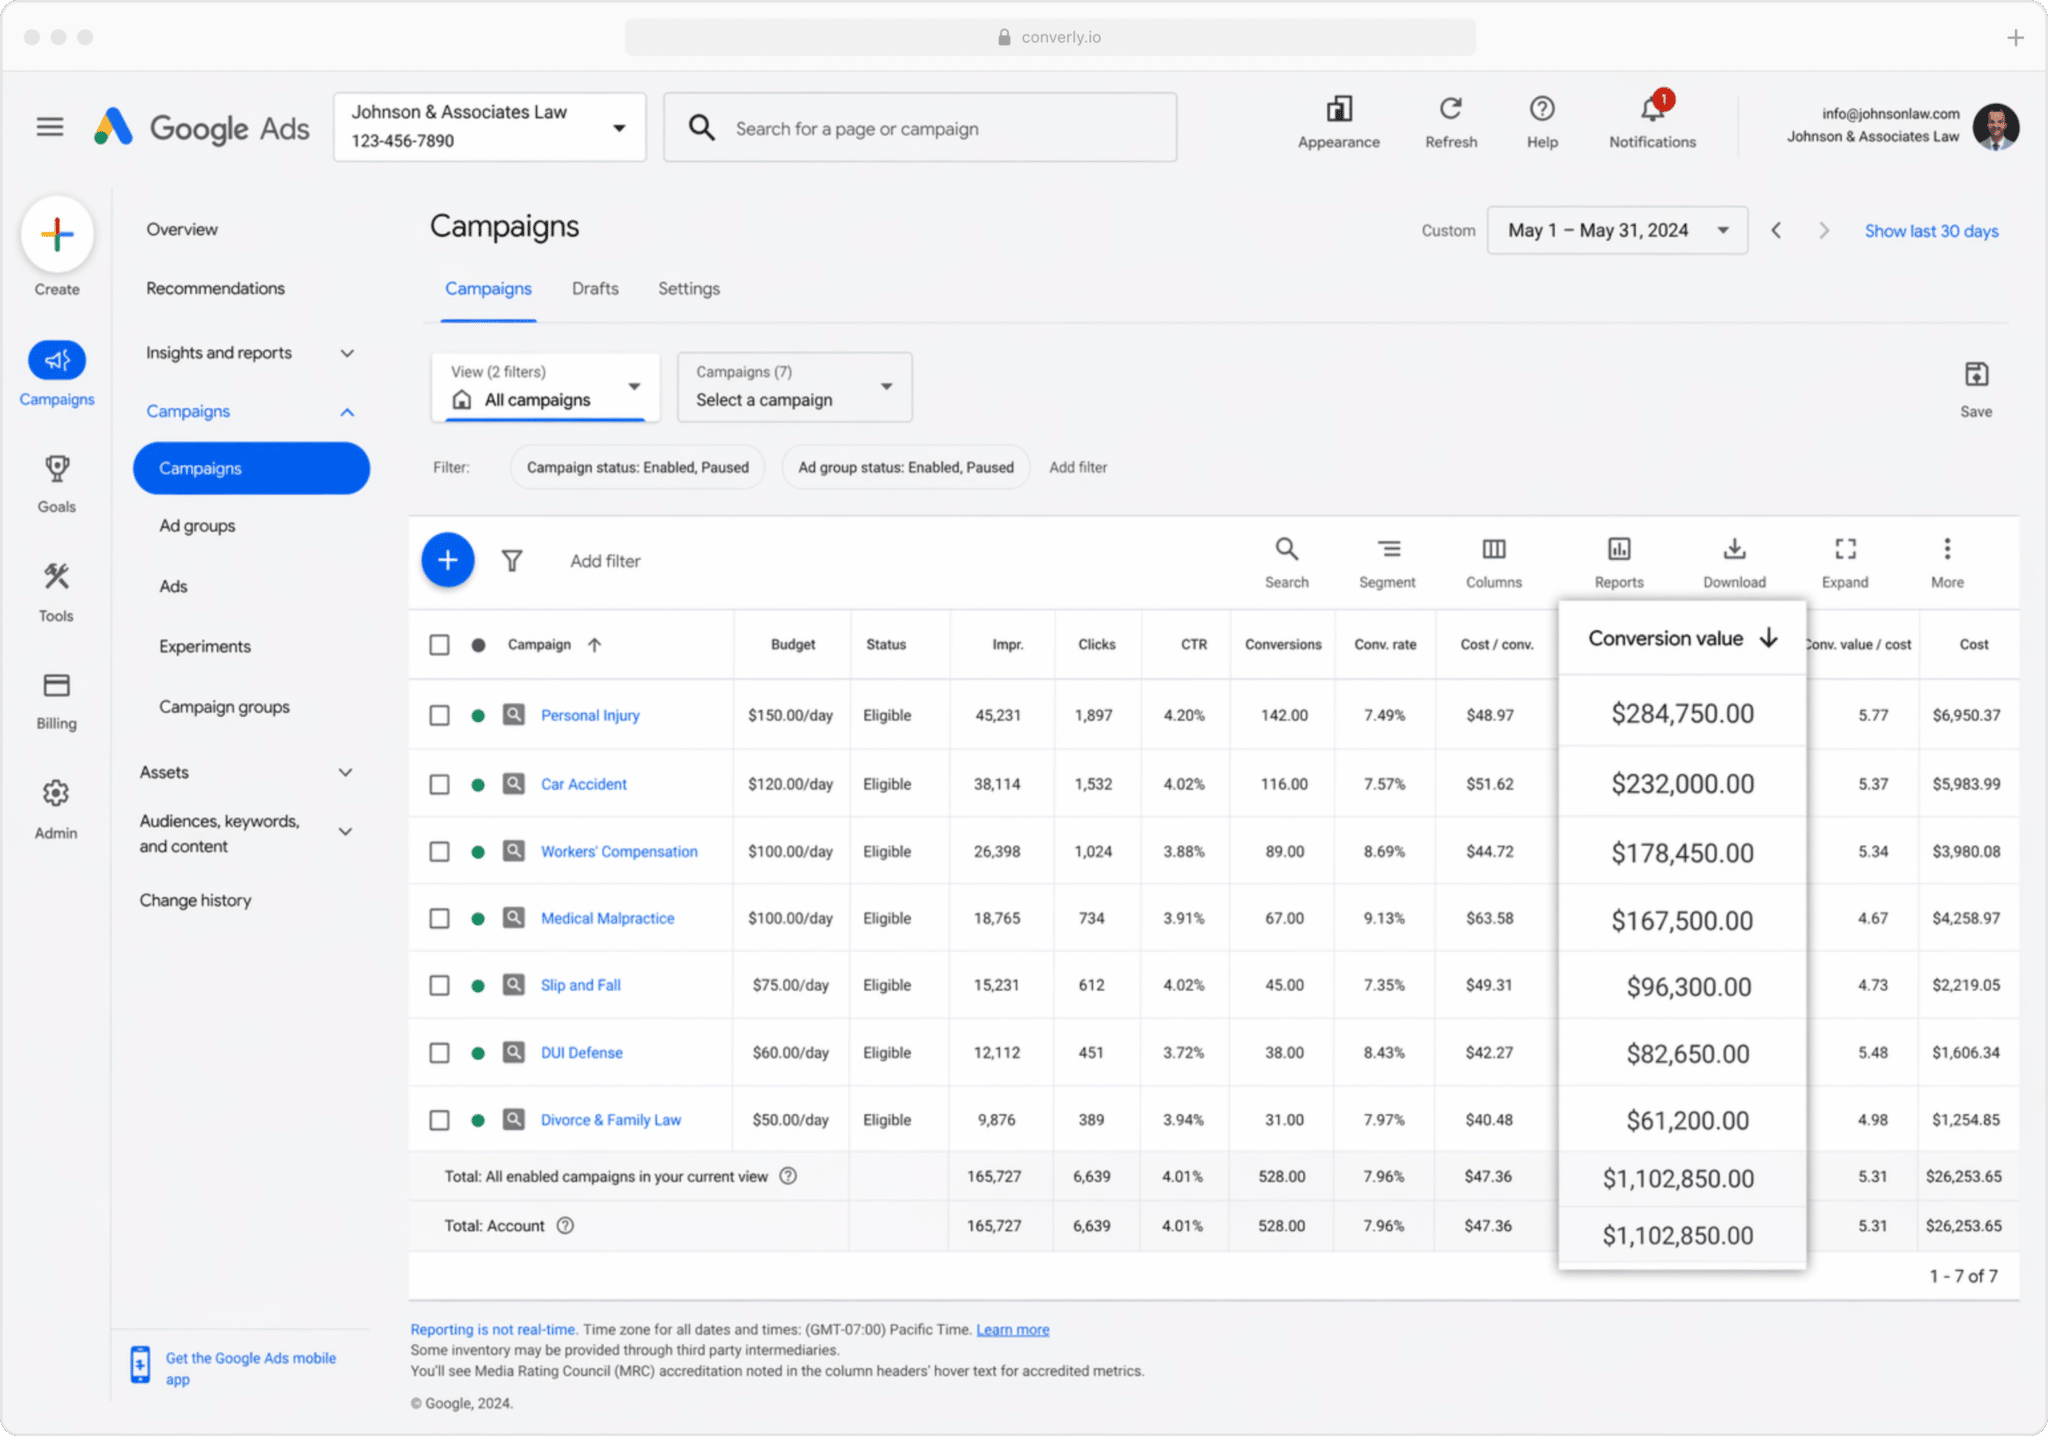
When you fire the conversion from your CRM, you can pass through the value of the deal so Google Ads knows not just that a conversion happened, but how big it was.
That distinction matters more than people realise. A roofing contractor running ads for both 'gutter cleaning' and 'full roof replacement' is probably winning customers from both campaigns. Treated as equal conversions, they look about the same on a Google Ads dashboard. Treated by revenue, they look completely different: a gutter cleaning job might be a few hundred dollars, a full roof replacement might be $30,000.
Once your conversion data has dollar amounts attached, you can finally see which campaigns are actually generating revenue, not just leads.
3. Conversions by Geography
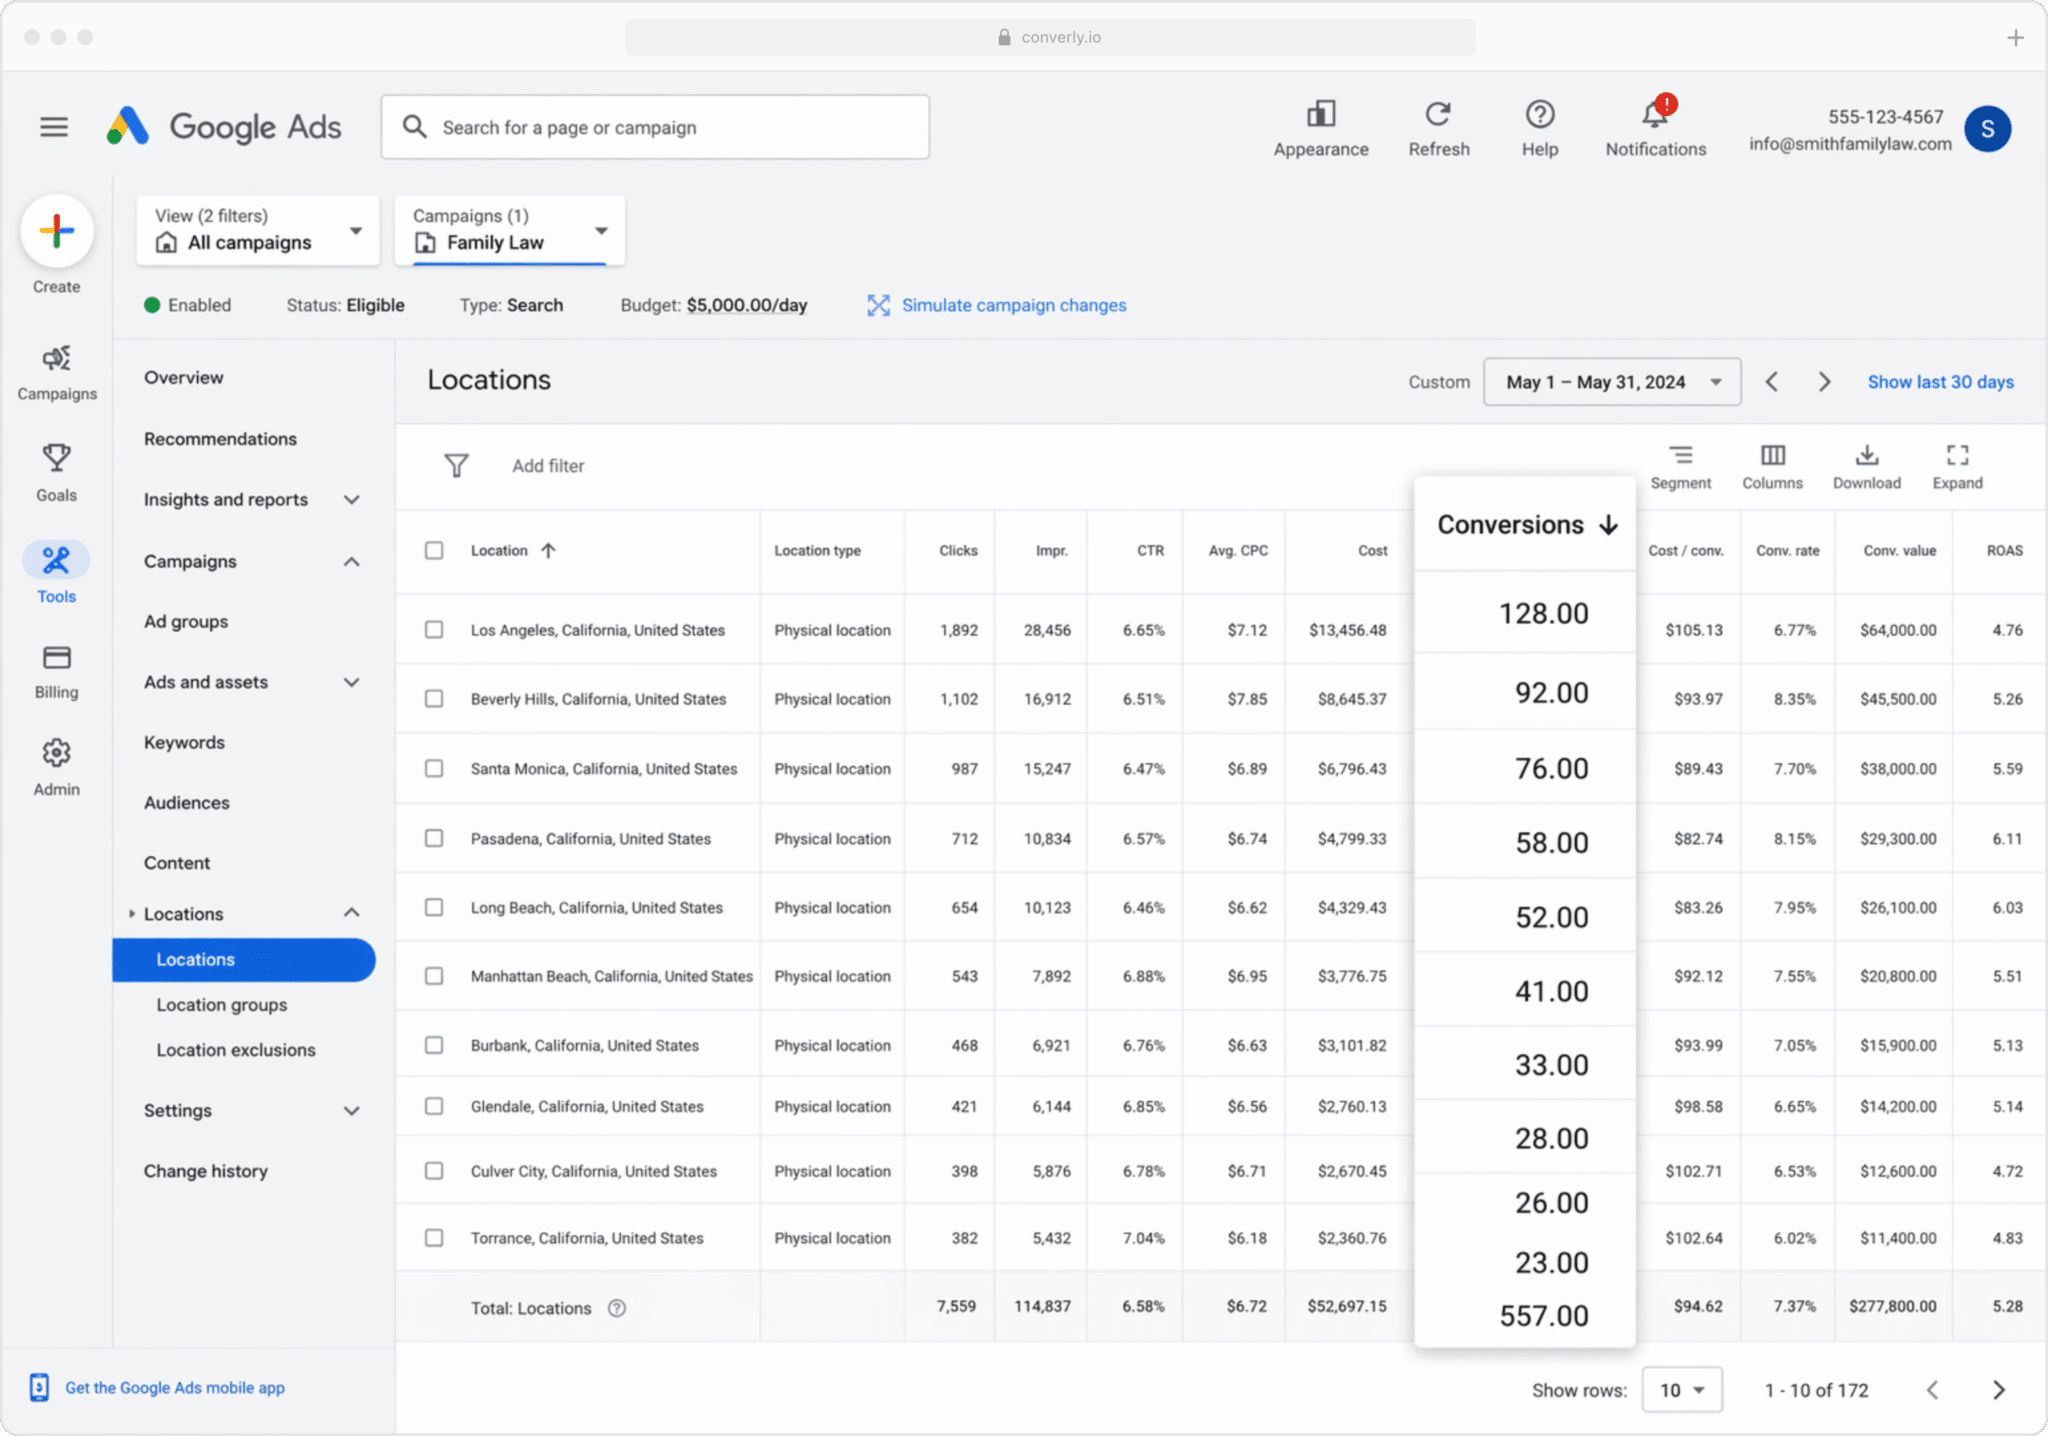
This one is especially useful for businesses that serve a local market (like roofing companies for example). It shows how many conversions each geographical region generated.
You can view this at a high level (country, state, or city), or drill down to a specific postcode. That lets you see whether your leads are actually coming from your target service areas, or whether you're wasting budget on clicks from suburbs you dont even serve.
Once you've got this data, you can use Google's Location Bid Adjustments to tell Google to bid more aggressively in the postcodes that produce your most profitable customers, and lower bids (or stop spending altogether) in the areas that generate clicks but never fill out your forms.
Wrap up
Accurate conversion tracking is the difference between a Google Ads account that quietly bleeds money and one that delivers a real return.
With proper conversion data in your account, you can make better manual decisions (where to bid higher, which campaigns to pause, which geographies to lean into), and Google's automated bidding has the signals it needs to do its job properly.
But if you're missing half of your conversions because of ad blockers and cookie deletion, you're effectively training Google's algorithms on bad data, and they'll respond by serving your ads to the wrong people.
So whatever flavour of server side tracking you settle on (firing on form submission, firing later when the lead becomes a customer, or both), the important thing is to do it. Attributer makes capturing the right data on Elementor Forms straightforward, and from there you've got plenty of options for getting that data back into Google Ads.
Get Started For Free
Start your 14-day free trial of Attributer today!

About the Author
Aaron Beashel is the founder of Attributer and has over 15 years of experience in marketing & analytics. He is a recognized expert in the subject and has written articles for leading websites such as Hubspot, Zapier, Search Engine Journal, Buffer, Unbounce & more. Learn more about Aaron here.