How To Send Offline Conversions to Microsoft Ads From Your CRM
Learn how to capture the Microsoft Click ID (MSCLKID) in your CRM and send it back to Microsoft Ads to trigger an offline conversion.

Do you want to send offline conversions back to Microsoft Ads when a lead becomes a deal or a customer in your CRM?
It’s a smart move. While it’s much easier to track things like form submissions, all leads aren't created equal and you don’t want to be sending conversions back to Microsoft Ads just because someone completed a form on your website. It could be an existing customer asking a question, or someone trying to sell you something.
So in this article, we’ll walk you through how to capture the required data about your leads in your CRM and send it back to Microsoft Ads as a conversion when a meaningful action occurs (e.g., the lead is marked as qualified or a deal is created or closed).
When to send offline conversions back to Microsoft Ads
When I speak to people about sending offline conversions back to Microsoft Ads, most of them want to trigger the conversion when a deal is closed in the CRM and the lead officially becomes a customer.
I can understand why they want to do this, but there’s some technical limitations that mean this might not be the best approach.
The first is that Microsoft Ads’ automated bidding strategies (like Maximize Conversions, Target CPA, or Enhanced CPC) need at least 50 conversions per month to give the system enough data to learn what a good lead looks like for you and to adjust bids accordingly.
But the reality is, most small businesses aren’t closing 50 new customers every month. So if you wait until a lead becomes a customer to send the conversion back, it likely won’t provide enough data for Microsoft Ads to optimize effectively.
Similarly, you also need to keep in mind Microsoft Ads’ conversion window, which is 30 days by default (but can be extended to a maximum of 90 days). If your sales cycle is longer than that, there could be too much time between the ad click and the eventual deal. This means that if you were to upload the lead as an ‘Offline Conversion’ to Microsoft Ads it wouldn’t count as it falls outside the maximum conversion window.
All of which is to say that you’re often better off choosing a milestone earlier in the sales process to use as the trigger for the offline conversion. This could be when a sales rep qualifies the lead or when a deal is created in the CRM (as opposed to when it is closed won). This increases your chances of hitting the volume needed for Microsoft’s machine learning systems to work.
5 steps to send offline conversions to Microsoft Ads from your CRM
Now that you’ve decided the ‘conversion point’ that you are going to use to send offline conversions back to Microsoft Ads, let’s walk you through how to set it up.
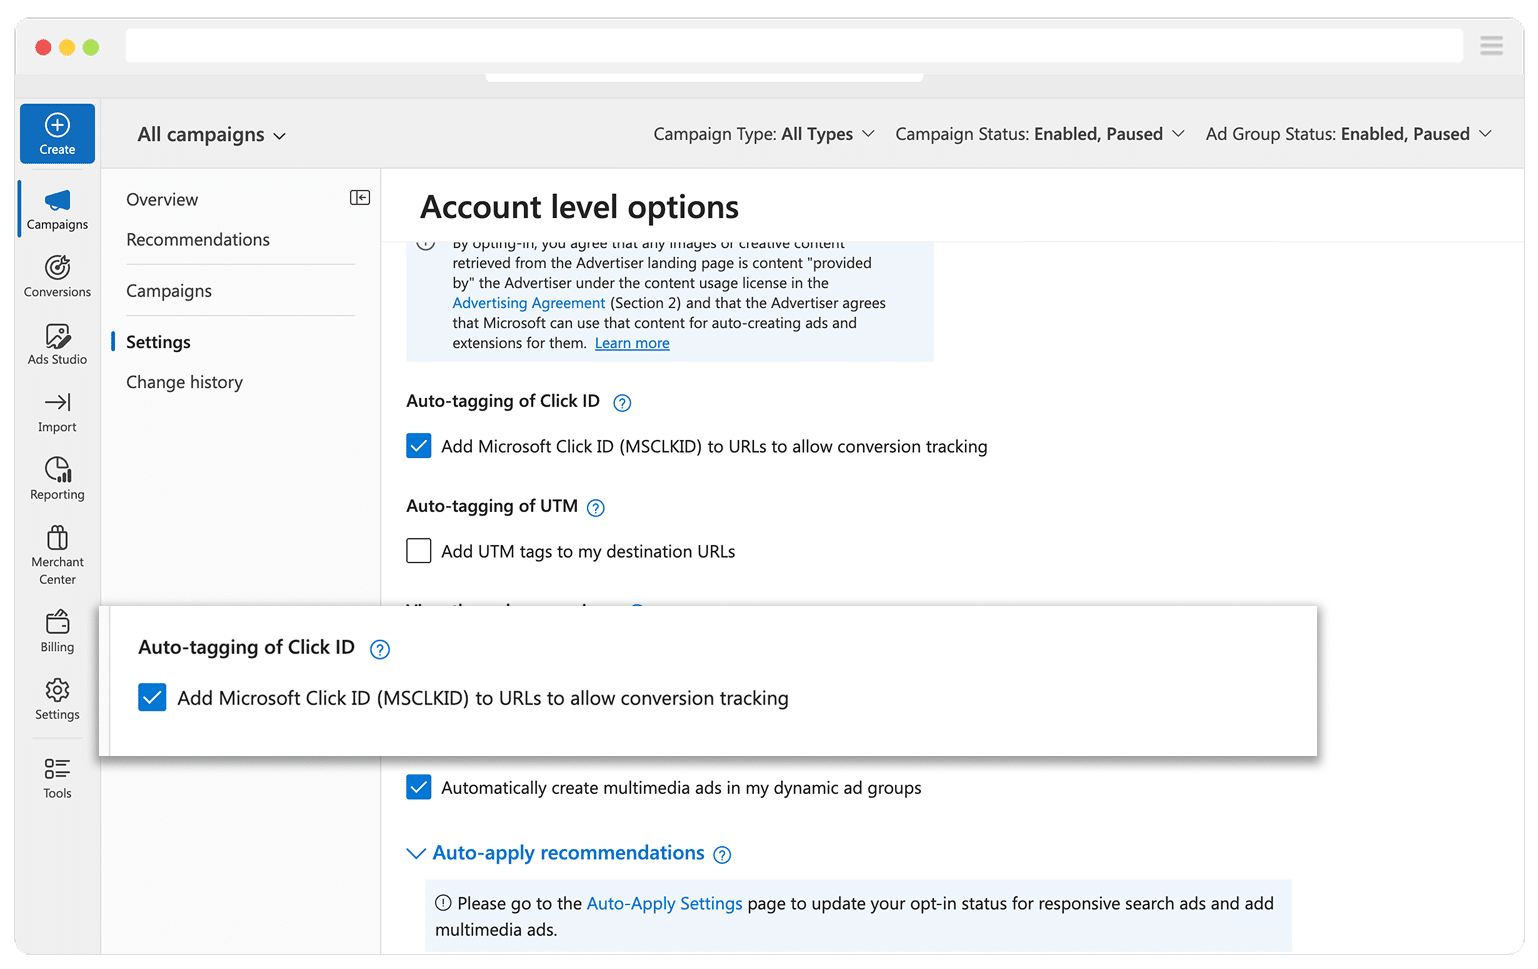
Step 1: Set up autotagging in Microsoft Ads
The first step is to enable autotagging in your Microsoft Ads account.
Once turned on, Microsoft Ads will begin appending a unique “Microsoft Click ID” (MSCLKID) to the URL whenever someone clicks one of your ads.
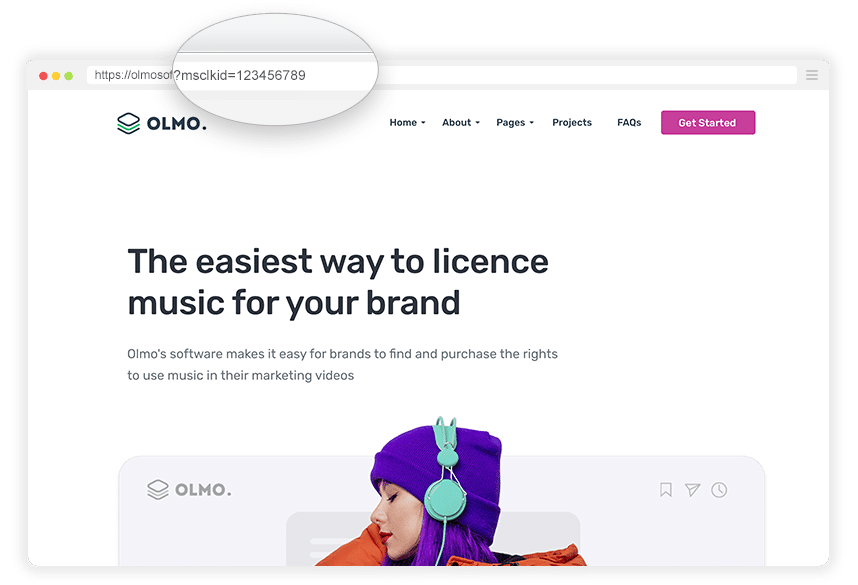
So if I was running Google Ads for Attributer and someone clicked one of my ads, instead of landing on https://attributer.io they would actually get sent to:
https://attributer.io?msclkid=735785837
This MSCLKID number is what you need to capture in your CRM and send back to Microsoft Ads to tell it which person converted.
You can turn it on by going to Campaigns - Settings - Account Level Options and ensuring “Auto-tagging of Click ID” is turned on.
Step 2: Capture the MSCLKID in your CRM with Attributer
The easiest way to capture the MSCLKID in your CRM is using a tool called Attributer.
If you’ve never heard of it, it’s a small bit of code you place on your website. When someone lands on your site, it stores information about where they came from (like the MSCLKID, any UTM parameters you have added to your ads, etc).
Then, when someone completes a form on your website and becomes a lead, it passes through all the data (the GCLID, UTM parameters, etc) with the form submission, and it can be sent to your CRM and other tools.
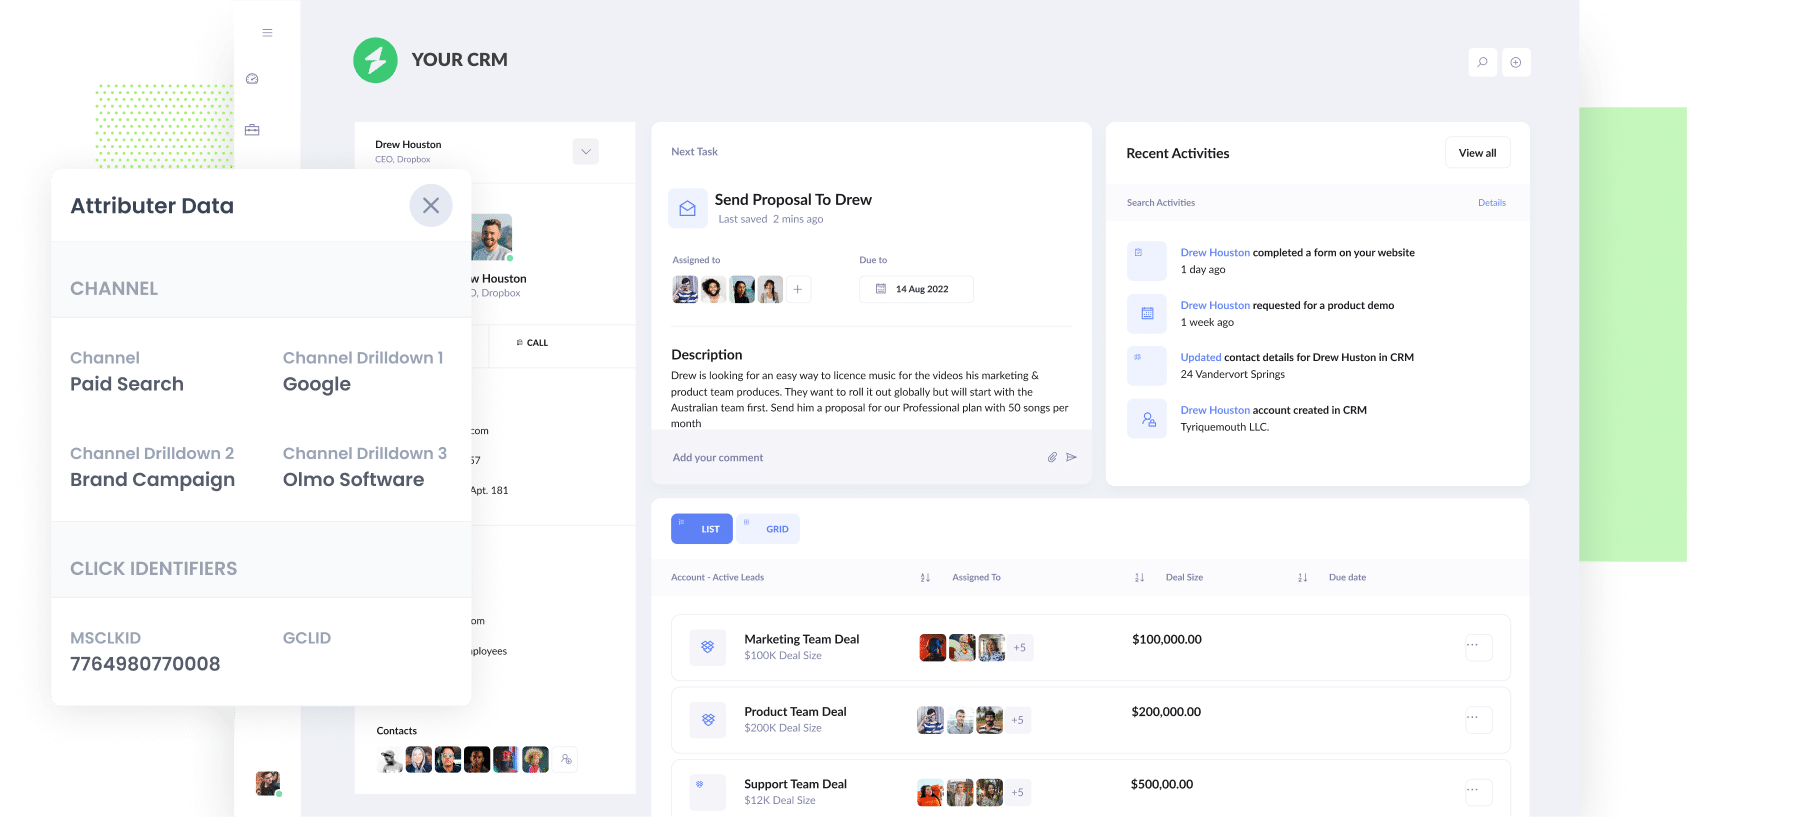
As a bonus, it will also provide other attribution on your leads beyond just UTM parameters and the GCLID. For instance, it will also tell you when a lead comes from organic channels like Organic Search, Organic Social, etc.
To set it up, you’ll need to start a 14-day free trial of Attributer and then place the code you receive on your website (instructions are available here). You can then add the hidden fields to your form (instructions here) and Attributer will write data about where the lead came from (including the MSCLKID) into the hidden fields and it will be captured with the form submission and can be sent to your CRM (it works with 100’s of CRM tools, including Salesforce, Pipedrive, HubSpot, GoHighLevel, Zoho CRM, Close CRM and more).
Step 3: Create the Offline Conversion in Microsoft Ads
The next thing you need to do is go and set up a new conversion in Microsoft Ads.
To do that, log in to your Microsoft Ads account, select the Conversions option from the main left-hand menu and then select Conversion Goals.
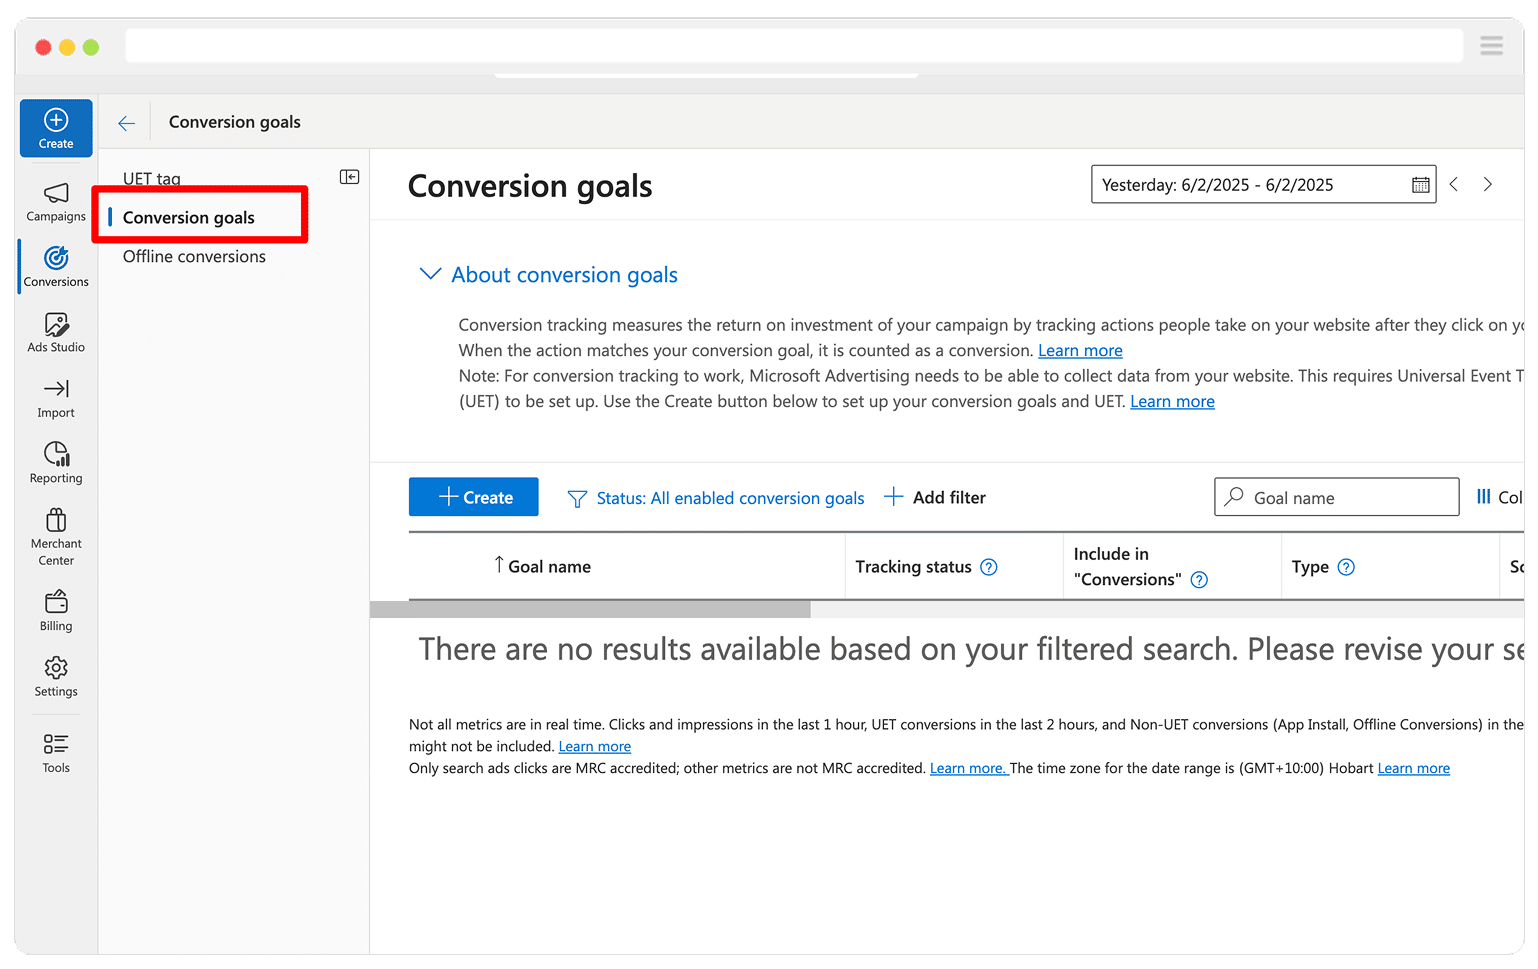
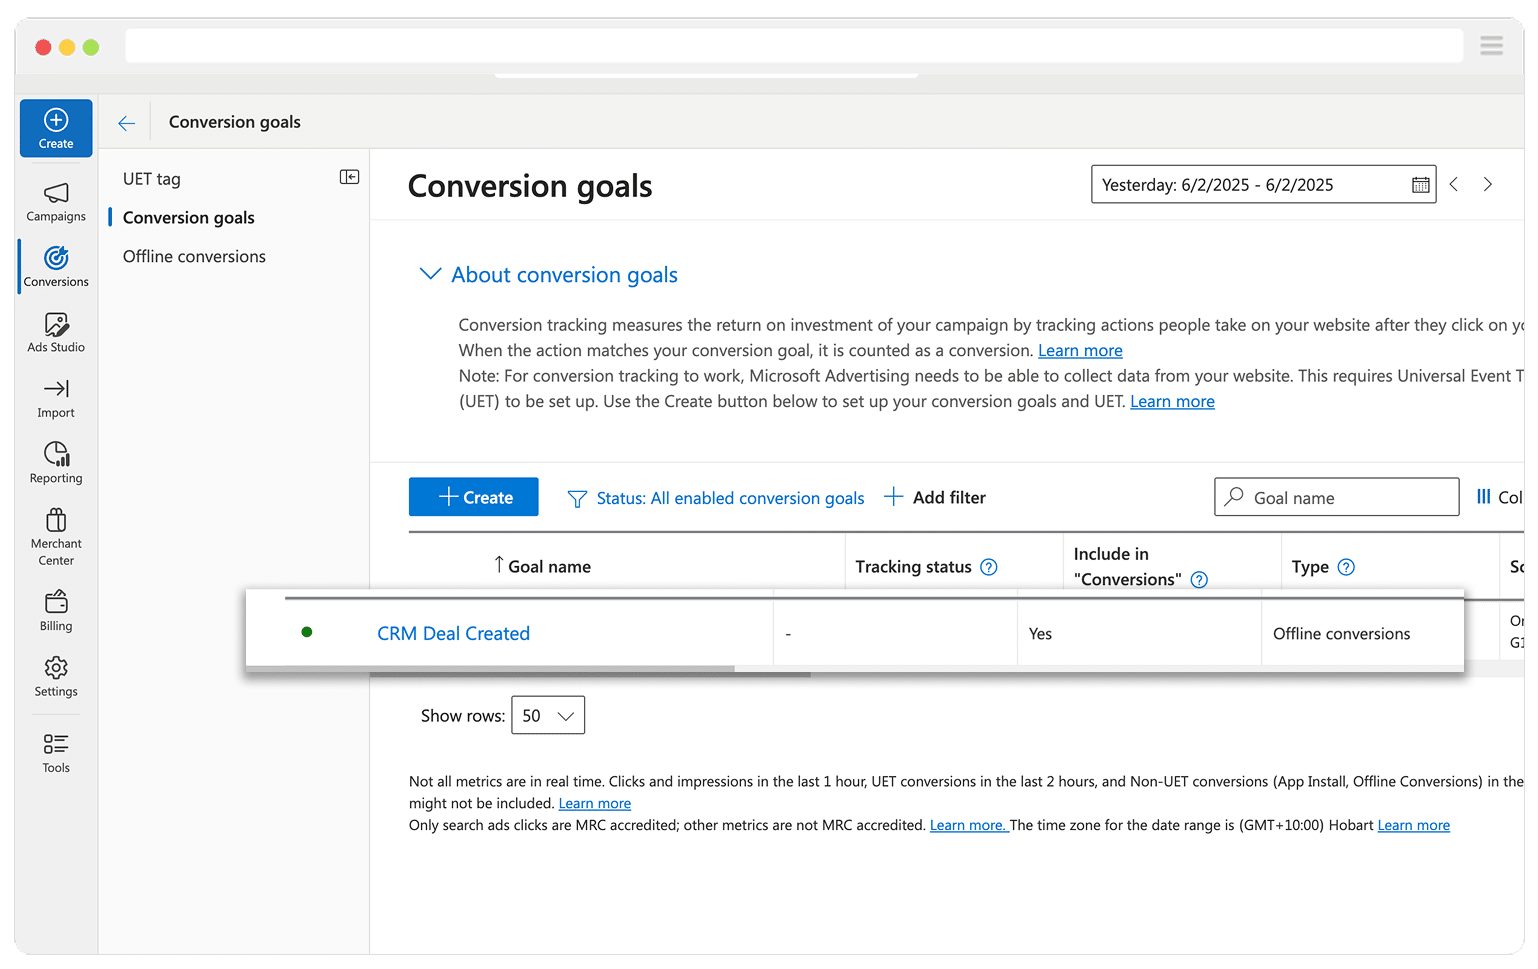
Once on the Conversion Goals page, click the button to add a new Conversion and then complete the Conversion Goal wizard that appears. Make sure to select it's an Offline conversion and to give it an appropriate name (like CRM Deal Created).

Once finished, you should have created a new Conversion Goal and it should appear in your account like below.
Step 4: Build your list of conversions to import into Microsoft Ads
Once you’ve received a few offline conversions and would like to start sending them back to Microsoft Ads, you’ll need to build a list of these conversions in an Excel spreadsheet or Google Sheet so that you can then go and upload these back into Microsoft Ads.
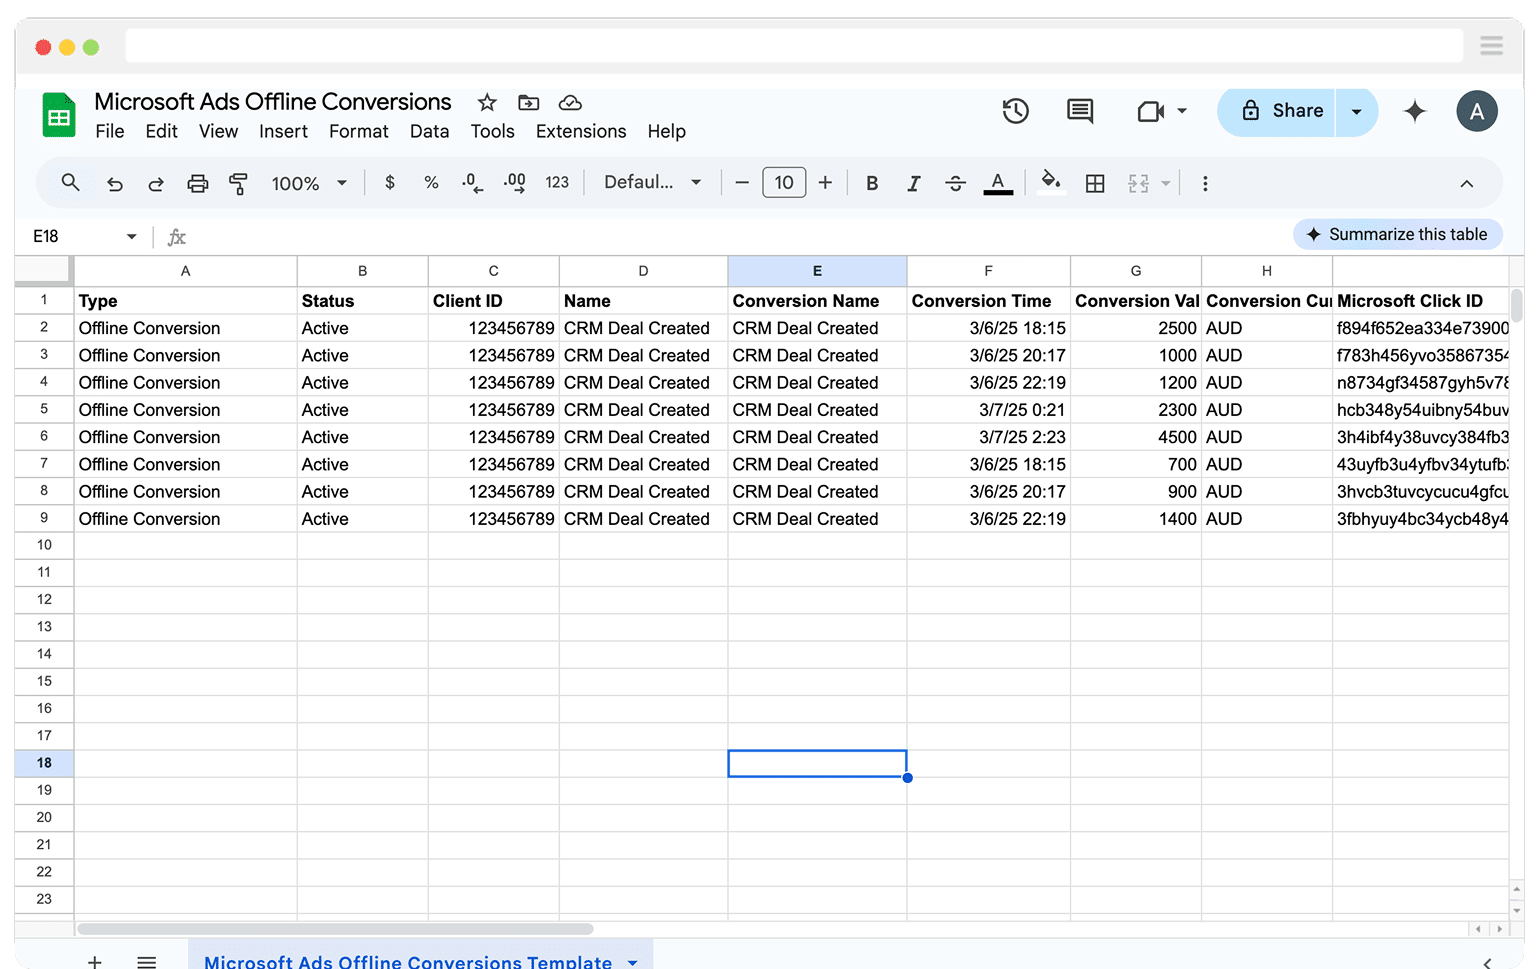
There are some fairly strict requirements for this spreadsheet and it needs to contain the following columns:
- Type - This is the type of conversion being uploaded. So in this case, you would just enter Offline Conversion on every row.
- Status - This is the status of the conversion. In this case, you would just enter Active on every row.
- Client ID - This is your Microsoft Ads Account ID (a numeric value you find under Account Settings - Account number). You would need to copy that into every row.
- Name - This is the exact name of the Offline Conversion Goal you created in step 3 (e.g., CRM Deal Created).
- Conversion Name - This is the same exact text as the ‘Name’ field above. (e.g., CRM Deal Created).
- Conversion Currency Code - The three-letter code of the currency you are reporting the conversion value in (e.g., USD or AUD).
- Conversion Time - The local date/time when the deal closed, formatted for your specific. For example, I am based in Sydney, Australia so I would use D/M/YYYY H:MM:SS AM/PM (e.g., 3/6/2025 6:15:00 PM).
- Conversion Value - The numeric deal amount. Do not enter a currency symbol, just the number (e.g., 2500).
- Microsoft Click ID: The MSCLKID that you saved for each lead (e.g., f894f652ea334e739002f7167ab8f8e3).
The best way to get this data is to run a report in your CRM that contains as much of the data as possible. So for instance, you might run a report with a filter like ‘Deal is Created’ or ‘Qualified = Yes’ to ensure you’re only pulling leads that meet your conversion criteria, and then you would include the MSCLKID, Deal Value, and Conversion Time in the report (because all the other fields needed in the CSV can be manually added, like the Conversion Name from your Microsoft Ads account or your Microsoft Ads Client ID).
To help you with this (admittedly messy) part of the process, we created a template for you, which can be downloaded below:
Step 5: Upload the list into Microsoft Ads
The final step is to upload this list of Offline Conversions into Microsoft Ads.
To do that, log in to your Microsoft Ads account and navigate to Conversions - Offline Conversions. Click the ‘Upload’ button and then select the CSV you just saved.

Once uploaded, click the Preview button to get an initial preview of the upload and see whether there are any errors (if there are, you’ll need to go back to your CSV and fix them). Once it’s all ready, click the Submit button and the Microsoft Ads will begin to process the file.
How to test it's working
Now that you've got everything set up, follow these 3 simple steps to test it's all working correctly.
1. Generate a real MSCLKID
Open an incognito window and do a search for a term that would trigger your ad to show. Click your ad and when you land on your website, make sure there is an MSCLKID in the URL.
Unfortunately, you need to do a real-life click in the search results to test capturing the MSCLKID. Ad preview tools don’t create genuine clicks and therefore never generate a MSCLKID.
2. Complete a form and validate that the MSCLKID is appearing in your CRM
Next, complete a form on your website (like your Contact Us form or Request A Quote form) as if you are a real visitor interested in your company’s products and services.
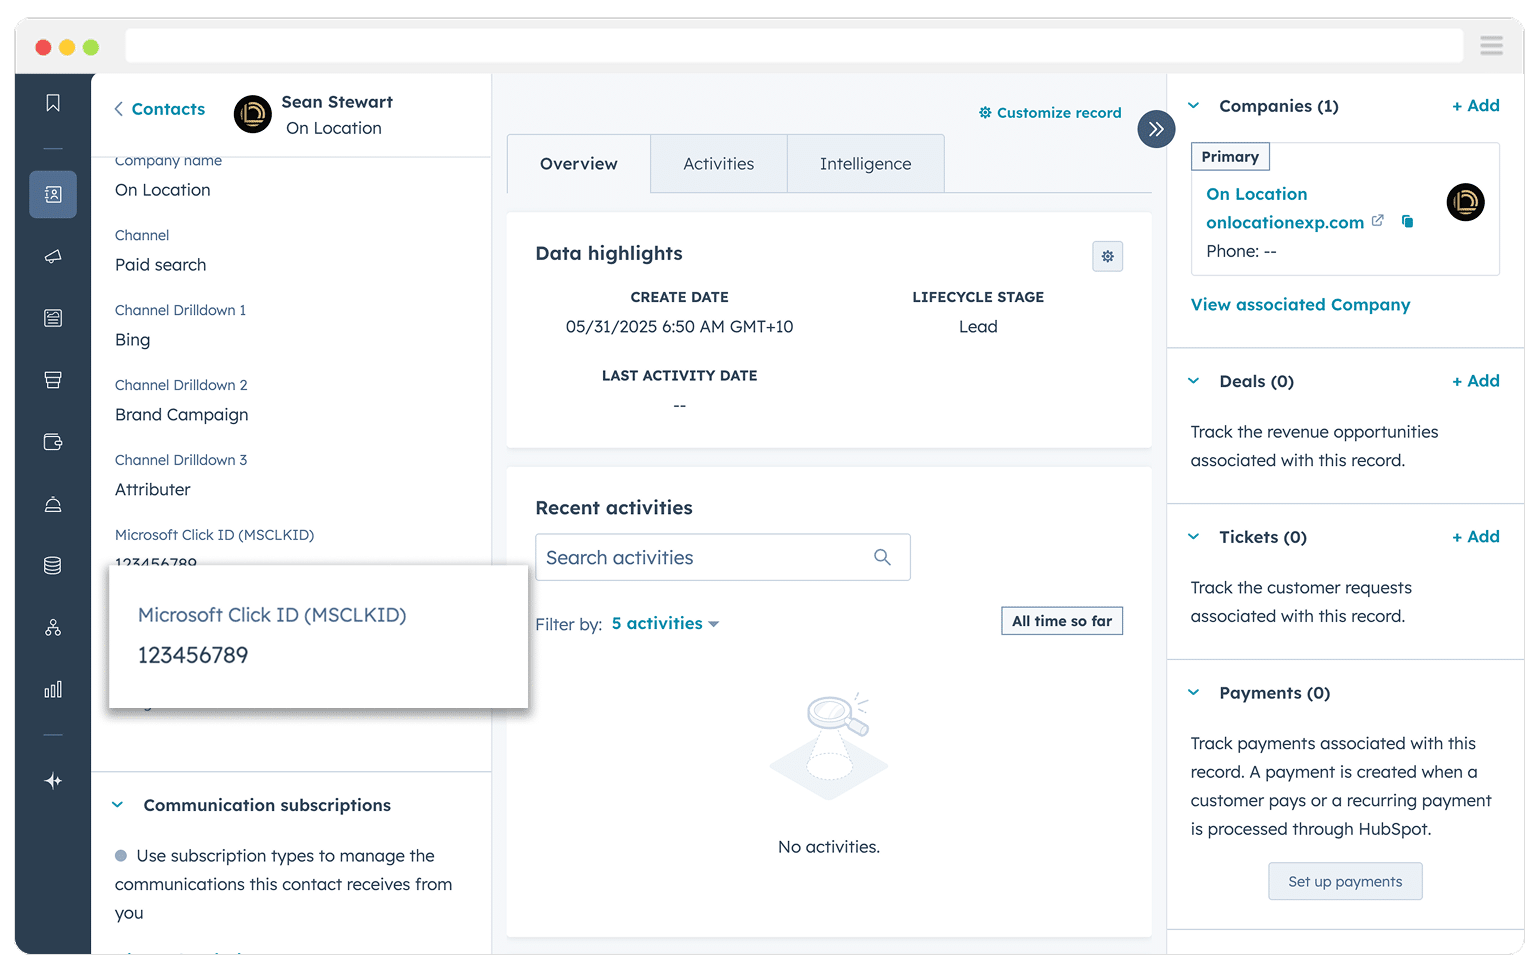
Then go into your CRM and find the contact record for the lead you just created. Make sure that you have successfully captured the MSCLKID with the lead record as you’ll need it to send back to Microsoft Ads later.
If you see an error, have a look at the logs for that particular run to understand might have gone wrong (the problem almost always lies in a blank CRM field or a mis-mapped Zapier field, so your best bet is to review the field mappings and try again).
3. Complete the CSV and upload it to Microsoft Ads
Finally, you can complete the CSV template using the MSCLKID from your test lead and then upload it back into Microsoft Ads.
You usually need to wait about 6-8 hours for the data to be processed and you can then go into Reporting - Conversions - Offline Conversions and look for the name of your goal. You’ll then be able to check that the number, timestamps and values match what you had in your CSV.
An optional way to automate this process
When I tried to set this up for the first time, I expected tools like Zapier to be able to automate it. I figured I could set up a Zap that triggers from my CRM whenever my conversion criteria is met (I.e. a new deal is created) and would then send the data back to Microsoft Ads automatically. Turns out you can do this for Google Ads, but Zapier doesn’t support it for Microsoft Ads.
So the workaround I came up with was to just automate the creation of the spreadsheet, and then it was pretty quick and easy to periodically download the spreadsheet and upload it into Microsoft Ads.
I set up a Zap that was triggered from my CRM whenever a new deal was created that then simply created a new row in a Google Sheet.

I then mapped all the CRM properties over (like the MSCLKID, the date the deal was created as the ‘Conversion Date’ and the Deal Amount as the ‘Conversion Value’), and then just set static values for all the other fields (I.e. Type = Offline Conversion).
That then meant that whenever my conversion criteria was met (I.e. a new deal was created in my CRM), a new row was added to my Google Sheet with all the necessary information.
Whenever I needed to (usually once every 1-2 weeks), I then quickly downloaded the Google Sheet as a CSV and uploaded it to Microsoft Ads.
Best practices for sending offline conversions to Microsoft Ads from your CRM
Now that you’re familiar with when to send offline conversions back to Microsoft Ads and how to set it up, let's chat about a few best practices you may want to keep in mind.
Remember the MSCLKID as users browse around your site
Capturing the MSCLKID for each lead that comes form your Microsoft Ads is key to making this work. Without that ID, you can’t reliably send Offline Conversions back to Microsoft Ads.
This is where tools like Attributer can be particularly helpful. Some form builders have a built-in ability to capture the MSCLKID with the form submission, but it only works if the user completes the form on the exact same page they land on when they click the ad.
So if someone clicks one of your Microsoft Ads and lands on your homepage, then clicks over to the ‘Contact Us’ page and fills out a form there, the MSCLKID would no longer be in the URL of the page (and therefore wouldn’t be captured by the form builder as it only pulls in data if it is in the URL at the time of form submission).
Attributer solves this problem though. It stores the MSCLKID in the user’s browser, meaning they can browse around your site before completing a form (or even leave and come back later), the MSCLKID would still be passed through with the form submission and into your CRM.
Make sure to only send records with an MSCLKID
If you get leads from a lot of different sources other than just Microsoft Ads, then it may be a good idea to only include those with a valid MSCLKID in the CSV you upload back to Microsoft Ads.
This isn’t absolutely necessary, as Microsoft Ads will reject any conversions you try to send without an MSCLKID, but you’ll get lots of errors when you try to upload the CSV and this can make it harder to spot real issues in your upload.
The best way to do this is to add a filter to the report you run in your CRM that is something like ‘MSCLKID is not empty’ (the exact wording will depend on what CRM you are using, but the general idea is the same).
Send through a value where possible
If you’re sending offline conversions back to Microsoft Ads when a lead becomes a customer, then it’s definitely worth sending through the value of the customer as well.
You can do this by populating the ‘Conversion Value’ field in the CSV file you upload. This gives Microsoft Ads more information to feed its machine learning algorithms, and also opens up other bidding strategies (like Target ROAS).
But if you’re sending offline conversions at an earlier point in the funnel (like when a deal is created), you won’t know what the value is, so what should you do?
You can either send the expected value of the deal (even though it isn’t closed), or you can come up with a ‘value per deal’ by taking your average deal size and dividing it by your average close rate.
As an example, if my average deal size is $1,000 and my average close rate is 25% then a new deal is would be valued at $250 (because if a closed deal is worth $1,000 and I close 1 in 4 deals, then I would be willing to pay $250 per deal).
Strictly speaking, you don’t need to upload a Conversion Value in the CSV, but it is a good idea for the above reasons. If you don’t upload one (I.e., you just leave the column blank), then Microsoft Ads will use the default conversion value and currency you set when you create the goal.
You don’t need to send more information
Microsoft Ads has a feature called Enhanced Conversions, which allows you to upload the lead’s email and phone number as part of the CSV.
They claim this helps the match rate, but Microsoft Ads looks for the MSCLKID first, and only falls back to the email and phone number if there's no MSCLKID. So as long as you're sending it, that's all you need.
It’s also quite difficult to send this other information. For privacy reasons, you can only send hashed email addresses and phone numbers which would mean you would need to put them through some sort of hashing tool, which is a pain to do.
Wrap Up
Sending your offline conversions back to Microsoft Ads is a great way to help its smart bidding system figure out what a good lead looks like (so it can go out and find you more of them, ideally for less money).
The key is choosing the right point in your sales process to send the conversion. It should be something that happens at least 50 times a month and within 90 days of the original ad click. Otherwise, Microsoft Ads might not have enough data to really optimize things.
Once you’ve picked that trigger point, you can follow the steps above to get everything set up so that you're sending offline conversions back to Microsoft Ads.
Need to capture the MSCLKID in your CRM?
Start your 14-day free trial of Attributer today!

About the Author
Aaron Beashel is the founder of Attributer and has over 15 years of experience in marketing & analytics. He is a recognized expert in the subject and has written articles for leading websites such as Hubspot, Zapier, Search Engine Journal, Buffer, Unbounce & more. Learn more about Aaron here.