How to get UTM parameters into Looker
Know what marketing channels & campaigns are generating your leads, customers & revenue by analysing UTM parameters in Looker

Looker is an excellent business intelligence tool that can help you explore, share, and analyse business analytics in real-time.
However, it relies heavily on the data you provide to it, which means you need to collect and send UTM parameters to Looker before you can build reports that can provide you with the performance data of your marketing campaigns and channels.
We bet your next question is, “how do I send UTM parameters and other data into Looker so I can create reports with them?”
Don’t fret, as this article will teach you how to capture and send UTM parameters into Looker in 4 simple steps using Attributer.
What is Attributer?
Simply put, Attributer is code you place on your website.
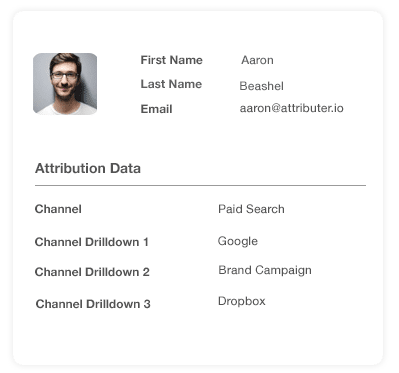
Every time a user reaches your site, Attributer scans through a number of technical data points to figure out the origins of the user (i.e., the UTM parameters in the URL). Once this has been determined, Attributer will group each visitor into different channels (like Organic Search, Paid Search, Paid Social, etc.) and store this information in the visitor's browser cookie.
Attributer then sends the UTM parameters and other information into your CRM or other backend tools when a visitor submits a form on your site.
From here, the data can now be sent into Looker for analysis. And with all the information now available inside Looker, you can create reports that can show you the answers to questions like:
- How many customers have my Facebook Ads generated?
- What's the average deal size comparison between my customers from Facebook Ads vs. customers from my Google Ads?
- What's the total revenue generated from our Facebook Ad campaigns?
- What's the overall ROI of our ads?
4 steps for analysing UTM parameters in Looker
Using Attributer to get UTM parameters into Looker is easy. Here's how to do it in 4 easy steps:
1. Add UTM variables to your ads
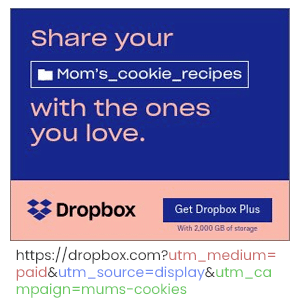
To start, you need to add UTM parameters to all your ads and campaigns so that Attributer can determine where all your traffic is coming from.
Examples of this include social network ads like Facebook, Twitter, and LinkedIn, ads in search engines like Google & Bing, and even bespoke campaigns you launch in places like trade publications and more.
2. Add the Attributer code to your website

Next thing to do is to add the Attributer code to your website.
After signing up for a free trial, a small snippet of code will be provided for you to add to your site. This is similar to other marketing tool codes you’ve added to your site before (such as Google Analytics code).
Depending on the CMS system you’re using to manage your website (i.e., WordPress, Squarespace, etc.), there will be an option in the Settings section of your site to add the code to the header.
On the other hand, if you’re using a tag management service such as Google Tag Manager, you can simply add the code through this tool.
If you need further assistance on adding the Attributer code to your site, instructions are available in the help section of our site.
3. Send the data to your CRM or other tools
Now that the code is up and running on your site, Attributer will determine how a visitor arrived at your site, categorise them into different Channels (i.e., Paid Search, Paid Social, etc.) and store the data as a cookie in the visitor’s browser.
From there, you have a few options for getting the data from the cookie and into your backend tools (and then into Looker):
- Hidden fields in forms - By adding some hidden fields to your website forms, Attributer will be able to write the UTM parameters into them. Then, when a visitor submits a form, this data will be passed to your backend tools alongside the other information entered in the form (like the lead’s name, email, etc.)
- Grab the data from the cookie - When you add a simple line of javascript to your site, you can retrieve the UTM parameters from the Attributer code and then pass them into your backend tools. This feature is especially beneficial if you have ‘Sign up with Google’ or ‘Sign up with Facebook’ buttons that let the user sign up for your product without completing an actual form.
4. Run reports in Grow
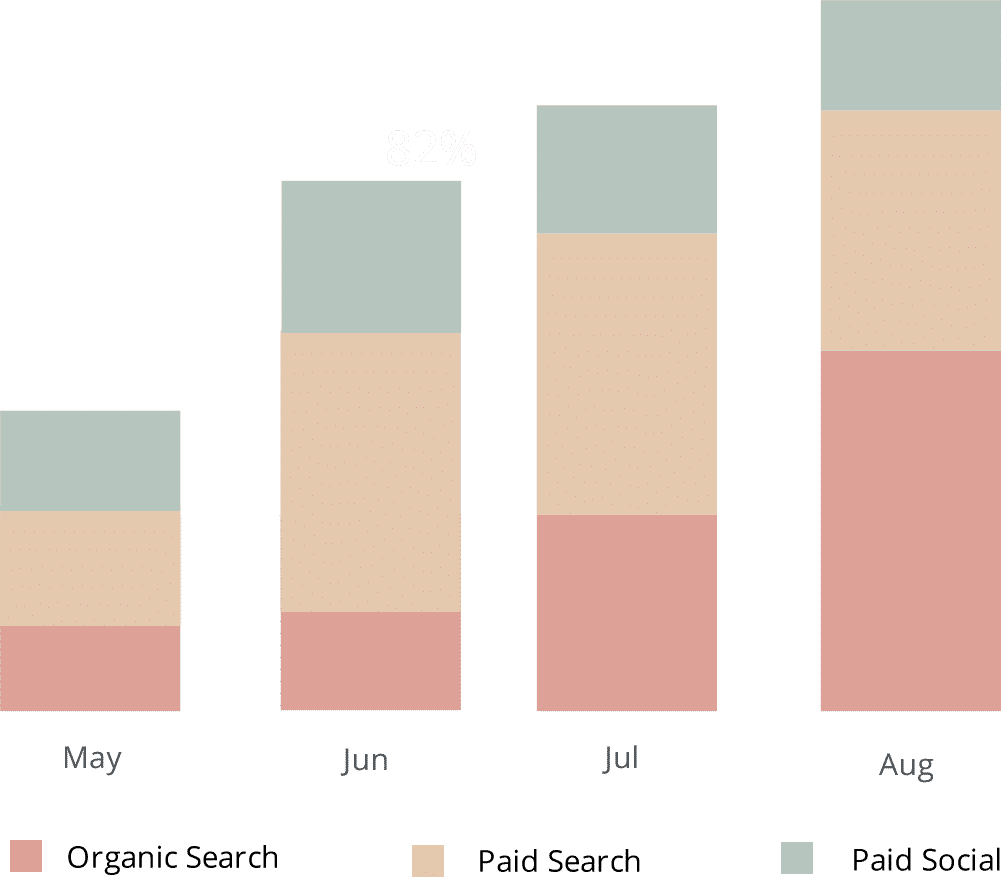
Once the UTM parameters and other data are inside your backend tools (like your CRM or other software where you keep customer data), you can now pass this data to Looker to start running reports and dashboards.
These reports can provide useful insight regarding your key customer acquisition metrics (i.e., customers, leads, sales opportunities, etc.) and allow you to answer questions like:
- How many leads did my Google Ads generate?
- Which Google Ad campaigns got the most leads?
- How many sales opportunities did my Google Ads generate?
- Which Google Ads campaigns drove the most pipeline?
- What is the exact number of customers did my Google Ads generate
- How much revenue has come from our Google Ads?
- And many more
Why using Attributer is better than capturing raw UTM parameters
We know other tools are available for capturing UTM parameters, so why choose Attributer?
Simple: Attributer does a whole lot more than just capture raw UTM parameters like other tools do. It also:
1. Captures all traffic
Apart from collecting raw UTM parameters and passing them into your CRM and analytics tools, Attributer also collects channel information on visitors who’ve reached your website through channels where UTM parameters aren’t present (i.e., Direct, Referral, Organic Social, Organic Search, etc.)
With this, you will be able to monitor where EVERY lead & customer comes from as opposed to just the leads that have come from your advertising campaigns where you’ve added UTM parameters.
2. Remembers the data across pageviews and sessions
It is common for most UTM capturing tools and methods to require the UTM parameter to be present on the page where the form is located. This can be a problem when the user has completed a form on a page they didn’t initially land on because you will have no way to know that they have come from one of your ads.
For instance, imagine someone clicks on one of your Google Ads and is brought to a landing page you’ve created for that campaign. Then they decide to click the ‘Get A Quote’ button once they know they want your product or service, which will lead them to a different page to complete a quote request form.
This means that the page they’ve completed a form on isn’t the exact page they first landed on, which means the UTM parameters are lost.
You can prevent this from happening with Attributer though as it stores the UTM parameters in the user’s browser as a cookie.
This way, it won’t matter if the user completes a form on a different page from their landing page. The UTM parameters will always be passed to your CRM and be available in Looker.
3. Provides cleaner data
If you have worked with UTM parameters for a while, you will know how the data can get messy, primarily if your ads have been handled by various agencies or individuals in the past.
Let’s say, for example, you have a number of your Facebook Ad campaigns tagged with UTM_Source=Facebook (capitalized), others with UTM_Source=facebook (uncapitalized), and others with UTM_Source=fb.
If you were to create reports on this information inside Looker using other UTM capturing tools, the results would show up as 3 different sources, and you’d receive the wrong information.
Attributer, on the other hand, was designed to recognize these nuances and inconsistencies, which means Attributer can assign these leads to the appropriate channel (i.e., Paid Social).
4. Captures landing page data as well
In addition to UTM parameters and other channel data, Attributer also collects information on the landing page (i.e., attributer.io/blog/capture-utm-parameters) as well as the page’s category (i.e., /blog).
With this information, you will be able to view how specific sections in your site (i.e., your blog) are performing in terms of generating leads, revenue & customers.
Moreover, with Attributer's ability to capture both the landing page and its group, you will be able to see how related content is performing as a whole (like your blog section) and zero in on the performance of individual blog posts or pieces of content.
Wrap up
As you can see, Attributer is more than the typical UTM parameter capturing tool, as it does a lot of heavy work behind the scenes to ensure you have more accurate data to analyse.
Attributer not only collects all your incoming traffic data but also makes sure this data won’t disappear when people click on a different page, and it helps clean the data to guarantee effortless report building.
Did we mention Attributer is free to start? Start your free trial today to experience the power of Attributer and see if it fits your needs.
Get Started For Free
Start your 14-day free trial of Attributer today!

About the Author
Aaron Beashel is the founder of Attributer and has over 15 years of experience in marketing & analytics. He is a recognized expert in the subject and has written articles for leading websites such as Hubspot, Zapier, Search Engine Journal, Buffer, Unbounce & more. Learn more about Aaron here.