How to create a custom marketing attribution system in your CRM
Learn how to combine Attributer with your CRM's built-in rules engine to create a marketing attribution system that is customised to your business.

If you’re like most businesses, you’re probably using a tool like Google Analytics to track how many visitors you get to your website and where they are coming from (I.e. Organic Search, Paid Search, etc).
That’s a good first step, but to really measure what’s working you need to be capturing this data in your CRM and using it to report on where your leads, customers and revenue are coming from.
Attributer is a great way to do this, but like Google Analytics, we have a predefined set of Channels (Organic Search, Paid Search, etc) and predefined rules that you need to adhere to in order for a lead to be categorised into a particular channel (I.e. UTM_Medium needs to equal either 'ppc', 'cpc', or 'paidsearch' for a lead to be classified as ‘Paid Search’
But what if you wanted to build your own custom attribution system in your CRM that has a set of channels specific to your business?
In this article, we’ll show you how to do exactly that. You’ll learn how to use Attributer to capture the initial data (in a fairly structured format) and then use the rules engine in your CRM (or in 3rd party tools like Zapier) to customize the data to create your own attribution system.
2 simple steps to create your own custom marketing attribution system
By following the 2 simple steps below, you'll be able to create your own customised marketing attribution system.
1. Use Attributer to capture the data initially
Attributer is a small piece of code that you place on your company's website.
When a visitor lands on your site, Attributer looks at a bunch of technical information about how that visitor got there (same things as tools like Google Analytics look at) and uses it to determine where the visitor originated from.
Attributer then categorizes the visit into a standardized set of marketing channels (the same channels you see in tools like Google Analytics, such as Organic Search, Paid Social, Paid Search, etc) and saves the data to a cookie in the user's browser.
When the site visitor submits a form on your website, Attributer passes the attribution information into hidden fields in your forms and the data flows into whatever backend tools you have connected to your forms, such as your CRM.
2. Transform the data to create your own custom attribution system
Now that you have the initial attribution data being captured with each form submission, you can then create rules to transform the data into whatever structure you wish.
For instance, you might want to see all organic traffic as one Channel rather than having it broken out into Organic Search, Direct, Referral, etc.
Similarly, if a person’s first landing page is a specific page on your site that they can only get to from a specific channel (I.e. an affiliate campaign), you may want to categorise them into a specific Channel regardless of what UTM parameters they arrived with.
There are a couple of ways to do this and the best approach will largely depend on what tools you already use and what features they have.
Using the rules engine in your CRM
Most CRM’s have some sort of rules engine that allows you to create ‘if this then that’ style rules that run when a new lead comes in (in Salesforce it’s called the Process Builder, while in Hubspot it’s called Workflows).
The user interface will be different depending on which CRM you use so it’s difficult for us to provide exact instructions, but generally speaking what you want to do is trigger the rule to run when a new lead comes in.
You would then setup conditional logic to only apply the rules to leads that meet a certain criteria (I.e. have a specific landing page, or a specific combination of values in the Channel and Channel Drilldown 1 fields).
Finally, you would then write the logic to apply when the condition is met (I.e. change Channel to ‘Affiliates’).
The below screenshot shows an example of how a workflow in Hubspot might look:
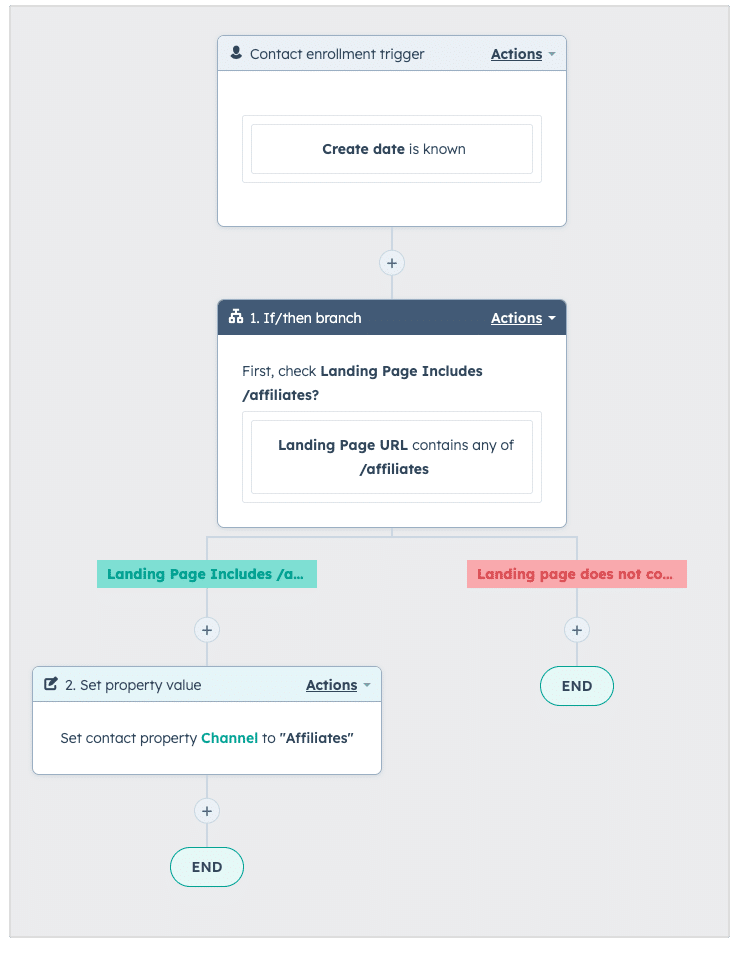
In the example above, we can see that the rule triggers when a new lead is created, then checks to see if the landing page contains /affiliates. If it does, then it updates the Channel to ‘Affiliates’
Using integration tools like Zapier
Dedicated integration tools like Zapier are usually used to send data from one tool to another (I.e. When a new submission is made in Gravity Forms, create a new Contact in Hubspot).
However, Zapier has a whole bunch of data formatting options that you allow you to modify the data before it reached the end destination.
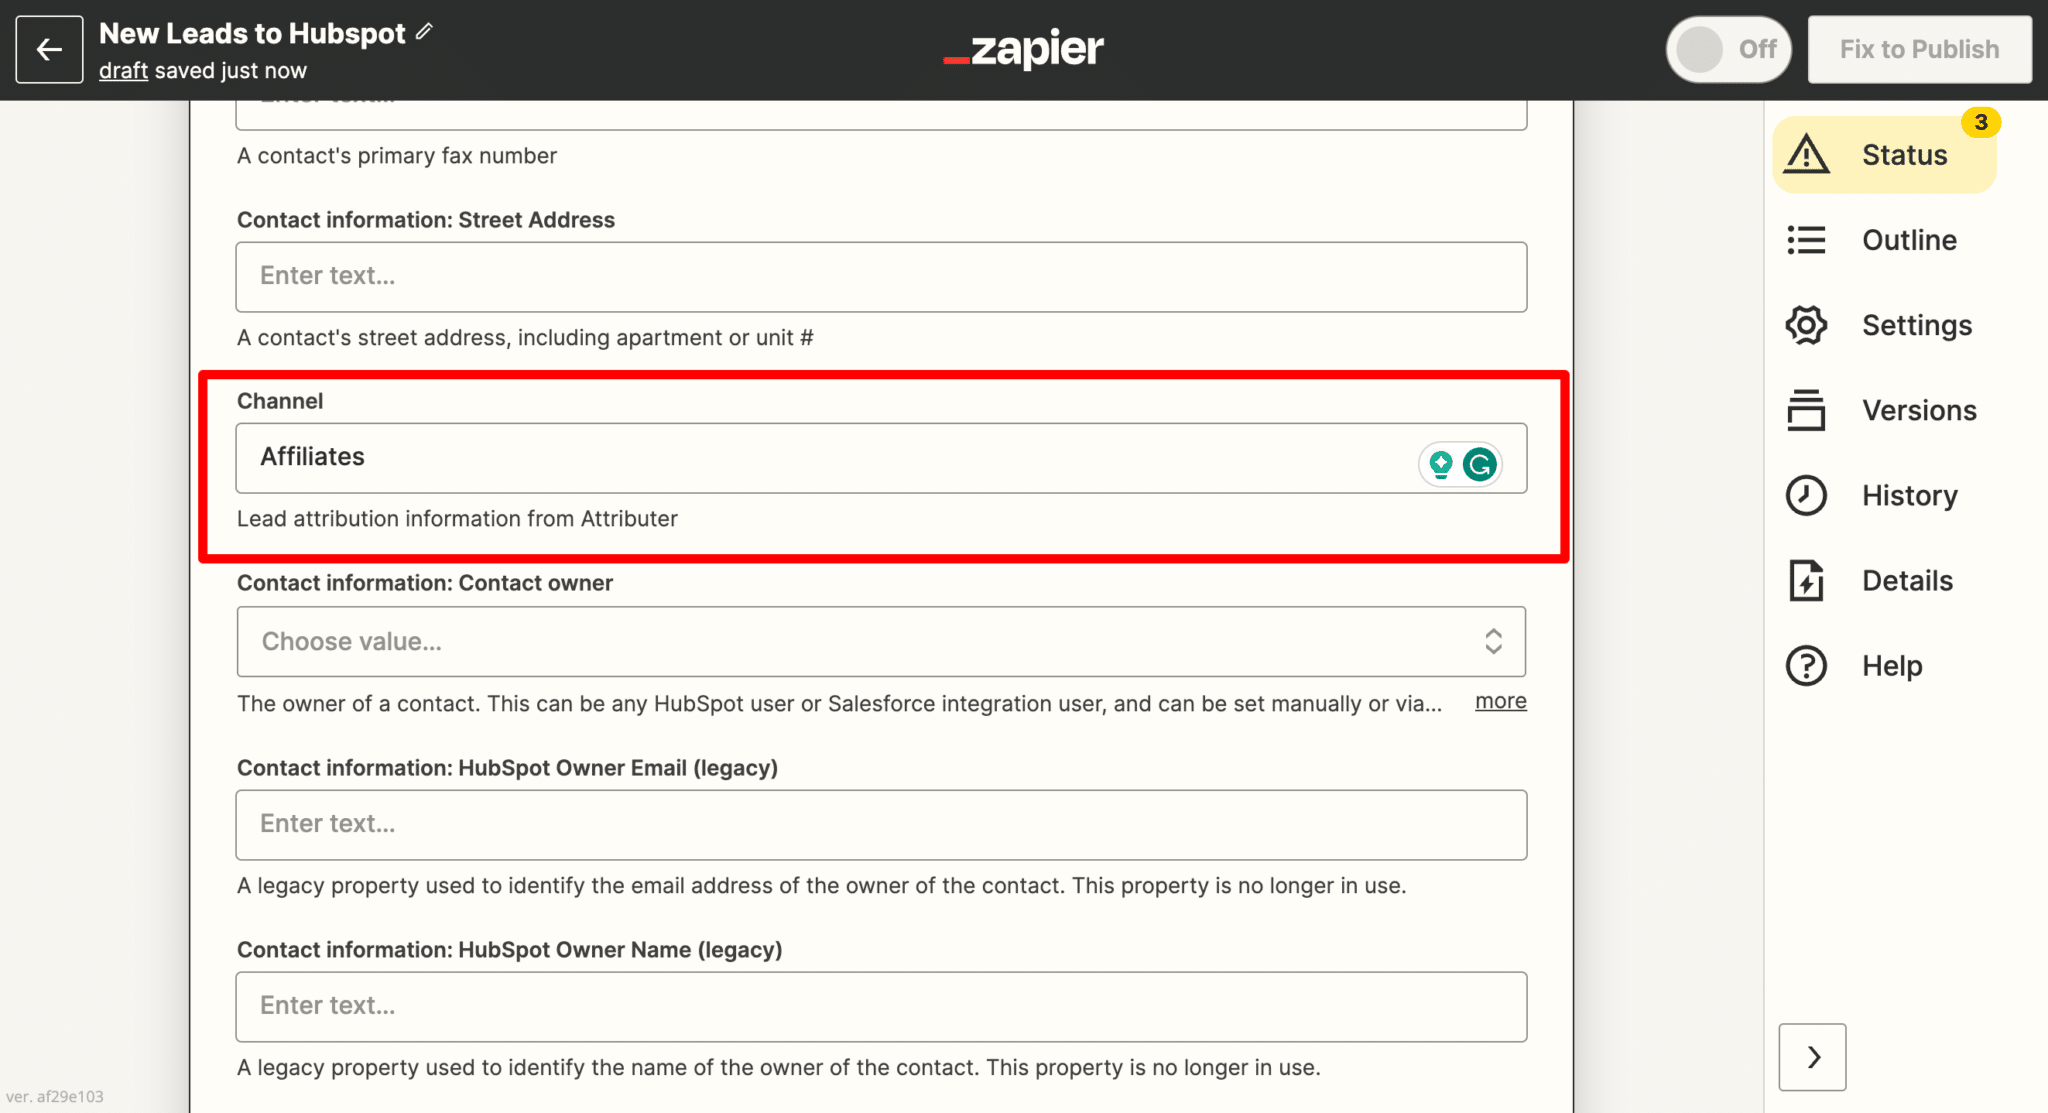
Continuing the example above, you could add a Condition to your Zap that only runs when the landing page contains /affiliates
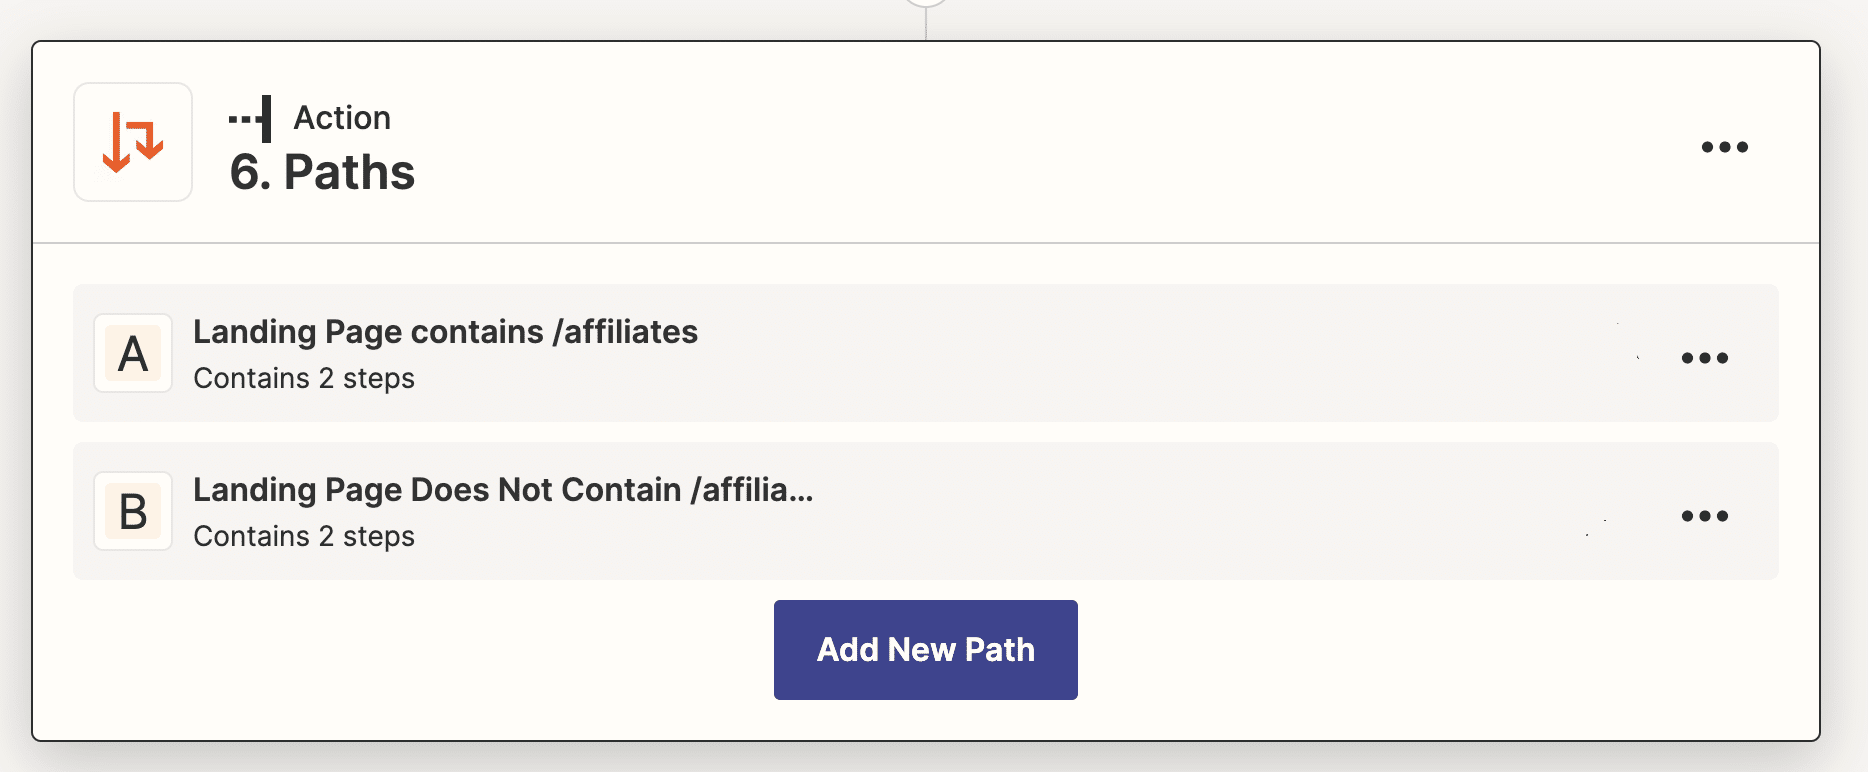
Then instead of passing through whatever value Attributer writes into the Channel field on your form, you would then just pass through the word ‘Affiliates’ to the Channel field in your CRM.
3 ways you can customise the data in your CRM
Now that you understand how to build a custom marketing attribution system with Attributer and your CRM's rules engine, let's look at a few ways you can manipulate data to create the different views you want.
1. Create a custom channel
Before founding Attributer, I used to work for a company called Qwilr, which made software for creating sales proposals as beautiful, responsive webpages (as opposed to boring PDF’s).
We got a lot of new customers through a channel we called Virality, which was essentially where people got sent a proposal built in Qwilr, liked how the proposal looked, and signed up for a Qwilr account for themselves.
‘Virality’ is not a standard channel in any analytics tool, so we had to create it ourselves.
So we wrote logic in our attribution system that essentially said ‘If a person's first landing page contains /proposals (which was in the URL of all proposals create in Qwilr), then change the Channel to ‘Virality’
That way, whenever a new customer signed up for Qwilr after initially viewing a proposal that was shared with them, they were assigned to the ‘Virality’ channel and we could measure in our CRM exactly how many new leads & customers were coming from this channel.
2. Consolidate or break out channels
By default, if a user comes from one of your ad campaigns on Facebook Ads, Instagram Ads, Twitter Ads, etc then Attributer would categorise them into the channel ‘Paid Social’.
This is a sensible default, as it allows you to see at a high-level how your paid social ads perform against other types of ads, such as Paid Search, Display, etc. It’s also lines up with Google Analytic’s default channel groupings as well.
However, you might be in a situation where you don’t do anything but paid social ads and so if you would prefer to see them broken out into seperate channels (a Facebook Ads channel, an Instagram ads channel, etc).
If that’s the case, you could write logic such as:
If Channel=Paid Social and Channel Drilldown 1=Facebook, then change Channel to ‘Facebook Ads’
This would then allow you to see your different ‘Paid Social’ ads as different ‘Channels’ in your reporting.
4. Create custom groupings of channels
Generally speaking, the channels that Google Analytics, Attributer and virtually any other analytics tool provides can be grouped into two buckets:
- Paid Channels: Channels that you’ve paid to acquire the lead through, such as Paid Search, Paid Social, Display, Affiliates, etc.
- Organic Channels: Channels that you have NOT paid to acquire the lead through, such as Organic Search, Organic Social, Direct Traffic, Referral, etc.
Perhaps you want to be able to run a report that shows how many leads you got from paid channels versus organic channels, regardless of the specific channel they actually came from.
In that case, you could create an additional field called something like ‘Channel Grouping’ and build a set of rules that essentially say:
- If Channel is equal to Paid Search, Paid Social, Display or Affiliates then change the Channel Grouping field to ‘Paid Leads’
- If Channel is equal to Organic Search, Organic Social, Direct or Referral then change the Channel Grouping field to ‘Organic Leads’
Wrap up
As you can see from the above article, it’s possible to combine the data provided by Attributer with the rules engine in your CRM (or in a tool like Zapier) to create your own completely customized marketing attribution system that will give you a view of where your leads & customers are coming from that is customized to how you think about lead generation.
The best part is this can be done relatively cheaply. Attributer starts at just $29 per month (Depending on how many leads you get each month) and your existing CRM system probably already includes the rules engine functionality you need to transform the data.
Ready to get started? Signup for a 14-day free trial of Attributer or book a demo with us and we can talk through exactly how this might work for your business.
Get Started For Free
Start your 14-day free trial of Attributer today!

About the Author
Aaron Beashel is the founder of Attributer and has over 15 years of experience in marketing & analytics. He is a recognized expert in the subject and has written articles for leading websites such as Hubspot, Zapier, Search Engine Journal, Buffer, Unbounce & more. Learn more about Aaron here.