The quickest way to capture Google Ads data in Webflow
Learn how to capture Google Ads data in Webflow form submissions so you know which campaigns, ad groups, etc are generating your leads & customers.

Are you having a hard time figuring out which of your Google Ads campaigns are actually producing customers and revenue?
What if you could see the exact origin of all the leads you receive, right down to the campaign and ad they clicked? If this is possible for you, you’d know which campaigns and ads are generating customers and revenue, and you can invest more in those to grow your business.
This article will show you how to use Attributer to capture Google Ads data in Webflow along with every lead that comes through.
Why it's important to track customers and revenue from Google Ads
Say you run a business that sells and installs pool equipment. To promote your business, you create ads on Google highlighting the products you offer, like Pool Pumps and Pool Cleaners.
If you’re simply using a tool like Google Analytics to count the visitors and form completions you get, you’d likely get something like this:
| Spend | $2,000 | $2,000 |
| Visitors | 200 | 100 |
| Goal Completions | 20 | 10 |
If the only information you have is on visitors and leads from spend, then it would seem like the Pool Pumps campaign surpasses your Pool Cleaners campaign, so you’d direct more of your budget to that.
But imagine if you could see the results all the way down to the number of customers and amount of revenue generated.
You’d get something like this:
| Spend | $2,000 | $2,000 |
| Visitors | 200 | 100 |
| Leads | 20 | 10 |
| Customers | 2 | 5 |
| Revenue | $8,000 | $25,000 |
You can see the whole story when you have the means to track campaign performance through to customers and revenue.
In our example scenario above, the Pool Cleaners Campaign is actually more productive because:
- You received more customers from the Pool Cleaners Campaign (5) than the Pool Pumps Campaign (2)
- Your lead-to-customer conversion rate is five times higher for the Pool Cleaners Campaign (50% vs. 10%)
- Your average customer value is greater for the Pool Cleaners Campaign: $5,000 per customer vs. $4,000 per customer from the Pool Pumps Campaign.
- Your cost of acquiring a customer is lower through the Pool Cleaners Campaign: $400 vs. $1,000
- Your Return on Ad Spend (ROAS) is three times higher in the Pool Cleaners Campaign
As seen from the analysis above, you better understand what’s effective and what isn’t when you can capture the source of every lead and track it through customers and revenue.
4 simple steps to capture Google Ads data in Webflow
Attributer makes it easy to capture Google Ads data in Webflow. Here's how it works:
1. Add UTM variables to your ads
Before capturing Google Ads data in Webflow, you must first add UTM parameters to all your campaigns.
If you’re unfamiliar with the term UTM parameters, they’re simply extra text that gets added at the end of the URL you send to people from your campaigns.
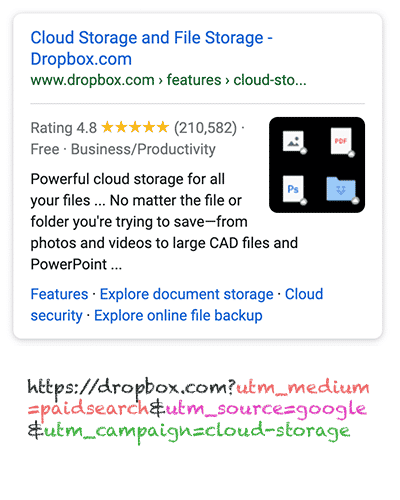
Supposing the page you want to send someone is attributer.io/integrations/salesforce, then your final URL with UTM parameters may look like this:
attributer.io/integrations/salesforce?utm_medium=paidsearch&utm_source=google&utm_campaign=brand-campaign
While you can structure the UTM parameters however you want, it is best to follow general best practice for Google Ads, which is something like:
- UTM Medium = Paid search
- UTM Source = Google
- UTM Campaign = The name of your Google Ads campaign
- UTM Term = The name of the ad group the ad belongs to
- UTM Content = The specific ad
Putting UTM parameters behind your URLs in Google Ads is simple. Plus, there are free tools online that can help you build them.
2. Add hidden fields to your forms
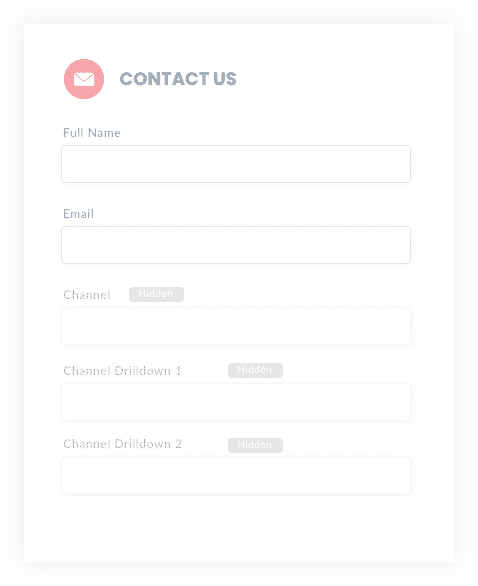
The following step is to add a number of hidden fields to your lead capture forms.
These forms are the ones used to collect data from site visitors. The hidden fields that you need to add to your forms are the following:
- Channel
- Channel Drilldown 1
- Channel Drilldown 2
- Channel Drilldown 3
- Landing Page
- Landing Page Group
Webflow makes adding hidden fields super simple. You can see how to do it here.
3. Attributer writes Google Ads data into the hidden fields
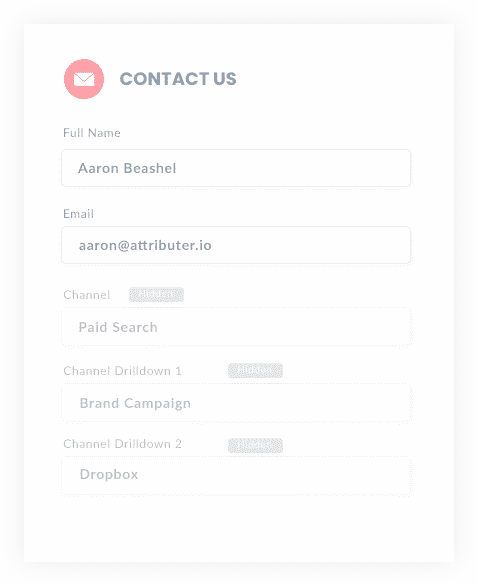
Assuming the hidden fields have been set up, Attributer will monitor where your visitors are coming from.
Then, Attributer fills out the hidden fields in your form with the values specified in your UTM parameters whenever a visitor completes a form.
For example, if I was a marketer at Dropbox and a person visited my website coming from one of my brand campaigns in paid search, Attributer would populate the hidden fields as follows:
- Channel = Paid search
- Channel Drilldown 1 = Google
- Channel Drildown 2 = Brand campaign
- Channel Drilldown 3 = Free account ad
Apart from the values from the UTM parameters, Attributer also captures the visitor's first landing page (e.g., dropbox.com/features/cloud-storage) and the first landing page group (e.g., features).
4. Google Ads data is captured in Webflow
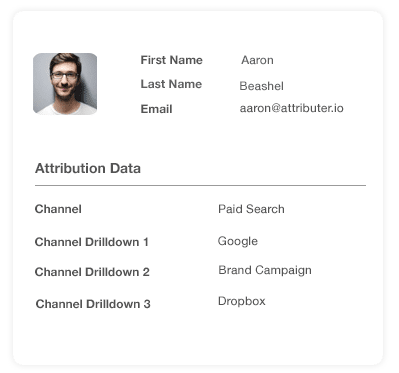
Finally, when a visitor submits the form, the Google Ads data is captured together with the details the lead entered into the firm, like their name, company, phone, email, etc.
You can then do a variety of beneficial things with this information, such as:
- Add it to each new lead notification email so you’ll be able to see where each lead came from instantly
- Send it to your CRM so your sales team can see where each lead has come from
- Use it to run reports showing you which Google Ads campaigns are generating you leads, customers & revenue.
Why using Attributer is the best way to capture Google Ads data in Webflow
There are a couple of other ways to place UTM parameters behind your Google Ads and capture the data on Webflow, so why use Attributer?
Here’s why:
1. Captures all traffic
Besides being an excellent tool for capturing Google Ads data in Webflow, Attributer can also pass through information on leads that come from other sources (Organic Social, Paid Social, Organic Search, etc.)
This means that when you build reports to see where your leads and customers have come from, you can pinpoint the source of ALL your leads, not just the ones from your Google Ads campaigns.
This feature can be very beneficial, especially if your SEO efforts generate most of your leads and customers instead of your Google Ads campaigns. When this happens, you’d want to be informed so you can invest wisely.
2. Attributer remembers the data as visitors browse your site
It is a common requirement for most other UTM capturing methods to have the UTM parameters on the page where the form is completed. This becomes a problem when the page a visitor completes a form on differs from the page they first landed on.
For instance, pretend someone clicks on your Google Ads and is then led to a landing page for this campaign. Once they’ve decided they want your service or product, they click the ‘Get A Quote’ button and are then taken to a different page to complete your quote request form. This means that the page they complete a form on differs from the page they initially landed on. Hence, the UTM parameters are lost.
You don’t have to deal with this with Attributer because it keeps the UTM parameters in a cookie in the user’s browser. This means that the UTM parameters will always be passed through no matter what page the user completes a form on.
In the end, regardless of the user’s navigation activity on your site before submitting your form, you’ll always be able to track them back to your Google Ads.
3. Provides cleaner data
A common dilemma when using other tools that capture raw UTM parameters is that the data gets messy, making it challenging to run accurate reports.
As an example, say some of your Google Ads campaigns are tagged with UTM_Source= Google.com (capital G), others with UTM_Source= google (lowercase, no domain), and others with UTM_Source= adwords.
If you capture these raw UTM parameters in Webflow and use them to report on how many leads your Google Ads campaigns have made, you’ll receive three different sources that you have to stitch together manually.
Attributer works differently because it recognizes the possibility of capitalization and other inconsistencies and would appoint the leads to the Paid Search channel regardless.
4. Attributer captures landing page data
Ever wondered how many leads and customers are being generated from your blog and the other in-depth content pieces you’ve done?
Aside from channel data, Attributer also captures the landing page (i.e., attributer.io/blog/capture-utm-parameters) and the landing page category (i.e., /blog).
With this information, you can see how particular sections of your site are performing (e.g., your blog) in generating leads, customers, and revenue.
And since it captures both the landing page and the landing page group, you can view how your blog is performing as a whole and zoom into individual blog posts too.
Wrap up
If you’re looking to track the number of leads and customers you get from your Google Ads, then Attributer is an excellent solution.
It will capture the UTM parameters behind your Google Ad campaigns, which allows you to create reports that tell you the campaigns, ad groups and even keywords where your leads and customers come from.
In addition, Attributer will also provide data on leads that come from other channels so that you can identify the source of ALL your leads (not just the ones from Google Ads). All in all, you will learn where to best invest to optimize your business.
Have we mentioned that it’s free to get started? Begin your free trial today and experience what Attributer has to offer.
Get Started For Free
Start your 14-day free trial of Attributer today!

About the Author
Aaron Beashel is the founder of Attributer and has over 15 years of experience in marketing & analytics. He is a recognized expert in the subject and has written articles for leading websites such as Hubspot, Zapier, Search Engine Journal, Buffer, Unbounce & more. Learn more about Aaron here.