The best way to capture Google Ads data in Netlify forms
Learn how to capture Google Ads data in Netlify form submissions so you know which campaigns, ad groups, etc are generating your leads & customers.

Are you struggling to determine which of your Google Ads campaigns are actually driving leads, customers and revenue?
What if you could pinpoint the exact source of all your leads, down to the campaign and ad they clicked? By having this visibility, you'd be able to identify which campaigns are generating the most leads and customers, allowing you to invest more in those areas to grow your business.
In this article, we’ll show you how to use Attributer to capture Google Ads data in Netlify forms and track every lead that comes through.
Why it's important to track customers and revenue from Google Ads
Let’s say you run a business that sells custom furniture. To promote your products, you create Google Ads highlighting your top offerings, like Dining Tables and Office Chairs.
If you’re only using a tool like Google Analytics to track visitors and form submissions, you might end up with data like this:
| Spend | $2,000 | $2,000 |
| Visitors | 200 | 100 |
| Goal Completions | 20 | 10 |
If the only information you have is on visitors and leads from your ad spend, it might seem like the Dining Tables campaign is outperforming your Office Chairs campaign, so you’d allocate more of your budget to Dining Tables.
But imagine if you could track the results all the way down to the number of customers and the revenue generated.
You’d get something like this:
| Spend | $2,000 | $2,000 |
| Visitors | 200 | 100 |
| Leads | 20 | 10 |
| Customers | 2 | 5 |
| Revenue | $8,000 | $25,000 |
You can see the whole picture when you have the tools to track campaign performance all the way through to customers and revenue.
In our example above, the Office Chairs Campaign is actually more productive because:
- You received more customers from the Office Chairs Campaign (5) than from the Dining Tables Campaign (2)
- Your lead-to-customer conversion rate is five times higher for the Office Chairs Campaign (50% vs. 10%)
- Your average customer value is greater for the Office Chairs Campaign: $5,000 per customer vs. $4,000 per customer from the Dining Tables Campaign
- Your cost of acquiring a customer is lower through the Office Chairs Campaign: $400 vs. $1,000
- Your Return on Ad Spend (ROAS) is three times higher in the Office Chairs Campaign
As demonstrated in the analysis above, when you can track every lead's source and follow them through to customers and revenue, you gain a much clearer understanding of what’s truly working and what isn’t.
4 simple steps to capture Google Ads data in Netlify
Attributer makes it easy to capture Google Ads data in Netlify. Here's how it works:
1. Add UTM parameters to your ads
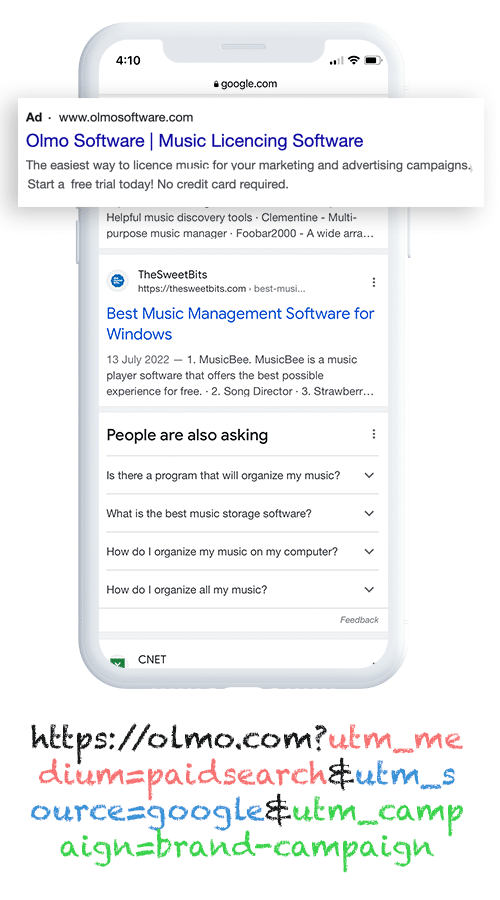
Before capturing Google Ads data in Netlify, you must first add UTM parameters to all your campaigns.
If you’re unfamiliar with UTM parameters, they’re simply additional text added at the end of the URL you use in your campaigns.
For example, if the page you want to send someone to is attributer.io/integrations/salesforce, then your final URL with UTM parameters may look like this:
attributer.io/integrations/salesforce?utm_medium=paidsearch&utm_source=google&utm_campaign=brand-campaign
Although you can structure UTM parameters in any way that works for you, it’s best to follow standard best practices for Google Ads, which typically look like this:
- UTM Medium = Paid search
- UTM Source = Google
- UTM Campaign = The name of your Google Ads campaign
- UTM Term = The name of the ad group the ad belongs to
- UTM Content = The specific ad
Adding UTM parameters to your Google Ads URLs is straightforward. Plus, there are free online tools available to help you create them easily.
2. Add hidden fields to your forms
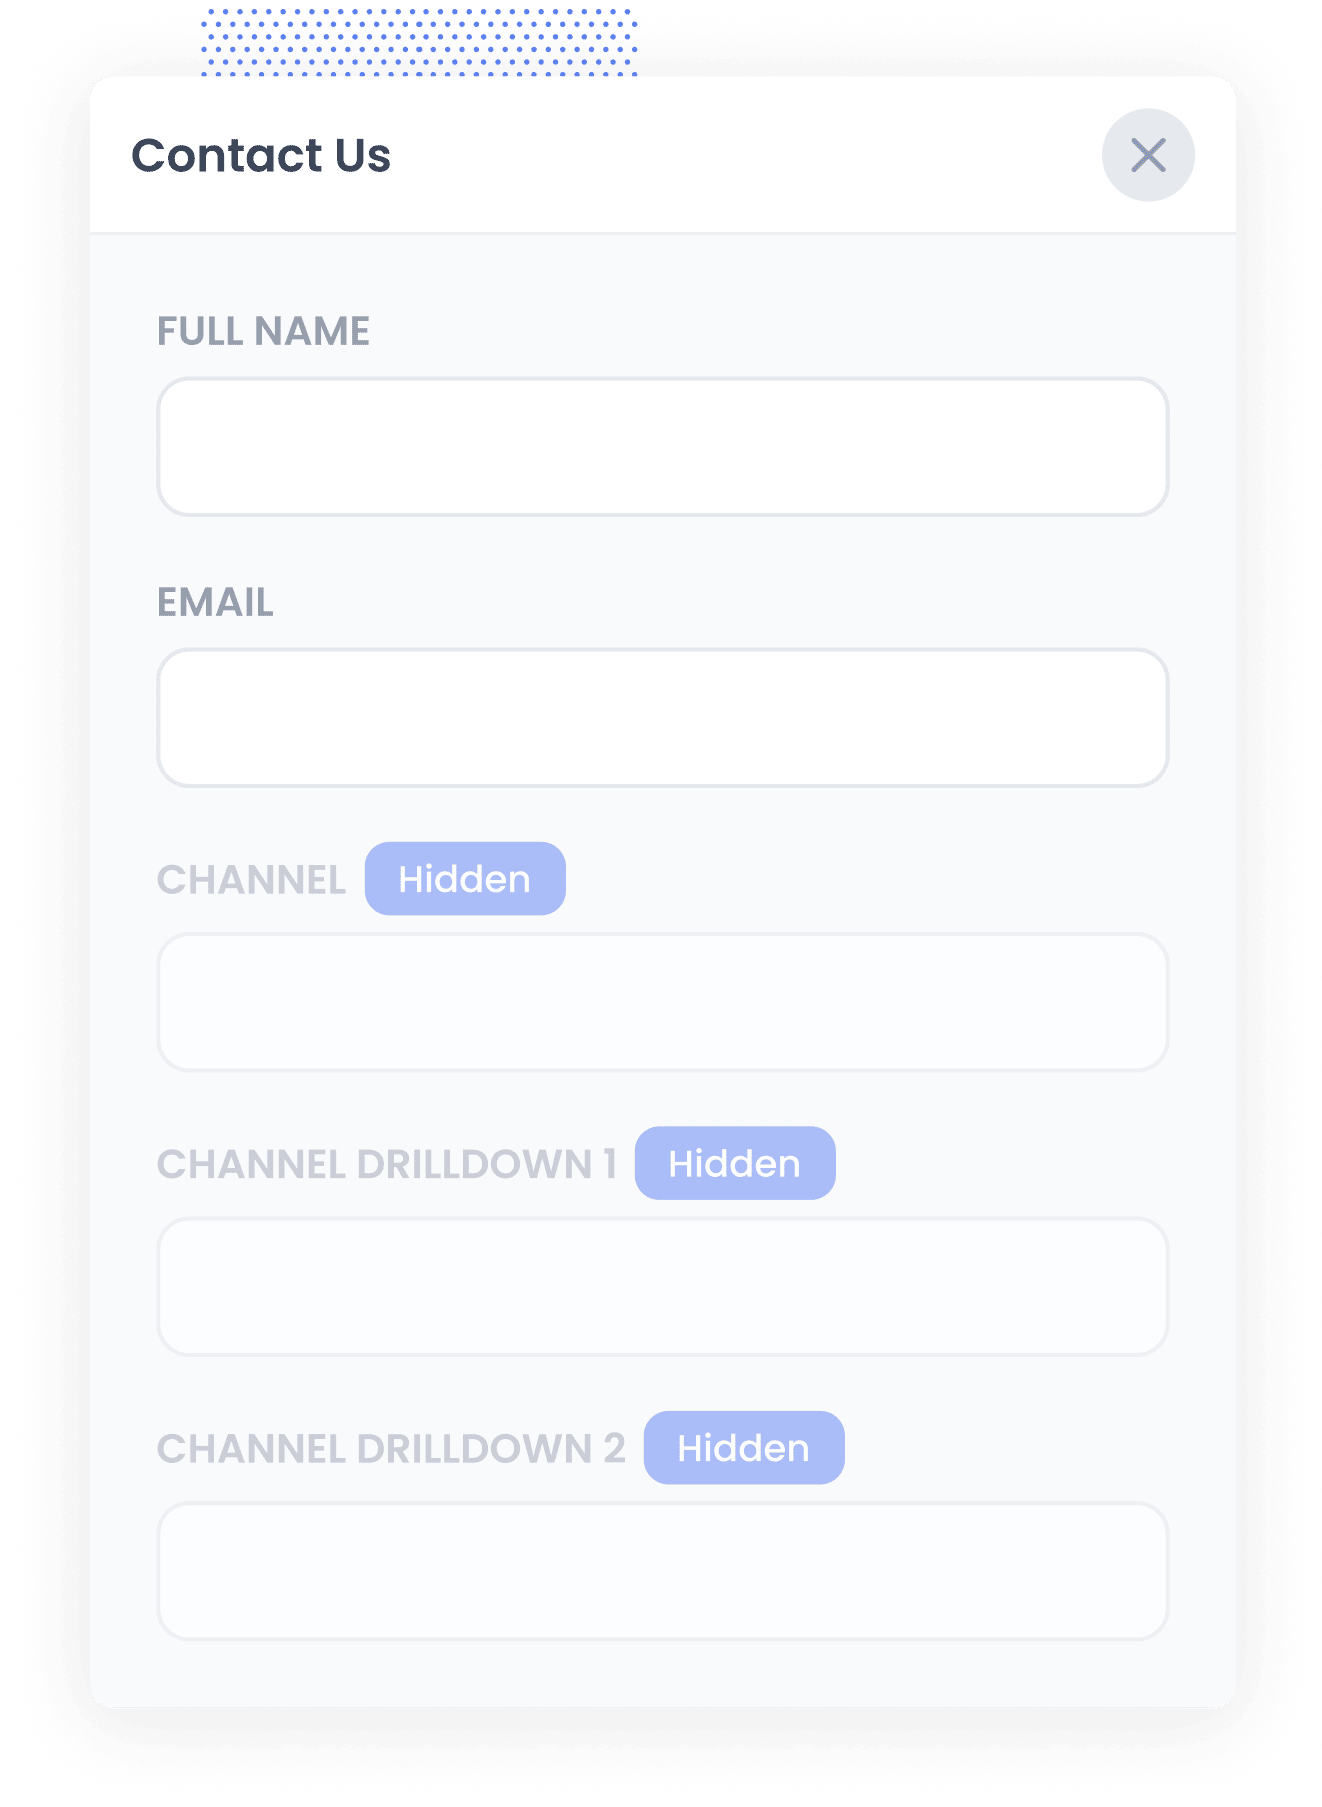
The next step is to add several hidden fields to your lead capture forms.
The hidden fields you need to include are:
- Channel
- Channel Drilldown 1
- Channel Drilldown 2
- Channel Drilldown 3
- Landing Page
- Landing Page Group
Instructions for adding these hidden fields in different form builders (including HTML forms with Netlify's form backend) can be found here.
3. Attributer writes Google Ads data into the hidden fields
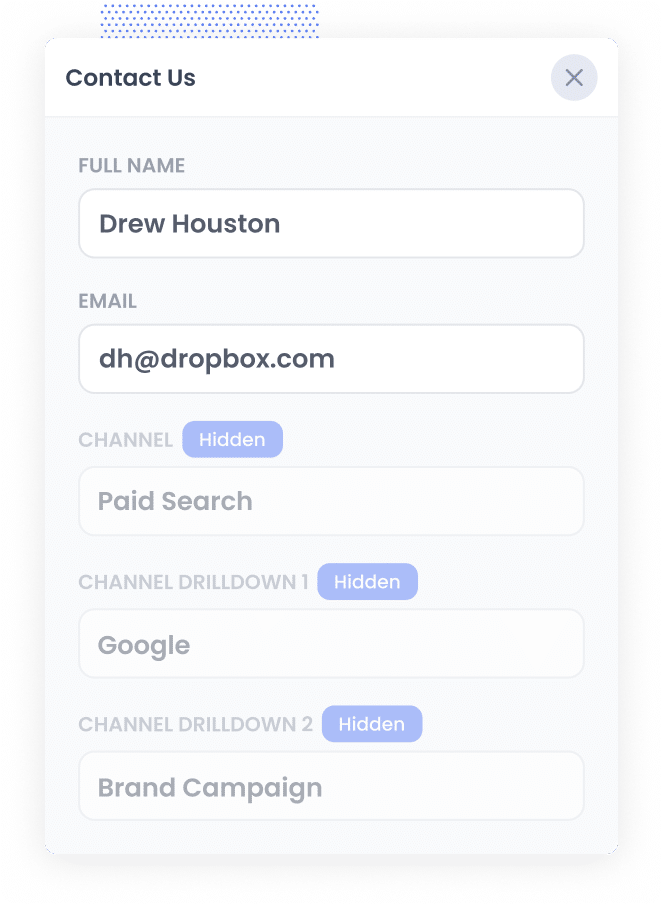
Once everything is set up, Attributer will start to track where your visitors are coming from.
Then, whenever a visitor completes a form, Attributer will automatically populate the hidden fields with the values defined in your UTM parameters.
For example, if I were a marketer at Shopify and a visitor came to my site through one of my paid search ads for an e-commerce campaign, Attributer would populate the hidden fields as follows:
- Channel = Paid search
- Channel Drilldown 1 = Google
- Channel Drilldown 2 = Ecommerce campaign
- Channel Drilldown 3 = Free trial ad
In addition to the UTM parameter values, Attributer also captures the visitor’s first landing page (e.g., shopify.com/tools/ecommerce) and the landing page group (e.g., /tools).
4. Google Ads data is captured in Netlify
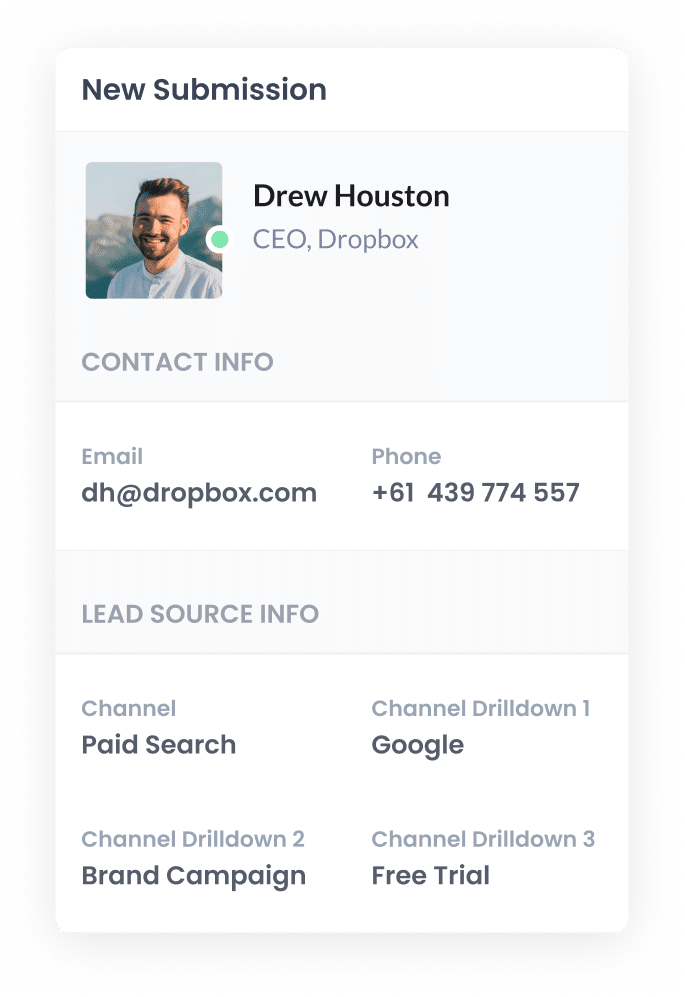
Finally, when a visitor submits the form, the Google Ads data is captured alongside the details the lead provided, such as their name, company, phone number, email, etc.
You can do several things with this data:
- See it alongside each form submissions in the Forms tab in your Netlify dashboard
- Include it in each new lead notification email, so you can instantly see where each lead came from.
- Send it to your CRM and use it to run reports that show how many leads you got from your Google Ads, how many became customers, how much revenue was generated, etc.
Why using Attributer is the best way to capture Google Ads data in Netlify
There are a couple of other ways to place UTM parameters behind your Google Ads and capture the data on Netlify, so why use Attributer?
Here’s why:
1. Captures all traffic
In addition to being a great tool for capturing Google Ads data in Netlify, Attributer can also track and pass through information on leads from other sources (such as Organic Social, Paid Social, Organic Search, etc.).
This means that when you generate reports to understand where your leads and customers are coming from, you can see the source of ALL your leads, not just those from your Google Ads campaigns.
2. Attributer remembers the data as visitors browse your site
Most UTM tracking methods only work if the form is submitted on the same page the visitor first landed on. But if they click through to another page before filling out the form, those UTM parameters are usually lost.
Attributer avoids this issue by storing the UTM data in the visitor's browser, so it sticks with the user as they move through your site.
That way, no matter where they end up submitting the form, you’ll still know exactly where they came from.
3. Provides cleaner data
A common issue with other tools that capture raw UTM parameters is that the data often becomes disorganized, making it difficult to run accurate reports.
For example, imagine some of your Google Ads campaigns are tagged with UTM_Source=Google.com (capital G), others with UTM_Source=google (lowercase, no domain), and still others with UTM_Source=adwords.
If you capture these raw UTM parameters in Netlify and try to report on the number of leads generated by your Google Ads campaigns, you'll end up with three separate sources that need to be manually consolidated.
Attributer works differently. It accounts for inconsistencies in capitalisation and other variations, automatically assigning the leads to the correct channel (Paid Search in this case) without any manual work required.
4. Attributer captures landing page data
Have you ever wondered how many leads and customers your blog and other detailed content pieces are generating?
In addition to tracking channel data, Attributer also captures the landing page URL (e.g., attributer.io/blog/capture-utm-parameters) and the landing page category (e.g., /blog).
This allows you to see how many leads & customers you are getting from certain sections of content on your site (like your blog).
And because Attributer tracks both the landing page and the landing page group, you can analyse your blog's overall performance and also drill down into individual blog posts.
3 example reports you can run when you capture Google Ads data in Netlify
Before starting Attributer, I spent over 15 years leading marketing and analytics teams at various companies.
During that time, I managed millions in Google Ads spend and built countless reports to measure how many leads and customers we were generating.
Along the way, I found a few key reports that consistently gave me the clearest picture of how our ads were performing. Here are the ones I relied on most:
1. Leads by Channel
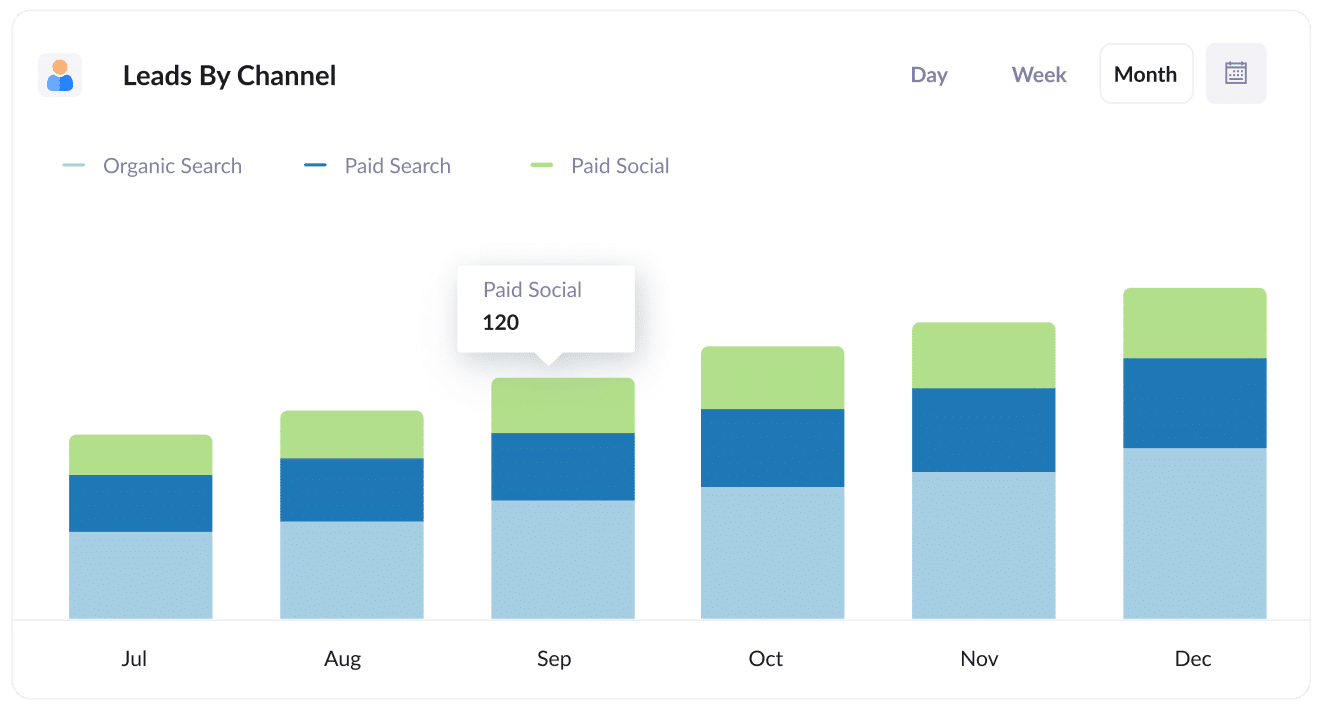
Like most businesses, your leads likely come from a mix of channels (such as Organic Search, Paid Search, Organic Social, and more).
This report shows how many leads you get each month from each channel. It gives you a clear, high-level view of what’s working and what's not and is a great way to spot opportunities.
For example, if most of your leads come from Organic Search but a large portion of your budget is going to Paid Search, it might be time to re-evaluate where you’re investing.
2. Customers by Google Ads campaign
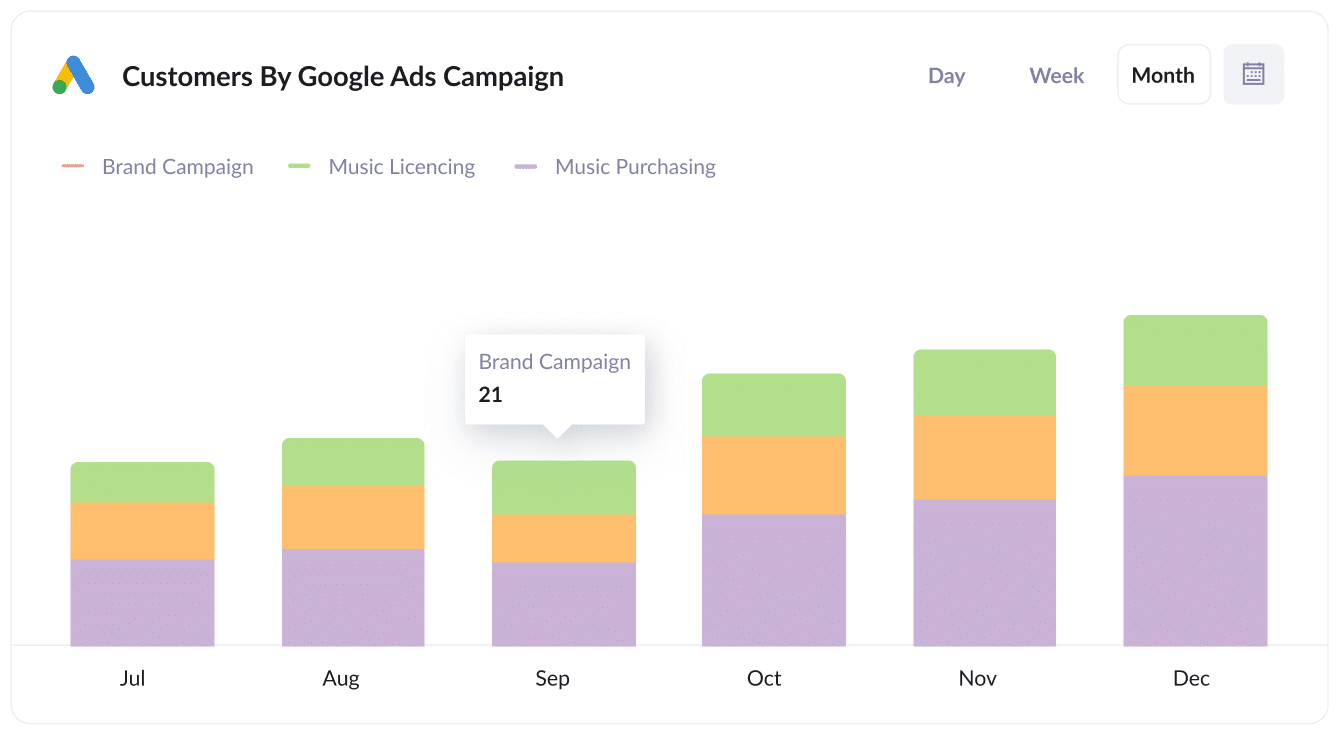
If you’re running multiple campaigns in Google Ads, you’ll want to see how each one is performing, and this chart can help.
It shows how many customers you’ve gained each month, broken down by the campaign they came from.
It helps you identify which campaigns are actually bringing in customers, not just driving clicks that don’t convert.
3. Revenue by Keyword
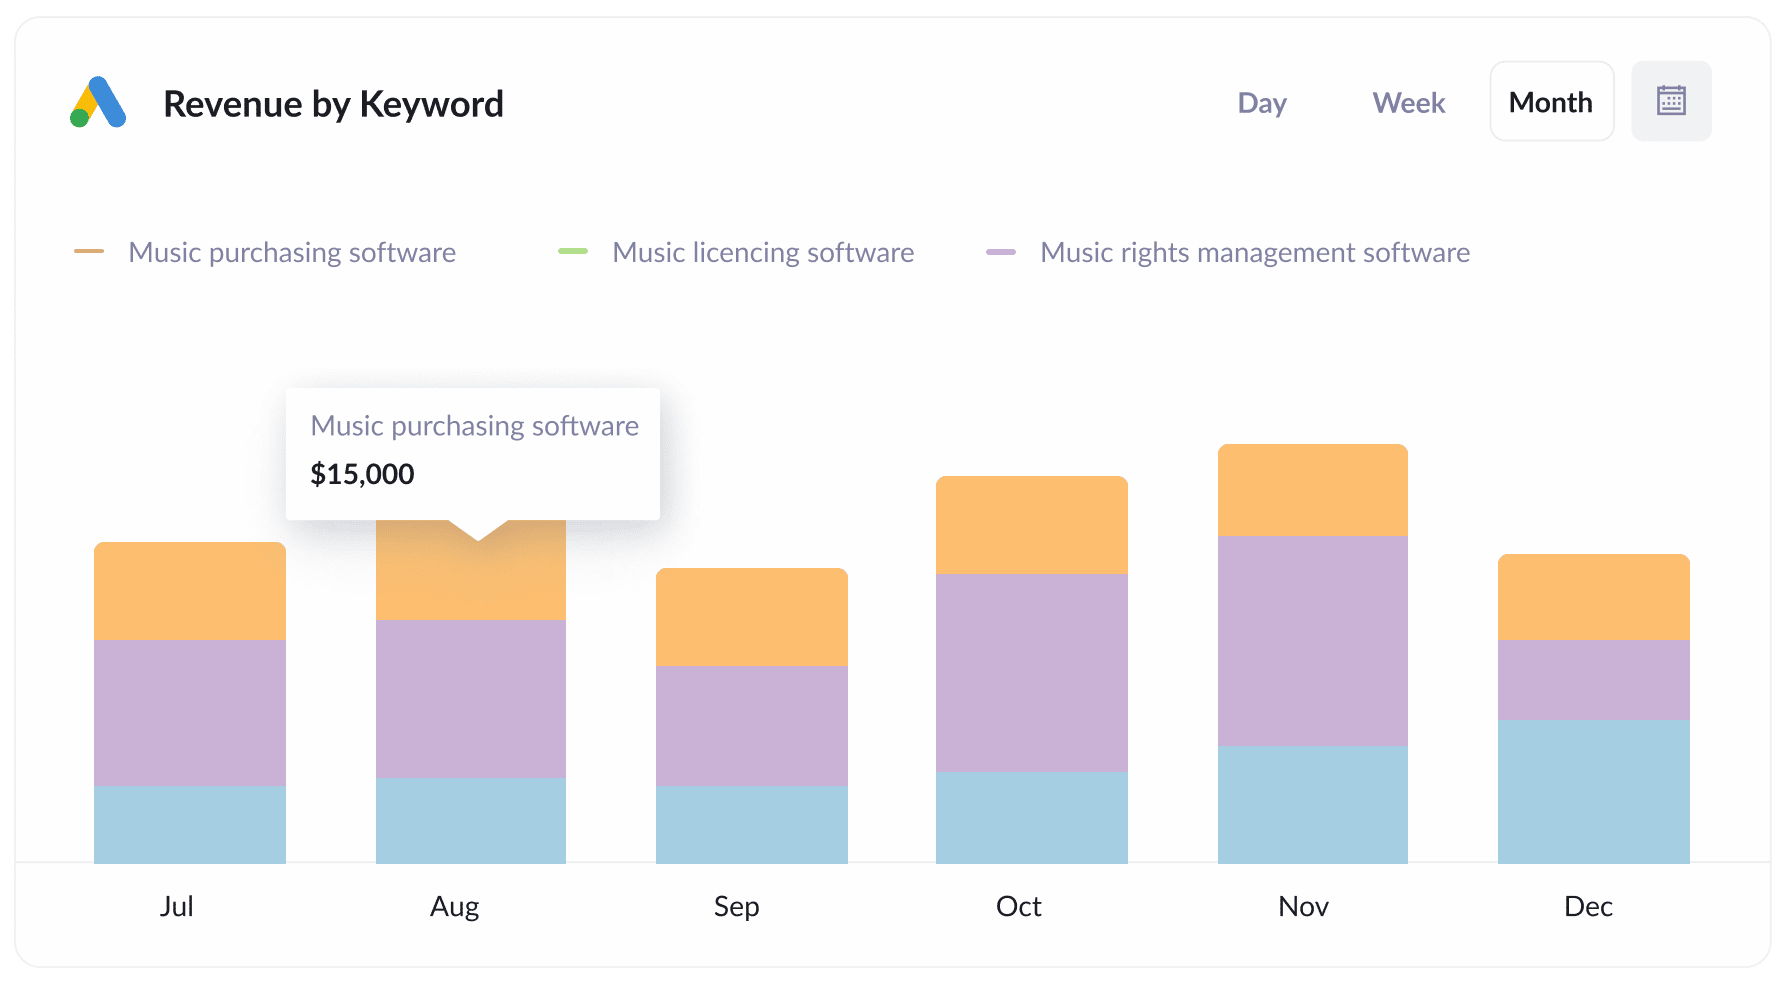
If you’re sending Google Ads data into your CRM and using your CRM to tracked closed deals), you can run a report like this one to see how much revenue you’ve generated from each keyword.
It gives you a clear view of which keywords are driving real results for your business, so you can invest more in the ones that are bringing in leads and customers.
Wrap up
If you want to track how many leads and customers come from your Google Ads, Attributer is the perfect solution.
It captures the UTM parameters behind your Google Ads campaigns, enabling you to generate reports that show exactly which campaigns, ad groups, and even keywords are driving leads and customers.
Moreover, Attributer also tracks leads from other channels, allowing you to see the source of all your leads (not just those from Google Ads).
And did we mention it’s free to get started and usually takes less than 10 minutes to set up? Start your free trial today and see all that Attributer can do for you.
Get Started For Free
Start your 14-day free trial of Attributer today!

About the Author
Aaron Beashel is the founder of Attributer and has over 15 years of experience in marketing & analytics. He is a recognized expert in the subject and has written articles for leading websites such as Hubspot, Zapier, Search Engine Journal, Buffer, Unbounce & more. Learn more about Aaron here.